Page 3 - CONTENTS; Safety Warnings
CONTENTS 1 Safety Warnings 1.1 Warning 1.2 Electricity related warnings 1.3 Related warnings for use 1.4 Warnings related to placing items 1.5 Warnings for energy 1.6 Warnings related to disposal 2 Proper Use of Beverage Cooler 2.1 Names of components 2.2 Display control 2.3 Functions 2.4 Placement ...
Page 4 - SAFETY WARNINGS
1 1 SAFETY WARNINGS This appliance is intended to be used in household, non-retail applications. This appliance is not intended for use by persons (including children) with reduced physical, sensory or mental capabilities unless they have been given permission by a person responsible for their safet...
Page 7 - PROPER USE OF BEVERAGE COOLER; Names of Components; cooler may be affected.
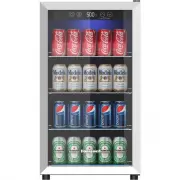
4 2 PROPER USE OF BEVERAGE COOLER 2.1 Names of Components 2.2 Display Control Standby button Lighting key Temperature-drop key Display area Temperature-rise key When powering on the cooler for the first time, the display screen will display in full for 3 seconds and the start-up tone will ring, and ...
Page 8 - Standby Function; screen will then display the set temperature.; Lighting Mode; under the existing mode.
5 Standby Function To exit standby state, press the standby button until the buzzer rings. The display screen will then display the set temperature. To enter the standby state, press the standby button until the buzzer rings. The display screen will turn off. Lighting Mode Press the lighting key unt...
Page 9 - Error Code
6 Storing too many cans or bottles in the cooler may cause the temperature in the cooler to rise temporarily. Temperature Setting Press the temperature-rise key and the temperature will increase 1 ° C (or ° F). After locking, the cooler will run according to the setting value. Press the temperature-...
Page 10 - both sides and backside to facilitate heat dissipation.; Usage of Temperature Zones Inside the Beverage Cooler
7 2.4 Placement 2.5 Start to Use • Before using the cooler, remove all packaging materials including bottom cushions, foam pads and tape inside, tear off the protective film on the door and the appliance body. • The cooler should be placed in a well-ventilated indoor place on ground that is flat and...
Page 11 - screws and door stopper, and fix them to the left side.; Reversing the Door Swing; upper hinge and axle sleeve.
8 03 Remove the door axle sleeve at the lower part of the glass door, door stopper back screws and door stopper, and fix them to the left side. 2.9 Reversing the Door Swing 01 Change the installation location of the upper hinge of the beverage cabinet, then the opening direction of the door can be c...
Page 12 - foot and positioning bolts.
9 04 Remove the adjustable foot, positioning bolts and lower hinge, then exchange the parts of right and left sides and later use the reverse method to install the adjustable foot and positioning bolts. 05 Put the glass door on the lower hinge, install the door axle sleeve back and then install the ...
Page 13 - MAINTENANCE OF BEVERAGE COOLER
10 3.1 Disconnect the cooler 3.2 Stop using the cooler 3.3 Cleaning 3 MAINTENANCE OF BEVERAGE COOLER Unplug the power plug to disconnect the cooler. • If the cooler is left unused for a long time please: • Unplug the cooler. • Clean the cooler. • Keep the cooler door open. Do not use detergent and s...
Page 14 - TROUBLESHOOTING
11 4 TROUBLESHOOTING Inoperation Long-term operation of compressor Light is out Loud noises Cooler enclosure heat condensation Airflow sound (Buzz / Clatter) Ensure the cooler is plugged in and connected to powerCheck that the voltage is not lowCheck whether there is a power failure or partial circu...