Page 2 - WARNING—READ AND SAVE THE AIR COOLER GUIDE AND USER MANUAL
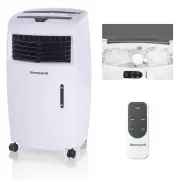
1 THANK YOU SAFETY RULES Congratulations on your purchase of this Honeywell Evaporative Air Cooler. The Safety & Maintenance Guide and the separate User Manual are intended to provide you with important information needed to set up, operate, maintain and troubleshoot this product. EN The Air Coo...
Page 3 - state speed control device.
2 SAFETY RULES (CONTINUED) EN Never pull the cord. Remove it from the electrical outlet/ socket by grasping and pulling on theplug-end of the cord.This appliance has been manufactured for use in domestic environments and must not be used for other purposes.DO NOT use in areas where gasoline, paint o...
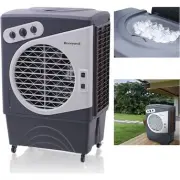
Page 4 - USER TIPS; What is Evaporative Cooling?; Honeycomb Cooling Media; NOTE
3 USER TIPS EN Honeywell Evaporative Air Coolers are built to maximize energy efficiency and keep energy costs low. Warm air is drawn into the cooler and enters the Honeycomb Cooling Media. Water pumped from the water tank pours over the Honeycomb Cooling Media. As the warm air passes through the Ho...
Page 5 - COOLER LOCATION; Indoors; recommended to be placed outdoors during heavy rain or snow.
4 COOLER LOCATION EN Indoors Place the cooler in front of an open door or window. Ensure that there is adequate cross-ventilation in the room by leaving a door or window open opposite the cooler. The Evaporative Air Cooler should not be used in enclosed spaces. It must be kept level and there must b...
Page 6 - STORAGE AND MAINTENANCE GUIDELINES; Cleaning; If the Air Cooler will not be used for a long time:
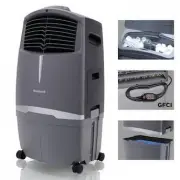
5 STORAGE AND MAINTENANCE GUIDELINES EN Read the detailed CLEANING & DRAINING THE WATER TANK instructions for your Air Cooler, located in the separate User Manual. Below is a general guideline for maintenance and storage of your Air Cooler. WARNING: Always switch OFF the Air Cooler and unplug it...
Page 7 - TROUBLESHOOTING GUIDE; PROBLEM
6 TROUBLESHOOTING GUIDE EN Customer Service Center Contact: See last page of User Manual. PROBLEM POSSIBLE CAUSE SOLUTION No discharge of air. Cord is not plugged in. Make sure power cord is plugged in and the switch is ON. Power is not ON. Turn the unit ON by pressing the power button on thecontrol...
Page 8 - Damaged remote control.
7 TROUBLESHOOTING GUIDE (CONTINUED) EN PROBLEM POSSIBLE CAUSE SOLUTION Remote control does not work. Remote control batteries are old & used or inserted incorrectly in the battery compartment. Replace with new batteries. Follow the polarity guide inside the battery compartment. Damaged remote co...
Page 9 - Correct Disposal of this product.
EN The batteries contain materials, which are hazardous to the environment; they must be removed from the appliance before it is scraped and that they are disposed of safely. Correct Disposal of this product. This marking indicates that this product should not be disposed with other h o u s e h o l ...
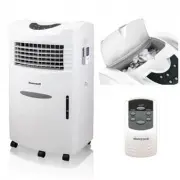
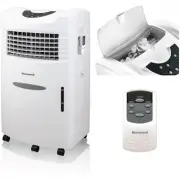
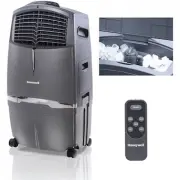
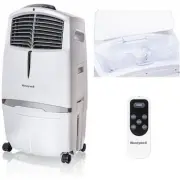
Page 10 - PARTS DESCRIPTION; ) Horizontal Louvers
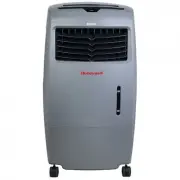
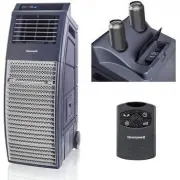
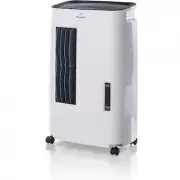
1 PARTS DESCRIPTION EN 1) Remote Control 7) Water Fill Door 2) Control Panel 8) Casters 3) Horizontal Louvers 9) Drain Plug 4) Water Level Indicator 10) Water Tank 5) Ice Compartment Lid 11) Handle 6) Vertical Louvers 12) Power Cord & Plug WARNING -- READ AND SAVE THE AIR COOLER SAFETY & MAI...
Page 11 - POWER; MODE
2 POWER Tank Empty MODE Fan Cool TIMER 0.5hr 1hr 2hr 4hr SPEED Sleep Lo Med Hi SWING POWER Press the POWER button to turn the unit on. The cooler will start automatically at medium speed. After a few seconds the speed will switch to low. To turn the unit off, press the button again. SPEED Press the ...
Page 12 - ROOM COOLING AND HUMIDIFYING; Water Regulator
3 EN ROOM COOLING AND HUMIDIFYING In cooling mode, Honey well Air Coolers provide moisturized air through the evaporation of water. There is a manual Water Regulator knob located in the ice compartment of the unit. This allows you to adjust the amount of water pumped over the Honeycomb Cooling Media...
Page 13 - REMOTE CONTROL
4 EN NOTE: •• • •••••• • The remote control requires AAA (2 x 1.5V) batteries for replacement. Open the battery compartment at the back of the remote control and insert the batteries inside. Care must be taken to insert the batteries according to the correct polarity (+ / –) markings shown inside th...
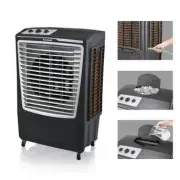
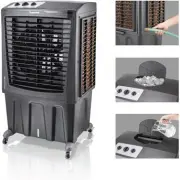
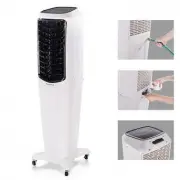
Page 16 - CLEANING THE CARBON DUST FILTER AND HONEYCOMB COOLING MEDIA; Removing the Carbon Dust Filter/ Honeycomb Cooling Media:
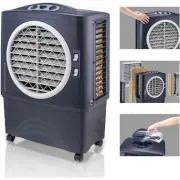
7 USE & OPERATION (CONTINUED) EN CLEANING THE CARBON DUST FILTER AND HONEYCOMB COOLING MEDIA The appliance is supplied with a Carbon Dust Filter & Honeycomb Cooling Media.The Carbon Dust Filter and Honeycomb Cooling Media are located inside the Rear Grill (See Figure 1) and see below for ins...
Page 17 - REFROIDISSEUR D’AIR
1 MERCI RÈGLES DE SÉCURITÉ Nous vous félicitons d’avoir acheté ce refroidisseur d’air par évaporation de Honeywell. Le Guide de sécurité et d’entretien et le Manuel de l’utilisateur ont tous deux pour but de vous communiquer des renseignements importants pour l’installation, l’utilisation, l’entreti...
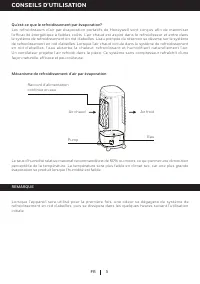
Page 19 - CONSEILS D’UTILISATION; Qu’est-ce que le refroidissement par évaporation?; Air chaud
3 CONSEILS D’UTILISATION FR Les refroidisseurs d’air par évaporation portatifs de Honey well sont conçus afin de maximiser l’efficacité énergétique à faibles coûts. L’air chaud est aspiré dans le refroidisseur et entre dans le système de refroidissement en nid d’abeilles. L’eau pompée du réservoir s...
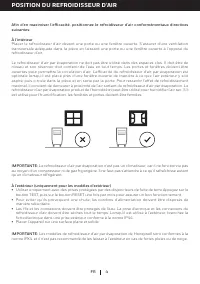
Page 20 - POSITION DU REFROIDISSEUR D’AIR; À l’intérieur
4 POSITION DU REFROIDISSEUR D’AIR FR À l’intérieur Placer le refroidisseur d’air devant une porte ou une fenêtre ouverte. S’assurer d’une ventilation transversale adéquate dans la pièce en laissant une porte ou une fenêtre ouverte à l’opposé du refroidisseur d’air. Le refroidisseur d’air par évapora...
Page 21 - DIRECTIVES DE RANGEMENT ET D’ENTRETIEN; électrique avant d’en faire le nettoyage ou l’entretien.
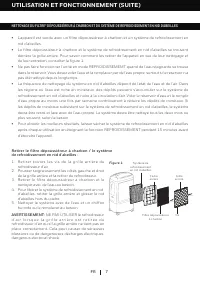
5 DIRECTIVES DE RANGEMENT ET D’ENTRETIEN FR Lire les consignes détaillées dans la section de votre Manuel de l’utilisateur intitulée NETTOYAGE ETVIDANGE DU RÉSERVOIR D’EAU de votre refroidisseur d’air. Des directives générales d’entretien et de rangement de votre refroidisseur d’air se trouvent ci-d...
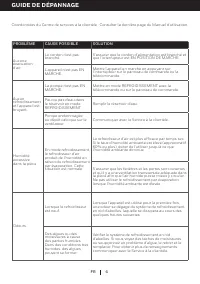
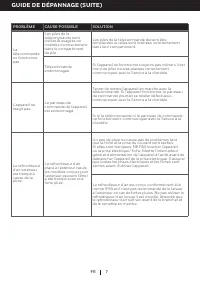
Page 22 - GUIDE DE DÉPANNAGE; PROBLÈME
6 GUIDE DE DÉPANNAGE FR Coordonnées du Centre de services à la clientèle : Consulter la dernière page du Manuel d’utilisation. PROBLÈME CAUSE POSSIBLE SOLUTION Aucune évacuation d’air. Le cordon n’est pas branché. S’assurer que le cordon d’alimentation est branché et que l’interrupteur est EN POSITI...
Page 24 - Élimination correcte de ce produit.
FR Les batteries contiennent des matériaux dangereux pour l'environnement. ils doivent être retirés de l'appareil avant d'être grattés et éliminés en toute sécurité. Élimination correcte de ce produit. C e m a r qu a g e i n d i qu e qu e c e p r o d u i t n e d o i t p a s ê t r e é l i m i n é a v...
Page 25 - DESCRIPTION DES PIÈCES; PAS SUIVRE CES CONSIGNES POURRAIT ENDOMMAGER ET/OU PERTURBER SON
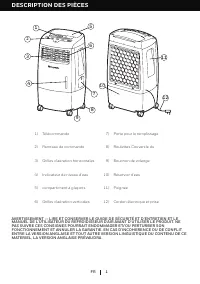
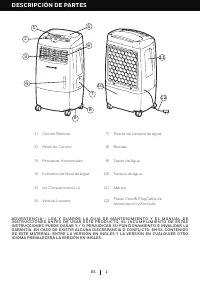
1 DESCRIPTION DES PIÈCES FR 1) Télécommande 7) Porte pour le remplissage 2) Panneau de commande 8) Roulettes Couvercle du 3) Grilles d’aération horizontales 9) Bouchon de vidange 4) Indicateur de niveau d’eau 10) Réservoir d’eau 5) compartiment à glaçons 11) Poignée 6) Grilles d’aération verticales ...
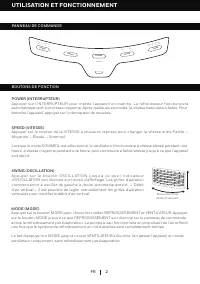
Page 26 - BOUTONS DE FONCTION; UTILISATION ET FONCTIONNEMENT; PANNEAU DE COMMANDE
2 POWER Tank Empty MODE Fan Cool TIMER 0.5hr 1hr 2hr 4hr SPEED Sleep Lo Med Hi SWING POWER (INTERRUPTEUR) Appuyer sur l’INTERRUPTEUR pour mettre l’appareil en marche. Le refroidisseur fonctionnera automatiquement à la vitesse moyenne. Après quelques secondes, la vitesse basculera à faible. Pourétein...
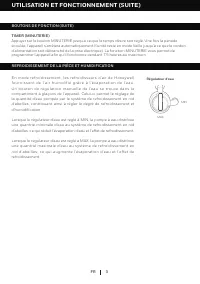
Page 27 - REFROIDISSEMENT DE LA PIÈCE ET HUMIDIFICATION; Régulateur d’eau
3 FR REFROIDISSEMENT DE LA PIÈCE ET HUMIDIFICATION En mode refroidissement , les refroidisseurs d’air de Honey well f o u r n i ss e n t d e l ’ a i r h u m i d i f i é g r â c e à l ’é v a p o r a t i o n d e l ’e a u . U n b o u t o n d e r é gu l a t i o n m a n u e l l e d e l ’e a u s e t r o u...
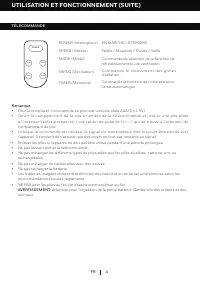
Page 28 - TÉLÉCOMMANDE
4 FR Remarque: •• • ••• ••• • Pour la remplacer, il convient de se procurer une pile plate AAA (2 x 1.5V).Ouvrir le compar timent de la pile à l’arrière de la télécommande et insérer une pile plate à l’intérieur.Veiller à respecter l’indication de pol arité (+/— ) qui se trouve à l’intérieur du comp...
Page 31 - NE PAS UTILISER le refroidisseur
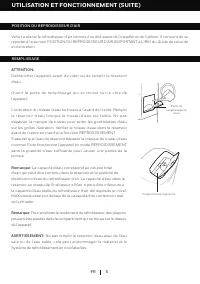
7 UTILISATION ET FONCTIONNEMENT (SUITE) FR NETTOYAGE DU FILTRE* DÉPOUSSIÉREUR À CHARBON ET DU SYSTÈME DE REFROIDISSEMENT EN NID D’ABEILLES L’appareil est vendu avec un filtre dépoussiéreur à charbon et un système de refroidissement en nid d’abeilles.Le filtre dépoussiéreur à charbon et le système de...
Page 32 - ADVERTENCIA—LEA Y GUARDE LA GUIA Y EL MANUAL DEL USUARIO
1 GRACIAS NORMAS DE SEGURIDAD Felicitaciones por la compra de este versátil Enfriador de Aire por Evaporación Honeywell. La Guía de Mantenimiento y Seguridad, y el Manual del Usuario independiente tienen como objetivo brindarle la información necesaria para establecer, operar, mantener y solucionar ...
Page 34 - ¿Qué es la Enfriamiento por Evaporación?; Aire Cálido; ATENCIÓN
3 CONSEILS D’UTILISATION ES Los Enfriadores de Aire por Evaporación Honeywell maximizan la eficiencia energética y mantiene bajos los costos de energía. El aire caliente ingresa es aspirado por el enfriador y luego ingresa al medio de refrigeración de Honeycomb. El agua bombeada desde el tanque de a...
Page 35 - UBICACIÓN DEL ENFRIADOR; Interiores
4 UBICACIÓN DEL ENFRIADOR ES Interiores Ubicar el enfriador en frente de una puerta o ventana abierta. Asegure la ventilación adecuada en elcuarto dejando una puerta o ventana abierta opuesta al enfriador. El Enfriador de Aire por Evaporación no debe utilizarse en espacios cerrados. Debe mantenerse ...
Page 36 - INSTRUCCIONES PARA EL GUARDADO Y MANTENIMIENTO; apague y desenchúfelo de la fuente eléctrica.
5 INSTRUCCIONES PARA EL GUARDADO Y MANTENIMIENTO ES Lea las instrucciones detalladas LIMPIEZA Y VACIADO DEL TANQUE DE AGUA para su Enfriador de Aire, ubicadas en el Manual del Usuario separado. Debajo encontrará una guía general para el mantenimiento y guardado de su Enfriador de Aire. ADVERTENCIA: ...
Page 37 - GUÍA PARA LA RESOLUCIÓN DE PROBLEMAS; PROBLEMA
6 GUÍA PARA LA RESOLUCIÓN DE PROBLEMAS ES Servicio de atención a clientes: consulte la última página del manual. PROBLEMA POSIBLE CAUSA SOLUCION Sin caudal de aire. Cable desenchufado. Asegúrese de que el cable esté enchufado y la unidad encendida. Unidad apagada. Encienda la unidad presionando el b...
Page 38 - GUÍA PARA LA RESOLUCIÓN DE PROBLEMAS (CONTINUA)
7 GUÍA PARA LA RESOLUCIÓN DE PROBLEMAS (CONTINUA) ES PROBLEMA POSIBLE CAUSA SOLUCION Control remoto no trabaja. Las baterías están viejas o no se han colocado correctamente las baterías en su compartimiento. Reemplazar con baterías nuevas. Seguir la polaridad adentro del compartimiento. Control remo...
Page 39 - Correcta eliminación de este producto.
ES Las baterías contienen materiales que son peligrosos para el medioambiente; deben sacarse del aparato antes de rasparlo y de que se eliminen de forma segura. Correcta eliminación de este producto. Esta marca indica que este producto no debe eliminarse junto con otros desechos domésticos en toda l...
Page 40 - DESCRIPCIÓN DE PARTES; ) Puerta de Llenado de Agua; A D V E R T E N C I A - - L E A Y G U A R D E L A G U I A D E M A N T E N I M I E N T O Y E L M A N U A L D E
1 DESCRIPCIÓN DE PARTES ES 1) Control Remoto 7) Puerta de Llenado de Agua 2) Panel de Control 8) Ruedas 3) Persianas Horizontales 9) Tapón de Agua 4) Indicador de Nivel de Agua 10) Tanque de Agua 5) Ice Compartment Lid 11) Manija 6) Vertical Louvers 12) Power Cord & PlugCable de Alimentación y E...
Page 41 - BOTONES DE FUNCIONES; PANEL DE CONTROL; USO Y FUNCIONAMIENTO
2 POWER Tank Empty MODE Fan Cool TIMER 0.5hr 1hr 2hr 4hr SPEED Sleep Lo Med Hi SWING POWER (ENCENDIDO / APAGADO) Presione el botón POWER para encender la unidad. El enfriador comenzará automáticamente a funcionar a velocidad media. Después de unos segundos la velocidad cambiará a baja. Para apagar l...
Page 42 - ENFRIAMIENTO DE AMBIENTE Y HUMIDIFICACIÓN; Regulador de Agua
3 ES ENFRIAMIENTO DE AMBIENTE Y HUMIDIFICACIÓN En modo FRÍO, los enfriadores Honeywell entregan aire hidratado a través de l a evaporación de agua. Hay un control manual de regulación de agua ubicado en el compar timento de hielo de la unidad. Esto le permite ajustar la cantidad de agua bombeada en ...
Page 43 - Controla el movimiento de los deflectores; CONTROL REMOTO
4 ES NOTA: •• • •••••• • El control remoto requiere 2 pilas AAA (2 x 1.5V) para su reemplazo.Abra el compartimento para pilas en la parte de atrás del control remoto e inserte las pilas. Asegúrese de colocar la pila de acuerdo a la polaridad correcta (+ / -) indicada dentro del compartimento para pi...
Page 46 - N O o p e r e e l e n f r i a d o r d e a i r e
7 USO Y FUNCIONAMIENTO (CONTINUACIÓN) ES LIMPIEZA DEL FILTRO DE CARBÓN Y FILTRO DE ENFRIAMIENTO HONEYCOMB El aparato se suministra con un filtro de polvo de carbón y un filtro de enfriamiento Honeycomb.El filtro de carbón y filtro de enfriamiento Honeycomb se encuentran dentro de la rejilla posterio...


 Honeywell CL201AEW
User Manual
Honeywell CL201AEW
User Manual
 Honeywell CL201AEWW
User Manual
Honeywell CL201AEWW
User Manual
 Honeywell CL30XC
User Manual
Honeywell CL30XC
User Manual
 Honeywell CL30XCWW
User Manual
Honeywell CL30XCWW
User Manual
 Honeywell CO25AE
User Manual
Honeywell CO25AE
User Manual
 Honeywell CO301PC
User Manual
Honeywell CO301PC
User Manual
 Honeywell CO30XE
User Manual
Honeywell CO30XE
User Manual
 Honeywell CO48PM
User Manual
Honeywell CO48PM
User Manual
 Honeywell CO60PM
User Manual
Honeywell CO60PM
User Manual
 Honeywell CO610PMG
User Manual
Honeywell CO610PMG
User Manual
 Honeywell CO810PM
User Manual
Honeywell CO810PM
User Manual
 Honeywell CS071AE
User Manual
Honeywell CS071AE
User Manual
 Honeywell CS10XE
User Manual
Honeywell CS10XE
User Manual
 Honeywell TC09PEU
User Manual
Honeywell TC09PEU
User Manual
 Honeywell TC10PEU
User Manual
Honeywell TC10PEU
User Manual
 Honeywell TC30PEU
User Manual
Honeywell TC30PEU
User Manual
 Honeywell TC50PEU
User Manual
Honeywell TC50PEU
User Manual