Page 2 - See this fold-out section for all the figures; Voir que cette section d’encart pour toutes les
ii See this fold-out section for all the figures referenced in the operator’s manual. Voir que cette section d’encart pour toutes les figures a adressé dans le manuel d’utilisation. Vea esta sección de la página desplegable para todas las figuras mencionó en el manual del operador. Fig. 1 C K A - Ba...
Page 4 - TABLE OF CONTENTS; TABLE DES MATIÈRES / ÍNDICE DE CONTENIDO; INTRODUCTION; INTRODUCTION / INTRODUCCIÓN
Page / Página 2 Introduction ...................................................................................................................................................................... 2 Introduction / Introducción General Safety Rules ..................................................
Page 5 - GENERAL SAFETY RULES; READ THESE INSTRUCTIONS
Page 3 — English GENERAL SAFETY RULES WARNING: READ AND UNDERSTAND ALL INSTRUCTIONS. Fail- ure to follow all instructions listed below, may result in electric shock, fire and/or serious personal injury. READ THESE INSTRUCTIONS Read the operator’s manual carefully. Be thoroughly famil-iar with the ...
Page 6 - SPECIFIC SAFETY RULES
Page 4 — English SPECIFIC SAFETY RULES Do not use the maximum dethatching depth setting until tines have worn down. Start in the highest setting and adjust as tines become worn. Stay alert. Watch what you are doing. Use common sense. Do not operate dethatcher when you are tired, ill, or upset....
Page 7 - SYMBOLS
Page 5 — English SYMBOLS Some of the following symbols may be used on this tool. Please study them and learn their meaning. Proper interpretation of these symbols will allow you to operate the tool better and safer. SYMBOL NAME DESIGNATION/EXPLANATION Safety Alert Indicates a potential personal inju...
Page 9 - DOUBLE INSULATION; ELECTRICAL CONNECTION; GFCI; FEATURES; ELECTRICAL
Page 7 — English When working outdoors with a product, use an extension cord that is designed for outside use. This type of cord is designated with “WA” on the cord’s jacket.Before using any extension cord, inspect it for loose or exposed wires and cut or worn insulation.It is possible to tie the ex...
Page 10 - ASSEMBLY
Page 8 — English FEATURES FEATURES PRODUCT SPECIFICATIONS Input ......................................................................................................................................120 V, AC only, 60 Hz, 10 AmpsNo-load Speed .............................................................
Page 11 - INSTALLING THE LOWER HANDLE; OPERATION
Page 9 — English FEATURES ASSEMBLY INSTALLING THE LOWER HANDLE See Figures 3 - 4. Slide the cord retainer over the lower handle and position in the center top portion of the handle. Insert the lower handle ends into the holes in the detatcher housing with the handle angled back. Insert the rub...
Page 12 - APPLICATIONS; STARTING/STOPPING THE DETHATCHER
Page 10 — English OPERATION APPLICATIONS You may use this product for the purpose listed below: Dethatching your lawn ADJUSTING DETHATCHER DEPTH See Figures 7 - 8. Dethacher depth is adjusted using the height adjustment knobs located on the wheels. Allow motor to come to a complete stop, then di...
Page 13 - GENERAL MAINTENANCE
Page 11 — English SLOPE OPERATION Slopes are a major factor related to slip and fall accidents that can result in severe injury. Operation on slopes requires extra caution. If you feel uneasy on a slope, do not dethatch it. For your safety, do not attempt to dethatch slopes greater than 15 degrees...
Page 14 - MAINTENANCE; REPLACING THE TINES
Page 12 — English MAINTENANCE REPLACING THE TINES See Figures 11 - 13. With normal use, tines can wear or break over time. When adjusting the tine depth no longer gives you the correct amount of dethatching, or if a tine breaks, follow the steps below to replace. Disconnect the dethatcher from the...
Page 15 - TROUBLESHOOTING; PROBLEM
Page 13 — English TROUBLESHOOTING PROBLEM POSSIBLE CAUSE SOLUTION Handle not in correct position. Lower handle not seated fully in hous-ing.Handle knobs not tightened. Seat lower handle fully in dethatcher housing.Tighten handle knobs. Dethatcher not starting. Extension cord not connected to the det...
Page 16 - WARRANTY; LIMITED WARRANTY STATEMENT
Page 14 — English WARRANTY LIMITED WARRANTY STATEMENT Homelite Consumer Products, Inc., (“Homelite”) warrants to the original retail purchaser that this HOMELITE brand outdoor product is free from defect in material and workmanship and agrees to repair or replace, at Homelite’s, discretion, any defe...
Page 17 - RÈGLES DE SÉCURITÉ GÉNÉRALES; CONSERVER CES INSTRUCTIONS
Page 3 — Français RÈGLES DE SÉCURITÉ GÉNÉRALES AVERTISSEMENT ! LIRE ET VEILLER À BIEN COMPRENDRE TOUTES LES INSTRUCTIONS. Le non respect de toutes les instructions ci-dessous peut entraîner un choc électrique, un incendie et / ou des blessures graves. CONSERVER CES INSTRUCTIONS Lire attentivement ...
Page 18 - RÈGLES DE SÉCURITÉ PARTICULIÈRES
Page 4 — Français RÈGLES DE SÉCURITÉ PARTICULIÈRES Ne pas utiliser le réglage de profondeur maximum de scarification tant que les dents ne sont pas usées. Commencer avec le réglage le plus élevé et l’adapter lorsque les dents commencent à s’user. Rester vigilant et concentré sur la tâche à ...
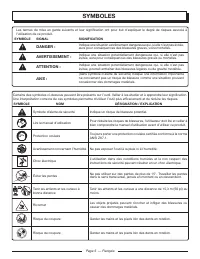
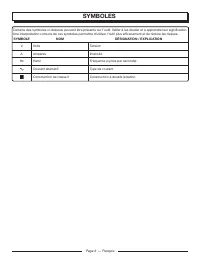
Page 19 - SYMBOLES
Page 5 — Français Certains des symboles ci-dessous peuvent être présents sur l’outil. Veiller à les étudier et à apprendre leur signification. Une interprétation correcte de ces symboles permettra d’utiliser l’outil plus efficacement et de réduire les risques. SYMBOLE NOM DÉSIGNATION / EXPLICATION S...
Page 21 - ISOLATION DOUBLE; CONNEXION ÉLECTRIQUE; FONCTIONS; CARACTÉRISTIQUES ÉLECTRIQUES
Page 7 — Français Pour les travaux à l’extérieur, utilisez un cordon prolongateur spécialement conçu à cet effet. La gaine des cordons de ce type porte l’inscription « W-A » ou « W ».Avant d’utiliser un cordon prolongateur, vérifier que ses fils ne sont ni détachés ni exposés et que son isolation n’...
Page 22 - CARACTÉRISTIQUES; ASSEMBLAGE
Page 8 — Français FONCTIONS CARACTÉRISTIQUES CARACTÉRISTIQUES DU PRODUIT Alimentation........................................................................................................................120 V, CA seulement, 60 Hz, 10 AVitesse sans charge...............................................
Page 23 - INSTALLATION DE LA POIGNÉE INFÉRIEURE; INSTALLATION DE LA POIGNÉE SUPÉRIEURE; UTILISATION
Page 9 — Français FONCTIONS ASSEMBLAGE AVERTISSEMENT : Ne mettez pas sous tension avant de compléter l’assemblage. Le non respect de cet avertissement pourrait résulter en un démarrage accidentel et des blessures corporelles graves. AVERTISSEMENT : N’utilisez jamais la scarificateur sans les disposi...
Page 24 - DÉMARRAGE/ARRÊT DE LA SCARIFICATEUR
Page 10 — Français UTILISATION APPLICATIONS Vous pouvez utiliser ce produit pour les tâches énumérées ci-dessous : Scarification de la pelouse RÉGLAGE DE PROFONDEUR DU SCARIFICATEUR Voir les figure 7 et 8. La profondeur du scarificateur se règle par l’utilisation des boutons de réglage de hauteur ...
Page 25 - ENTRETIEN GÉNÉRAL; LUBRIFICATION
Page 11 — Français Faites attention aux trous, ornières, roches, objets cachés ou bosses qui peuvent provoquer un glissement ou une chute. De l’herbe haute peut cacher des obstacles. Enlevez tous les objets tels que les roches, les racines, etc. qui peuvent être projetés ou qui pourraient provoque...
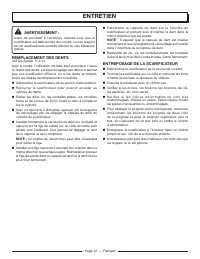
Page 26 - ENTRETIEN; REMPLACEMENT DES DENTS
Page 12 — Français ENTRETIEN AVERTISSEMENT : Avant de procéder à l’entretien, assurez-vous que la scarificateur est débranchée du courant. Le non respect de cet avertissement pourrait résulter en des blessures graves. REMPLACEMENT DES DENTS Voir les figures 11 à 13. Avec le temps, l’utilisation norm...
Page 27 - DÉPANNAGE; PROBLÈME
Page 13 — Français DÉPANNAGE PROBLÈME CAUSE POSSIBLE SOLUTION Poignée en mauvaise position. L a p o i g n é e i n f é r i e u r e n ’ e s t p a s complètement assise sur le cadre.Boutons de poignée non serrés Asseoir complètement la poignée inférieure sur le cadre.Serrez les boutons de poignée. La s...
Page 28 - GARANTIE; DÉCLARATION DE GARANTIE LIMITÉE
Page 14 — Français GARANTIE DÉCLARATION DE GARANTIE LIMITÉE Homelite Consumer Products, Inc. (« Homelite ») garantit à l’acheteur original au détail que ce produit de plein air de marque HOMELITE est exempt de tout vice de matériau ou de fabrication et s’engage à réparer ou remplacer, à discrétion, ...
Page 29 - REGLAS DE SEGURIDAD GENERALES; LEA ESTAS INSTRUCCIONES
Página 3 — Español REGLAS DE SEGURIDAD GENERALES ADVERTENCIA: LEA Y COMPRENDA TODAS LAS INSTRUCCIONES. El incumplimiento de las instrucciones señaladas abajo puede causar descargas eléctricas, incendios y lesiones serias. LEA ESTAS INSTRUCCIONES Lea cuidadosamente el manual del operador. Familiarí...
Page 30 - REGLAS DE SEGURIDAD ESPECÍFICAS
Página 4 — Español REGLAS DE SEGURIDAD ESPECÍFICAS No utilice el ajuste de profundidad máxima para quitar el musgo hasta que las púas se hayan desgastado. Comience con el ajuste más alto y ajústelo a medida que las púas se desgasten. Permanezca alerta. Ponga atención a lo que hace. Aplique el ...
Page 31 - SÍMBOLOS
Página 5 — Español Es posible que se empleen en esta herramienta algunos de los siguientes símbolos. Le suplicamos estudiarlos y aprender su significado. Una correcta interpretación de estos símbolos le permitirá utilizar mejor y de manera más segura la herramienta. SÍMBOLO NOMBRE DENOMINACIÓN/EXPLI...
Page 33 - DOBLE AISLAMIENTO; CONEXIÓN ELÉCTRICA; ASPECTOS ELÉCTRICOS
Página 7 — Español Al trabajar a la intemperie con un producto, utilice un cordón de extensión fabricado para uso en el exterior. Este tipo de cordón lleva las letras "WA" en el forro.Antes de utilizar un cordón de extensión, inspecciónelo para ver si tiene conductores flojos o expuestos y a...
Page 34 - CARACTERÍSTICAS; ARMADO
Página 8 — Español FEATURES CARACTERÍSTICAS ESPECIFICACIONES DEL PRODUCTO Corriente de entrada ........................................................................................................... 120 V, sólo corr. alt., 60 Hz, 10 AVelocidad en vacío ..............................................
Page 35 - INSTALACIÓN DEL MANGO INFERIOR; INSTALACIÓN DEL MANGO SUPERIOR; FUNCIONAMIENTO
Página 9 — Español FEATURES ARMADO ADVERTENCIA: No conecte la unidad al suministro de corriente sin haber terminado de armarla. De lo contrario la unidad puede ponerse en marcha accidentalmente, con el consiguiente riesgo de lesiones serias. ADVERTENCIA: Nunca utilice la quitamusgos sin que los disp...
Page 36 - USOS; ENCENDIDO Y APAGADO DE LA QUITAMUSGOS
Página 10 — Español FUNCIONAMIENTO USOS Este producto puede emplearse para el fin señalado abajo: Quitar el musgo su césped AJUSTE DE LA PROFUNDIDAD DEL QUITAMUSGOS Vea las figuras 7 y 8. La profundidad del quitamusgos se ajusta utilizando los mangos de ajuste de altura ubicado en las ruedas. Pe...
Page 37 - MANTENIMIENTO GENERAL
Página 11 — Español MANEJO EN PENDIENTES Las pendientes son una de las causas principales de accidentes por resbalones y caídas que pueden provocar lesiones graves. El manejo en pendientes requiere precaución extra. Si se siente inseguro en una pendiente, no la quite el musgo. Para su seguridad, n...
Page 38 - MANTENIMIENTO; REEMPLAZO DE LAS PÚAS; GUARDADO DE LA QUITAMUSGOS
Página 12 — Español MANTENIMIENTO ADVERTENCIA: Antes de efectuar cualquier tarea de mantenimiento, asegúrese de que la quitamusgos esté desconectada del suministro de corriente. La inobservancia de esta advertencia podría causar lesiones serias. REEMPLAZO DE LAS PÚAS Vea las figuras 11 a 13. Con el ...
Page 39 - CORRECCIÓN DE PROBLEMAS; PROBLEMA
Página 13 — Español CORRECCIÓN DE PROBLEMAS PROBLEMA CAUSA POSIBLE SOLUCIÓN El mango no está en posición correcta. El mango inferior no está asentado completamente en el alojamiento. L a s p e r i l l a s d e l m a n g o n o e s t á n apretadas. Asiente el mango inferior por completo en el alojamien...
Page 40 - GARANTÍA; DECLARACIÓN DE LA GARANTÍA LIMITADA
Página 14 — Español GARANTÍA DECLARACIÓN DE LA GARANTÍA LIMITADA Homelite Consumer Products, Inc. garantiza al comprador original al menudeo que este producto para uso en el exterior HOMELITE carece de defectos en materiales y mano de obra y acuerda reparar o reemplazar, a la sola discreción de Home...
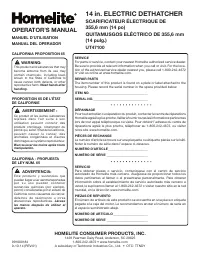
Page 42 - 4 in. ELECTRIC DETHATCHER; OPERATOR’S MANUAL; CALIFORNIA PROPOSITION 65; PROPOSITION 65 DE L’ÉTAT
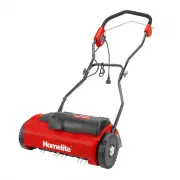
9910001849-10-14 (REV:01) 14 in. ELECTRIC DETHATCHER SCARIFICATEUR ÉLECTRIQUE DE 355,6 mm (14 po)QUITAMUSGOS ELÉCTRICO DE 355,6 mm (14 pulg.) UT47100 OPERATOR’S MANUAL MANUEL D’UTILISATIONMANUAL DEL OPERADOR HOMELITE CONSUMER PRODUCTS, INC. 1428 Pearman Dairy Road, Anderson, SC 29625 1-800-242-4672 ...