Page 2 - Table of Contents; READ AND SAVE THESE INSTRUCTIONS
Table of Contents .......................................................... Safety Information ......................................................... Warranty ......................................................................... Pre-Installation .................................................
Page 3 - Safety Information
3 HOMEDEPOT.COM/HOMEDECORATORS Please contact 1-800-986-3460 for further assistance. Safety Information 1. To reduce the risk of electric shock, ensure electricity has been turned off at the circuit breaker or fuse box before beginning. 2. Avoid placing objects in the path of the blades. 3. To avoid...
Page 4 - Warranty; SPECIFICATIONS
Warranty 4 SPECIFICATIONS SPECIFICATIONS Pre-Installation Pre-Installation 18 in. Low Medium High 120 Fan size Fan size Speed Speed Volts Volts 7.37 cu. ft. N.W. N.W. G.W. G.W. C.F. C.F. 7.73 kgs (17.01 lbs) 11.6 kgs (24.55 lbs) The manufacturer warrants the fan motor to be free from defects in work...
Page 5 - HARDWARE INCLUDED
AA BB CC DD EE Wood screw Thumb screw Rear guard screw (preassembled) Front guard screw (preassembled) Blade cover (preassembled) Part Part Description Description 7 2 4 4 1 Quantity Quantity AA BB CC DD Pre-Installation (continued) HARDWARE INCLUDED HARDWARE INCLUDED NOTE: Hardware not shown to act...
Page 7 - Installation
1 Installing the wall mounting bracket to the wall 7 HOMEDEPOT.COM/HOMEDECORATORS Please contact 1-800-986-3460 for further assistance. Installation WARNING: To reduce the risk of the fan falling, use all six mounting holes in the wall mounting bracket (B) when installing the wall mounting bracket (...
Page 8 - Assembly — Hanging the Fan
2 Hanging the fan to the wall mounting bracket 3 □ Remove the stopper (II) by pressing the clip on the stopper (II) and sliding it forward off of the tube and fan assembly. 8 Assembly — Hanging the Fan BB A B GG HH II A □ Remove the thumb screw (BB) at the base of the fan assembly (A). □ Grab the fa...
Page 9 - Attaching the plug to the wall outlet
4 Attaching the plug to the wall outlet 9 HOMEDEPOT.COM/HOMEDECORATORS Please contact 1-800-986-3460 for further assistance. Assembly — Hanging the Fan (continued) JJ KK □ Insert the power cord preassembled on fan assembly (A) into proper wall outlet (LL). WARNING: If using this fan in a DAMP locati...
Page 10 - Disassembling Your Fan
10 Disassembling Your Fan This fan comes with a pre-assembled rear guard (C), blade (D), and front guard (E) for your easy installation. Check that all screws are tight and securely in place. If you need to disassemble the fan for any reason such as cleaning, follow these steps below: □ Loosen the f...
Page 11 - Operation; SWITCH OPERATING INSTRUCTIONS; User Servicing Instructions; REPLACING THE FUSE
Operation 11 HOMEDEPOT.COM/HOMEDECORATORS Please contact 1-800-986-3460 for further assistance. SWITCH OPERATING INSTRUCTIONS SWITCH OPERATING INSTRUCTIONS It is recommended you test the fan before finalizing installation. Restore power to the circuit box. Test fan speeds with the wall control on th...
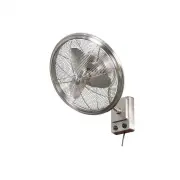
Page 13 - Service Parts
Service Parts Part Part A B C D E Description Description Motor head (preassembled) Wall mounting bracket Rear guard (preassembled) Blade (preassembled) Front guard (preassembled) Part Part AA BB CC DD EE Description Description Wood screw Thumb screw Rear guard screw (preassembled) Front guard scre...