Page 2 - SYMBOLS
WDH100401AV-S 10/10 WARNING: This product or its power cord may contain chemicals known to the State of California to cause cancer and birth defects or other reproductive harm. Wash hands after handling. Do not nail on top of another nail. This is able to cause the nail to be deflected and hit someo...
Page 3 - TOOL USE AND CARE; TOOL SERVICE
4 5 Safety Information(Continued) Safety Information(Continued) Do not overreach. Keep proper footing and balance at all times. Proper footing and balance enables better control of the tool in unexpected situations. Do not attach the hose or tool to your body. Attach the hose to the structure to red...
Page 4 - AIR SUPPLY AND CONNECTIONS; Warranty; LOADING TOOL; Unpacking
Safety Information(Continued) AIR SUPPLY AND CONNECTIONS The Connector on the tool must not hold pressure when air supply is disconnected. If an incorrect fitting is used, the tool can remain charged with air after disconnecting and thus will be able to drive a fastener even after the air line is di...
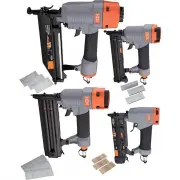
Page 5 - Specifications
8 9 Air consumption : 3.66 SCFM with 100 fasteners per minute @ 90 psiAir inlet: 1/4 inch NPTMagazine capacity: 100 headless pins, 23 gaugeWeight: 2.10 lbsMaximum pressure: 100 psiPressure range: 60 psi – 100 psi Pin size range: 1/2 inch to 1 inch Compatible with All Generic 23 Gauge Micro Pins. Spe...
Page 6 - Features; Loading fasteners
3 360 Adjustable exhaust Allows user to direct air away from face Comfort-grip handle For increased comfort and control Ergonomically engineered body ° . . Rugged and comfortable resulting in a light-weight tool great for extended use. 4 360 Adjustable exhaust Allows user to direct air away from fac...
Page 12 - Maintenance; LUBRICATION; Recommended hookup
22 23 Maintenance ANTI-DUST CAP WARNING: Any time inspection, maintenance, and cleaning are done: Disconnect the tool from the air source. Empty the magazine completely. Each tool is packed with an anti-dust cap on the air connector, check it after unpacking. Keep the anti-dust cap covering the air ...
Page 13 - Troubleshooting; Corrective action
Troubleshooting Air leaking at trigger valve area. O-rings in trigger valve housing are damaged Replace O-rings. Air leaking between housing and nose. Loose screws in housing Damaged O-rings Damaged to bumper Tighten screws Replace O-rings Replace bumper Air leaking between housing and cap. Loose sc...
Page 14 - A DE USO Y MANTENIMIENTO; Tabla de Contenido
27Sp Í A DE USO Y MANTENIMIENTO 1-800-514-6729 HOMEDEPOT.COM Tabla de Contenido Preguntas, problemas, o piezas faltantes? Antes de regresar a la tienda, llama al Servicio al Cliente de HDX de lunes a viernes entre 8 a.m. y 6 p.m., (hora del Eete de EE. UU.) GRACIAS POR TU COMPRA Apreciamos la confia...
Page 15 - S MBOLOS; Informac; USO Y CUIDADO DE LA HERRAMIENTA
Informac ó n de Seguridad Lea el manual del operador de: Para reducir el riesgo de lesiones, el usuario debe leer y entender el manual del operador antes de usar este producto. Protecci ó n de los ojos: Use siempre gafas de seguridad, gafas de seguridad con protecci ó n lateral o una careta completa...
Page 19 - mo cargar los sujetadores; Operaci
ADVERTENCIA: La herramienta puede dispararse al ser conectada por primera vez a la fuente de aire. Conecta siempre la herramienta a la fuente de aire antes de cargar los fijadores para evitar lesiones causadas por ciclos accidentales. Aseg ú rate siempre de que el cargador de la herramienta est é va...
Page 20 - mo configurar la presi; mo ajustar el escape
38Sp 39Sp Operaci ó n(Continuaci )-(Modelo#HDXST9032) ó n (G) 4 5 Desconecta la herramienta de la fuente de aire. Gire el interruptor de seguridad (G) desde la posici ó n central de seguridad hacia la izquierda oa la derecha de gatillo. Gire a la izquierda oa la derecha ADVERTENCIA: Durante el uso n...
Page 23 - mo activar la herramienta
Empujador(B) Gancho de empuje (B-1) Entrada de aire Gancho de empuje (B-1) Operaci ó n(Continuaci )-(Modelo#HDXFN64) ó n Operaci ó n(Continuaci )-(Modelo#HDXBR50) ó n 5 C ó mo activar la herramienta C ó mo configurar la presi ó n de aire La cantidad de presi ó n de aire requerida depende del tama ñ ...
Page 26 - Problema
WDH100401AV-S 10/10 50Sp 51Sp El compresor de aire debe ser capaz de mantener un m í nimo de 4,83 bar mientras la herramienta est á en uso. Un suministro inadecuado de aire puede causar una p é rdida de potencia y un clavado desigual. Se puede usar un lubricador para proporcionar circulaci ó n de ac...