Page 2 - READ AND SAVE THESE INSTRUCTIONS; Table of Contents
2 One-year Limited Warranty 7 7 8 8 Preparation Assembly Instructions Operating Instructions Care And Maintenance 9 Table of Contents 2 Package Contents 3 Safety Information 4 5 Polarized Plug Plug And Power Cord Instructions 5 Power Cord Safety Tips 5 READ AND SAVE THESE INSTRUCTIONS Table of Conte...
Page 3 - B E; Package
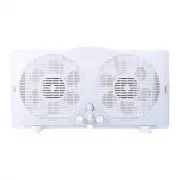
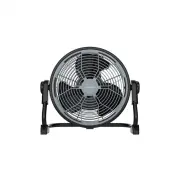
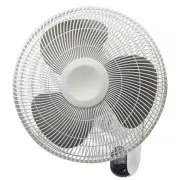
A G B E F D C HAMPTONBAY.COM Please contact 1-855-HD-HAMPTON for further assistance. Fan Body Left Fan Speed Control Right Fan Speed Control Ther mostat Control Feet Expandable Panels Right and Left Intake / Exhaust / Exchange Control Lever PART DESCRIPTION QUANTITY A B C D E F G 1 1 1 1 1 2 2 3 Pac...
Page 4 - Safety
Please read and understand this entire manual before attempting to assemble, operate or install the product. When using electrical appliances, basic precautions should always be followed to reduce the risk of fire, electric shock and injur y to persons,including the following: 1. Do not operate any ...
Page 5 - Polarized Plug; Power Cord Safety Tips; Plug And Power Cord Instructions
Polarized Plug N O T E : This appliance has a polarized plug (one blade is wider than the other). The polarized plugis not intended to be used in non-polarized outlets(having both slots the same size). To reduce therisk of electric shock, this plug is intended to fit in apolarized outlet only one wa...
Page 7 - Assembly Instructions; Preparation
Assembly Instructions Before beginning assembly of product, make sure all parts are present. Compare parts with package contents list. If any part is missing or damaged, do not attempt to assemble the product. Estimated Assembly Time: 5-10 minutesNo Tools Required for Assembly. A G Fig. 3 1. This wi...
Page 8 - Care And Maintenance; Operating Instructions
1. Make sure rotar y switches are in the OFF position. 2. Plug into 120V AC electric outlet. 3. Set the individual fan motors on either In ( intake ), Out ( exhaust ) or Exch (exchange) using the control lever. 4. Tur n the Ther mostat Control to its highest setting (full clockwise). 5. To start the...
Page 9 - One-year Limited Warranty
The manufacturer warrants to the original purchaser that each new product and ser vice part is free from defects in material and workmanship and ag rees to repair or replace under this warranty any defective product or part as follows from the original date of purchase for a period of one (1) year. ...
Page 10 - VENTILADOR PARA VENTANA; UGUÍA DE USO Y CUIDADO
VENTILADOR PARA VENTANA DE 22,86 CM (9 PULG.) Item #1002 774 783 Model #WDF9-2 UGUÍA DE USO Y CUIDADO 1-855-HD-HAMPTON HAMPTONBAY.COM ¿Problemas, preguntas o piezas faltantes? Antes de regresar a la tienda, llama al servicio al cliente de Hampton Bay de lunes a viernes entre 8 a.m. y 7 p.m. y los sá...
Page 11 - Tabla De Contenido; LEA Y GUARDE ESTAS INSTRUCCIONES
1 1 11 12 13 14 Contenido Del Paquete Información De Seguridad 14 Enchufe Polarizado 14 Consejos De Seguridad Del Cable De Alimentación Instrucciones Del EnchufeY El Cable De Alimentación Preparación 16 16 17 17 18 Instrucciones De Ensamblaje Instrucciones De Funcionamiento Cuidado Y Mantenimiento U...
Page 12 - Contenido Del Paquete
1 2 A G B E F D C Contenido Del Paquete DESCRIPCIÓN CANTIDAD PIEZA Cuerpo del ventilador Control de velocidad del ventilador izquierda Control de velocidad del ventilador derecha Control del ter mostato Palanca de control de entrada/salida/intercambioderecha e izquierda 1 1 1 1 2 2 Patas Paneles ext...
Page 13 - Información De Seguridad
HAMPTONBAY.COM 1 3 Información De Seguridad Lea y comprenda completamente este manual antes de intentar ensamblar, usar o instalar el producto. Cuando utilice electrodomésticos, siempre tome medidas de precaución básicas para reducir el riesgo de incendios, descargas el ctricas y lesiones personales...
Page 14 - Enchufe Polarizado
1 4 NOTA: Este electrodoméstico tiene un enchufepolarizado (una clavija es más ancha que la otra).El enchufe polarizado no está diseñado para su usoen tomacorrientes no polarizados (en los cualesambas ranuras tienen el mismo tamaño). Parareducir el riesgo de descarga eléctrica, este enchufeestá dise...
Page 16 - Preparación
A G Fig. 3 INSTRUCCIONES DE INSTALACIÓN 1. Este ventilador para ventana se ha diseñado para ajustarse a ventanas de doble abertura, corredizas y giratorias con aberturas mínimas de 61,97 cm (24,4 pulg.) de ancho y 33,02 cm (13 pulg.) de alto. (Fig. 1). No se requieren pies cuando se usa en la ventan...
Page 17 - Cuidado Y Mantenimiento; Instrucciones De Funcionamiento
Cuidado Y Mantenimiento PA R A L I M P I A R : Siempre desconecte el cable de alimentación del tomacorriente antes de limpiar el ventilador. La acumulación leve de polvo se puede eliminar con un paño suave. S e debe eliminar el polvo de la parte posterior de la rejilla del ventilador. Limpie ocasion...
Page 18 - Un Año De Garantía Limitada
El fabricante garantiza al comprador original que cada producto nuevo y sus respectivos repuestos no presentan defectos en los materiales y la mano de obra, y se compromete a reparar o cambiar, en virtud de esta garantía, cualquier producto o pieza dañado durante un período de un (1) año a partir de...