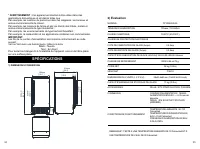
Page 2 - SPECIFICATIONS
* WARNING: This appliance must be earthed. Use the proper power source according to the nameplate. * WARNING: Keep ventilation openings, in the appliance enclosure or in the built-in structure, clear of obstruction. * WARNING: Do not damage the refrigerant circuit. * WARNING: This appliance is not i...
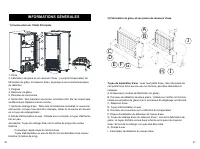
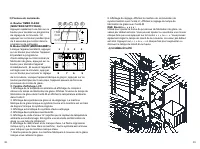
Page 3 - GENERAL INFORMATION; )Main Unit Construction
2)Rating MODEL POWER SUPPLY VOLTAGE CLIMATE CLASS ELECTRICAL PROTECTION CLASS ICE MAKING RATING (Amps) ICE HARVEST RATING (Amps) ICE MAKING CAPACITY (KG/24H) REFRIGERANT CHARGE NET WEIGHT(lbs) VESICANT UNIT DIMENSIONS(W X D X H) (inch) MAX ICE STORAGE CAPACITY(lbs) ACCESSORIES CONNECTION RUNNING CON...
Page 4 - Water dividing pipe; A B C D E; “TIMER CLEAN”button
2)Ice-making and its water tank parts A B C D E F G H I J Water dividing pipe : with nine little holes, water will flow out from these little holes. And if no water flows out, can be disassembled and cleaned.A.Evaporator (ice-making module)B.Ice full detecting board: Used to check whether the inner ...
Page 6 - OPERATING PROCEDURES & MAINTENANCE; r, without direct sunlight and other; WARNING: connect to the potable water supplying only. Only use
36 37 38 39 40 41 42 43 44 45 46 47 48 49 50 51 52 53 54 Main PCB Main PCB cover Foaming cabinet Ice scoop Ice basket Back-cover plate Back support column Top hinge Top cover Screw hole cover Fix plate Water outlet tube form pump Magnet switch Evaporator frame Water dividing pipe, eight holes Cap of...
Page 7 - INSTALLATION LOCATION REQUIREMENT
Top Hinge Fix plate Screw hole cover Top cover Unit top surface Left fix piece Right fix piece Change Move Left bottom hinge Right bottom Hinge 1. Ensure the unit is unplugged before starting door reversal. 2. Remove the 2 Screw hole cover on the top cover,unscrew 2 screws which fix the top over. 3....
Page 8 - ELECTRICAL REQUIREMENT & CONNECTIONS; Recommended grounding method
ELECTRICAL REQUIREMENT & CONNECTIONS To ensure proper ventilation for your ice maker, the front of the unit must be completely unobstructed (at least 16 inch free space). Allow about 0.2 inch clearance at rear, and 0.2 inch at top for proper air circulation. The installation should allow the ice...
Page 9 - WATER CONNECTION FOR YOUR ICE MAKER; Connecting the water drain pipe; OPERATING YOUR UNIT; Important: The water pressure of main water supply system must; Operation button and display area diagram
A B WATER CONNECTION FOR YOUR ICE MAKER Important: Be sure to use the new hose-sets supplied with the appliance to connect to water mains and that old hose-sets should not be reused.1. Connect the water supplying hose to the unitStep 1: First remove the tape on the water inlet port for water supply ...
Page 11 - WIRING DIAGRAM; Normal Sounds; CAUTION; Preparing the Ice Maker for Long Storage
WIRING DIAGRAM Normal Sounds Your new ice maker may make sounds that are not familiar to you. Most of the new sounds are normal. Hard surfaces like the floor, walls and cabinets can make the sounds seem louder than they actually are. The following describes the kinds of sounds that might be new to y...
Page 12 - WARNING; Interior Cleaning
What shouldn't be done Never keep anything in the ice storage bin that is not ice: objects like wine and beer bottles are unsanitary, and also its labels may slip off and obstruct the drain pipe. Exterior Cleaning The ice storage bin should be sanitized occasionally. Clean the bin before the ice mak...
Page 13 - For the water tank and ice-full detecting plate
WARNING Wear rubber gloves and safety goggles ( and/or face shield ) when handing Ice Machine Cleaner or sanitizer. WARNING The ice machine cleaner contains acids. DO NOT use or mix with any other solvent-based cleaner products. Use rubber gloves to protect hands. Carefully read the material safety ...
Page 14 - Problem
8.Then open the water faucet of the main water supply, Let the water flow in the unit. Again press the“TIMER CLEAN”button on control panel for more than 5 seconds, to enter the self-Cleaning program. Same as above explanation, the water pump runs for 8 minutes and stops for 3 minutes, one cycle, aga...
Page 15 - NORMAL TROUBLE SHOOTING
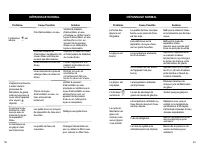
a)Ambient temp sensor breakdown Display E1 in digital window.b)The machine not make ice or the gas leak Display E2 in digital windowc)Magnetic control switch cutoff----“ Full” light will be on when plugging on orjust turning on the unit. And it will delete the breakdown display if this switchis elec...
Page 16 - SÉCURITÉ IMPORTANTE
* AVERTISSEMENT : Cet appareil doit être mis à la terre. Utilisez la source d'alimentation appropriée selon la plaque signalétique. * AVERTISSEMENT : Gardez les ouvertures de ventilation, dans l'enceinte de l'appareil ou dans la structure intégrée, dégagées de toute obstruction. * AVERTISSEMENT : Ne...
Page 17 - SPÉCIFICATIONS
2) Évaluation MODÈLE TENSION D'ALIMENTATION CLASSE CLIMATIQUE CLASSE DE PROTECTION ÉLECTRIQUE COTE DE FABRICATION DE GLACE (Amps) COTE DE RÉCOLTE DE GLACE (Amps) CAPACITÉ DE FABRICATION DE GLACE (KG/24H) CHARGE DE RÉFRIGÉRANT POIDS NET VÉSICANT DIMENSIONS DE L'UNITÉ (L X P X H) CAPACITÉ MAXIMALE DE ...
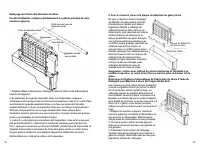
Page 18 - Tuyau d'alimentation en eau de Φ6,35 mm de diamètre et de couleur; INFORMATIONS GÉNÉRALES; ) Fabrication de glace et ses pièces de réservoir d'eau; E F G
1. Porte2. Fabrication de glace et son réservoir d'eau : y compris l'évaporateur defabrication de glace, le réservoir d'eau, la pompe à eau et certaines piècesde détection3. Poignée4. Réservoir de glace5. Panneau de commande6. Sortie d'air : Doit maintenir une bonne circulation d'air. De l'air chaud...
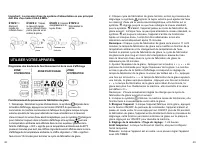
Page 19 - ) Panneau de commande
TIMERCLEAN ON/OFF + - A B C D E 3) Panneau de commande A. Bouton TIMER CLEAN (MINUTERIE NETTOYAGE) : Appuyez rapidement une fois sur ce bouton pour accéder au programme de réglage de la minuterie ; Et appuyez sur ce bouton pendant plus de 5 secondes pour entrer dans le programme de nettoyage. B. Bou...
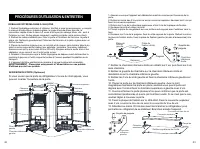
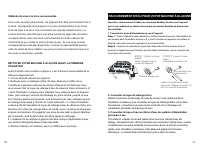
Page 21 - réinstallez-le sur la charnière inférieure gauche.
Charnière supérieure Charnière supérieure Poignée Poignée Plaque de fixation Couvercle supérieur PROCÉDURES D'UTILISATION & ENTRETIEN DÉBALLER VOTRE MACHINE À GLAÇONS 1. Retirez l'emballage extérieur et intérieur. Vérifiez si tous les accessoires, y compris le manuel d'instructions, la pelle à g...
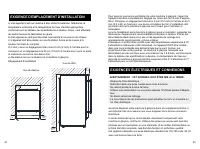
Page 22 - EXIGENCES ÉLECTRIQUES ET CONNEXIONS; AVERTISSEMENT : CET APPAREIL DOIT ÊTRE MIS À LA TERRE.
5mm [0.2” ] 50mm [2.0”] 5mm [0.2”] 5mm [0 .2” ] 50mm [2 .0” ] a) Cet appareil n'est pas destiné à être utilisé à l'extérieur. Maintenez latempérature ambiante et la température de l'eau d'entrée appropriéesconformément au tableau des spécifications ci-dessus. Sinon, cela affecterales performances de...
Page 23 - RACCORDEMENT D'EAU POUR VOTRE MACHINE À GLAÇONS; principal en eau
Pour votre sécurité personnelle, cet appareil doit être correctement mis à la terre. Cet appareil est équipé d'un cordon d'alimentation muni d'une fiche de mise à la terre. Pour minimiser les risques d'électrocution, le cordon doit être branché dans une prise murale de type mise à la terre correspon...
Page 24 - UTILISER VOTRE APPAREIL; Diagramme des boutons de fonctionnement et de la zone d'affichage
UTILISER VOTRE APPAREIL Important : La pression d'eau du système d'alimentation en eau principal doit être d'au moins 0,04-0,6 MPa. ÉTAPE 1 : Raccord rapide du robinet d'eau. ÉTAPE 2: Vissez le raccord rapide sur le robinet d'eau par le pas de vis et retirez la pince. ÉTAPE 3: Insérez complètement l...
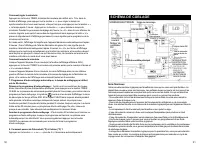
Page 25 - SCHÉMA DE CÂBLAGE; Sons Normaux
SCHÉMA DE CÂBLAGE Sons Normaux Votre nouvelle machine à glaçons peut émettre des sons qui ne vous sont pas familiers. La plupart des nouveaux sons sont normaux. Les surfaces dures comme le sol, les murs et les armoires peuvent rendre les sons plus forts qu'ils ne le sont en réalité. Ce qui suit décr...
Page 27 - Nettoyage des Pièces de Fabrication de Glace; Pour le réservoir d'eau et la plaque de détection de glace pleine; Nettoyant pour Machine à Glace Nu-Calgon Nickle Safe
Nettoyage des Pièces de Fabrication de Glace Pendant l'utilisation, nettoyez périodiquement le système principal de votre machine à glaçons. Petits trous de tuyau de séparation d'eau Tuyau de séparation d'eau Évaporateur Tirez d'abord Déplacez ensuite vers la droite 1. Répétez l'étape ci-dessus pour...
Page 28 - Suggestion de Nettoyage; ) NETTOYAGE QUOTIDIEN
AVERTISSEMENT Portez des gants en caoutchouc et des lunettes de sécurité (et/ou un écran facial) lorsque vous manipulez le nettoyant ou le désinfectant pour machine à glaçons. AVERTISSEMENT Le nettoyant pour machine à glace contient des acides. NE PAS utiliser ou mélanger avec d'autres produits nett...
Page 30 - ÉLIMINATION CORRECTE DE CE PRODUIT; Instructions De Retour / Réclamation De Dommages; Return / Damage Claim Instructions
a) Panne du capteur de température ambiante, affichez E1 dans lafenêtre numérique.b) La machine ne fabrique pas de glaçons ou le gaz fuit, affichez E2dans la fenêtre numérique.c) Coupure de l'interrupteur de commande magnétique ---- Le voyant «Full » s'allume lors du branchement ou de la mise sous t...