Page 3 - Table of Contents
Like all machinery there is potential danger when operating this machine. Accidents are frequently caused by lack of familiarity or failure to pay attention. Use this machine with respect and caution to decrease the risk of operator injury. If normal safety pre- cautions are overlooked or ignored, s...
Page 4 - Contact Info; Manual Accuracy; INTRODUCTION
We stand behind our machines! If you have ques-tions or need help, contact us with the information below. Before contacting, make sure you get the serial number and manufacture date from the machine ID label. This will help us help you faster. Grizzly Technical Support 1815 W. Battlefield Springfiel...
Page 5 - Identification
For Your Own Safety, Read Instruction Manual Before Operating Saw. a) Wear eye protection. b) Do not remove jammed cutoff pieces until blade has stopped. c) Maintain proper adjustment of blade tension, blade guides, and thrust bearings. d) Adjust upper guide to just clear workpiece. e) Hold workpiec...
Page 6 - Components
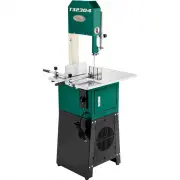
To reduce your risk of serious injury, read this entire manual BEFORE using machine. Figure 1. Front components. Figure 3. Meat grinder. Figure 2. Rear components. -4- Model T32304 (Mfd. Since 02/21) Controls & Components A. Blade Guard: Protects operator from acci- dental contact with portion o...
Page 9 - NOTICE; Safety Instructions for Machinery
ELECTRICAL EQUIPMENT INJURY RISKS. You can be shocked, burned, or killed by touching live electrical components or improperly grounded machinery. To reduce this risk, only allow qualified service personnel to do electrical installation or repair work, and always disconnect power before accessing or ...
Page 11 - Additional Safety for Meat Saws
Serious cuts, amputation, or death can occur from contact with the moving saw blade during operation or if blade breakage occurs. To reduce this risk, anyone operating this machine MUST completely heed the hazards and warnings below. CLEANING & SANITIZING. Keep machine and work area clean and sa...
Page 12 - SECTION 2: POWER SUPPLY; 20V Circuit Requirements
Before installing the machine, consider the avail-ability and proximity of the required power supply circuit. If an existing circuit does not meet the requirements for this machine, a new circuit must be installed. To minimize the risk of electrocution, fire, or equipment damage, installation work a...
Page 13 - Extension Cords
Improper connection of the equipment-grounding wire can result in a risk of electric shock. The wire with green insulation (with or without yellow stripes) is the equipment-grounding wire. If repair or replacement of the power cord or plug is nec-essary, do not connect the equipment-grounding wire t...
Page 14 - Unpacking
This machine was carefully packaged for safe transport. When unpacking, separate all enclosed items from packaging materials and inspect them for shipping damage. If items are damaged, please call us immediately at (570) 546-9663. IMPORTANT: Save all packaging materials until you are completely sati...
Page 15 - Inventory
NOTICE If you cannot find an item on this list, care- fully check around /inside the machine and packaging materials. Often, these items get lost in packaging materials while unpack- ing or they are pre-installed at the factory. The following is a list of items shipped with your machine. Before begi...
Page 16 - Hardware Recognition Chart
Hardware Recognition Chart USE THIS CHART TO MATCH UPHARDWARE DURING THE INVENTORYAND ASSEMBLY PROCESS. 5mm 5 mm Flat Head Cap Screw -14- Model T32304 (Mfd. Since 02/21)
Page 17 - Weight Load; Space Allocation; Site Considerations
Weight Load Refer to the Machine Data Sheet for the weight of your machine. Make sure that the surface upon which the machine is placed will bear the weight of the machine, additional equipment that may be installed on the machine, and the heaviest work-piece that will be used. Additionally, conside...
Page 18 - Assembly
Figure 9. Attaching feet to stand legs. Stand Top Figure 10. Attaching stand legs to stand top. Side Brace (1 of 2) Figure 11. Attaching side braces to stand legs. Upper Brace Motor Mount Rear Side Brace Clamp Hole Stand Top Figure 12. Attaching motor mount to stand. x 4 x 8 x 8 x 4 -16- Model T3230...
Page 25 - Test Run; Cleanup
If you are not familiar with safe meat handling tech- niques, contact your local Board of Health or the USDA for proper sanitizing procedures. When cleaning with sanitizers, make sure the product is approved for stainless steel food processing equipment and always fol- low the manufacturer's recomme...
Page 26 - SECTION 4: OPERATIONS; Operation Overview
The purpose of this overview is to provide the nov-ice machine operator with a basic understanding of how the machine is used during operation, so the machine controls/components discussed later in this manual are easier to understand. Due to the generic nature of this overview, it is not intended t...
Page 28 - Upper Blade Support Bearing
Whenever changing blade or adjusting blade tension or tracking, blade support bear- ings and blade guides must be re-adjusted before resuming operation to ensure proper blade support. Figure 34. Upper blade guide support bearing (blade guard removed). Figure 33. Location of blade tension nut. -26- M...
Page 29 - Lower Blade Support Bearing:; Adjusting Blade
Figure 36. Upper blade guide assembly (blade guard removed). Figure 35. Lower blade guide support bearing (table removed). Model T32304 (Mfd. Since 02/21) -27- Lower Blade Support Bearing: 1. DISCONNECT MACHINE FROM POWER! 2. Remove table. Note: Fence and meat pusher can remain installed when removi...
Page 31 - Changing Blade; Removing Blade
ONLY use food-grade saw blades (typically stainless steel) to prevent food contamina- tion from metal corrosion. Saw blades are very sharp and can quickly cause cut- ting injuries. Always wear heavy-leather gloves when handling saw blades. Figure 40. Five cap screws securing upper wheel cover (three...
Page 32 - Installing Blade
Figure 44. Two cap screws securing lower blade guides. Figure 45. Location of blade tension nut. Blade Centered on Wheel Blade Centered on Wheel PROPER TRACKING Wheel Figure 47. Correct tracking of blade on wheel. Table Blade Teeth Facing Down Figure 46. Correct blade teeth orientation. -30- Model T...
Page 34 - Grinding Meat; Installing Meat Grinder
Always remove meat grinder when not being used. Failure to comply may result in damage to meat grinder due to insufficient lubrication without meat being processed. DO NOT use your fingers to push meat into grinder or serious injury will occur! Always use the provided pusher, and remove meat grinder...
Page 35 - SANITIZING; Cleaning Saw
Always be as thorough as possible when cleaning and sanitizing the saw and its parts. Any surface that has been exposed to raw meat or bone may develop bacteria that could cause illness or death if not prop- erly cleaned and sanitized. Cleaning saw while it is connected to power could cause severe e...
Page 37 - Proper Sanitation
When using sanitizers, always follow the recom- mendations on the manu- facturer’s label, and make sure that the product will do the job for which you intend. Never use a prod- uct that will cause exposed surfaces to render meat unsafe for human con- sumption and cause illness or death. Acidic solut...
Page 38 - Basic Eye Protection; SECTION 6: ACCESSORIES
Installing unapproved accessories may cause machine to malfunction, resulting in serious personal injury or machine damage. To reduce this risk, only install accessories recommended for this machine by Grizzly. NOTICE Refer to our website or latest catalog for additional recommended accessories. ord...
Page 39 - SECTION 7: MAINTENANCE; Lubrication; Schedule; Sanitizing
To reduce risk of shock or accidental startup, always disconnect machine from power before adjustments, maintenance, or service. Saw blades are very sharp and can quickly cause cut- ting injuries. Always wear heavy-leather gloves when handling saw blades. Model T32304 (Mfd. Since 02/21) -37- SECTION...
Page 40 - Troubleshooting
Review the troubleshooting procedures in this section if a problem develops with your machine. If you need replacement parts or additional help with a procedure, call our Technical Support. Note: Please gather the serial number and manufacture date of your machine before calling. -38- Model T32304 (...
Page 41 - Operations
Model T32304 (Mfd. Since 02/21) -39- Symptom Possible Cause Possible Solution Machine has vibration or noisy operation. 1. Motor or component loose. 2. Stand feet not adjusted properly.3. Blade weld at fault/teeth broken.4. V-belt worn, loose, pulleys misaligned or belt slapping cover. 5. Pulley loo...
Page 44 - Wiring Safety Instructions
SHOCK HAZARD. Working on wiring that is con-nected to a power source is extremely dangerous. Touching electrified parts will result in personal injury including but not limited to severe burns, electrocution, or death. Disconnect the power from the machine before servicing electrical com-ponents! MO...
Page 45 - Wiring Diagram
MOTOR 120V IN OUT ON /OFF Switch GAOYOU KJD6-6F/2 Ground Ground Neutral Hot Ground 120VAC 5-15 Plug MOTOR JUNCTION BOX WARNING! SHOCK HAZARD! Disconnect power before working on wiring. Run Capacitor 35µF 250VAC Model T32304 (Mfd. Since 02/21) -43- READ ELECTRICAL SAFETY ON PAGE 42! Wiring Diagram
Page 46 - Electrical Components
Figure 61. Motor junction box. -44- Model T32304 (Mfd. Since 02/21) READ ELECTRICAL SAFETY ON PAGE 42! Electrical Components
Page 48 - Main Parts List
BUY PARTS ONLINE AT GRIZZLY.COM ! Scan QR code to visit our Parts Store. REF PART # DESCRIPTION REF PART # DESCRIPTION 1 PT32304001 MEAT PUSHER 41 PT32304041 GUIDE RAIL SUPPORT BRACKET 2 PT32304002 CAP SCREW M6-1 X 16 42 PT32304042 CAP SCREW M4-.7 X 10 3 PT32304003 PUSHER SHAFT 310MM 43 PT32304043 B...