Page 3 - Table of Contents
Table of Contents SECTiON 5: ACCESSORiES ......................... 27 SECTiON 6: MAiNTENANCE ......................... 29 schedule ...................................................... 29Cleaning & protecting .................................. 29lubrication ........................................
Page 4 - iNTRODUCTiON; Contact info; Manual Accuracy
-2- G0783 (Mfd. Since 10/17) iNTRODUCTiON Contact info We stand behind our machines! if you have ques-tions or need help, contact us with the information below. Before contacting, make sure you get the serial number and manufacture date from the machine id label. this will help us help you faster. g...
Page 5 - identification
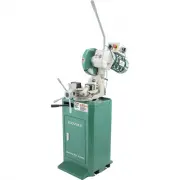
G0783 (Mfd. Since 10/17) -3- identification Miter lock lever Vise Blade guard splash guard lever Arm trigger Button Blade speed switch Emergency stop Button oil level sight glass Coolant hose depth stop Miter Angle gauge Master power switch Vise handwheel Cabinet To reduce your risk of serious injur...
Page 6 - Components
-4- G0783 (Mfd. Since 10/17) Controls & Components refer to figures 1–3 and the following descrip- tions to become familiar with the basic controls and components of this machine. Understanding these items and how they work will help you understand the rest of the manual and stay safe when opera...
Page 9 - for your Own Safety, Read instruction; NOTICE; Safety instructions for Machinery
G0783 (Mfd. Since 10/17) -7- ELECTRiCAL EQUiPMENT iNJURy RiSKS. you can be shocked, burned, or killed by touching live electrical components or improperly grounded machinery. to reduce this risk, only allow qualified service personnel to do electrical installation or repair work, and always disconne...
Page 11 - Additional Safety for Metal Cutting Saws
G0783 (Mfd. Since 10/17) -9- No list of safety guidelines can be complete. Every shop environment is different. Like all machines there is danger associated with the Model G0783. Accidents are frequently caused by lack of familiarity or failure to pay attention. Use this machine with respect and cau...
Page 12 - SECTiON 2: POWER SUPPLy; Availability
-10- G0783 (Mfd. Since 10/17) SECTiON 2: POWER SUPPLy Availability Before installing the machine, consider the avail-ability and proximity of the required power supply circuit. if an existing circuit does not meet the requirements for this machine, a new circuit must be installed. to minimize the ri...
Page 13 - Extension Cords; Grounding instructions
G0783 (Mfd. Since 10/17) -11- improper connection of the equipment-grounding wire can result in a risk of electric shock. the wire with green insulation (with or without yellow stripes) is the equipment-grounding wire. if repair or replacement of the power cord or plug is nec-essary, do not connect ...
Page 14 - Unpacking
-12- G0783 (Mfd. Since 10/17) SECTiON 3: SETUP this machine was carefully packaged for safe transport. When unpacking, separate all enclosed items from packaging materials and inspect them for shipping damage. If items are damaged, please call us immediately at (570) 546-9663. iMPORTANT: save all pa...
Page 15 - Cleanup
G0783 (Mfd. Since 10/17) -13- the unpainted surfaces of your machine are coated with a heavy-duty rust preventative that prevents corrosion during shipment and storage. this rust preventative works extremely well, but it will take a little time to clean. Be patient and do a thorough job cleaning you...
Page 16 - Site Considerations
-14- G0783 (Mfd. Since 10/17) Children and visitors may be seriously injured if unsuper- vised around this machine. Lock entrances to the shop or disable start switch or power connection to prevent unsupervised use. Workbench Load refer to the Machine Data Sheet for the weight and footprint specific...
Page 17 - Anchoring to floor; Anchoring to Concrete floors; Assembly
G0783 (Mfd. Since 10/17) -15- Anchoring to floor Anchoring machinery to the floor prevents tipping or shifting and reduces vibration that may occur during operation, resulting in a machine that runs slightly quieter and feels more solid. if the machine will be installed in a commercial or workplace ...
Page 19 - Test Run
G0783 (Mfd. Since 10/17) -17- Test Run once assembly is complete, test run the machine to ensure it is properly connected to power and safety components are functioning correctly. if you find an unusual problem during the test run, immediately stop the machine, disconnect it from power, and fix the ...
Page 20 - SECTiON 4: OPERATiONS; Operation Overview
-18- G0783 (Mfd. Since 10/17) SECTiON 4: OPERATiONS Operation Overview To complete a typical operation, the operator does the following: 1. disCoNNECts sAW FroM poWEr! 2. Checks cutting fluid reservoir. 3. Examines workpiece to make sure it is suit-able for cutting. 4. Adjusts miter angle, if necess...
Page 21 - Adjusting vise
G0783 (Mfd. Since 10/17) -19- the Model g0783 features a self-centering vise that provides maximum support, while still pro-viding enough clearance for cutting at a variety of angles. Each vise jaw is independently adjustable left or right to provide proper blade clearance for the cut. Tools Needed:...
Page 24 - Coolant
-22- G0783 (Mfd. Since 10/17) Adding /Changing Coolant To add/change coolant: 1. disCoNNECt sAW FroM poWEr! 2. remove rear panel from saw base to access cutting fluid reservoir (see figure 25). 3. Wearing protective equipment, slide reservoir out of base cabinet. Fluid pump hose is long enough to al...
Page 25 - blade Terminology
G0783 (Mfd. Since 10/17) -23- f D blade Terminology selecting the right blade for the cut requires an understanding of various blade characteristics. A. blade Size (Diameter): the overall diame- ter of the blade. the Model g0783 uses 11" blades (see Page 27). b. Pitch: the distance from the tip ...
Page 27 - blade feed Rate
G0783 (Mfd. Since 10/17) -25- blade break-in proper break-in is important for the cutting per-formance and longevity of the blade. during the break-in period, only mild pressure should be exerted on the blade (about half of the normal feed pressure for a properly broken-in blade). the duration of th...
Page 28 - Chip inspection Chart
-26- G0783 (Mfd. Since 10/17) Chip inspection Chart the best method of evaluating the performance of your cutting operation is to inspect the chips that are formed. refer to the chart below for chip inspection guidelines. Chip Appearance Chip Description Chip Color feed Rate Additional Actions thin ...
Page 29 - SECTiON 5: ACCESSORiES; order online at
G0783 (Mfd. Since 10/17) -27- T27132 - Cold Cut Saw blade 11" x 180Tthis 180-tooth, 11" blade, provides a clean, straight, burr-free cut and precise miters for a wide range of metal projects. Features a 1.26" bore diameter. figure 34. t27132 replacement blade for g0783. SECTiON 5: ACCESS...
Page 30 - SECTiON 6: MAiNTENANCE; Schedule
-28- G0783 (Mfd. Since 10/17) SECTiON 6: MAiNTENANCE Always disconnect power to the machine before performing maintenance. failure to do this may result in serious person- al injury. For optimum performance from your machine, follow this maintenance schedule and refer to any specific instructions gi...
Page 33 - Troubleshooting
G0783 (Mfd. Since 10/17) -31- review the troubleshooting procedures in this section if a problem develops with your machine. if you need replacement parts or additional help with a procedure, call our technical support. Note: Please gather the serial number and manufacture date of your machine befor...
Page 34 - Cutting Operations
-32- G0783 (Mfd. Since 10/17) Symptom Possible Cause Possible Solution premature blade wear. 1. Blade not worn in correctly. 2. Cutting pressure too high.3. Cutting pressure too low.4. incorrect blade for material type.5. inadequate blade lubrication. 1. Follow correct procedure for breaking in new ...
Page 36 - Wiring Safety instructions
-34- G0783 (Mfd. Since 10/17) ShOCK hAzARD. Working on wiring that is con-nected to a power source is extremely dangerous. touching electrified parts will result in personal injury including but not limited to severe burns, electrocution, or death. disconnect the power from the machine before servic...
Page 37 - Wiring Overview
G0783 (Mfd. Since 10/17) -35- READ ELECTRICAL SAFETY ON PAGE 34! Wiring Overview transformer power Cord Master power switch Contactor Variable- speed Control Emergency stop Button figure 46. g0783 electrical components.
Page 38 - Wiring Diagram
-36- G0783 (Mfd. Since 10/17) READ ELECTRICAL SAFETY ON PAGE 34! Wiring Diagram CONTACTOR Telemecanique 220V Ground TOP VIEW (Bottom) 1 O O (Top) 2 6 10 1 5 9 1L1 3L2 5L3 13NO A1 TRANSFORMER NC V LC1K 0910 50/60 HZ CanSen HZ5D-20 IEC60947-3 GB14048.3 1 2 LW26-20 AC-23A POWER: 20VA TC U LEVER POWER B...
Page 39 - base
G0783 (Mfd. Since 10/17) -37- BUY PARTS ONLINE AT GRIZZLY.COM ! Scan QR code to visit our Parts Store. 1 2 4 5 6V2 9 11 14 15 16 17 18 19 20 21 22 23 24 25 26 27 28 40V2 126 126 127 127 1 130 131 128 129 26 22 29 133 133 132 135 Please Note: We do our best to stock replacement parts whenever possibl...
Page 40 - vise
-38- G0783 (Mfd. Since 10/17) BUY PARTS ONLINE AT GRIZZLY.COM ! Scan QR code to visit our Parts Store. 180 30 31 32 34 35 36 37 38 39 46 42 43 44 45 46 47 48 49 136 136 37 47 37 45 41 47 41 vise REF PART # DESCRIPTION REF PART # DESCRIPTION 30 P0783030 VISE HANDLE HUB COVER 42 P0783042 CAP SCREW M6-...
Page 41 - Motor
G0783 (Mfd. Since 10/17) -39- BUY PARTS ONLINE AT GRIZZLY.COM ! Scan QR code to visit our Parts Store. 50 51 52 53 54 55 56 58 59 60 62 63 64 65 66 67 68 69 73 82 84 85 89 90 88 139 140 137 138 53-2 53-1 141 66 53-3 53-4 142 52 52 143 144 Motor REF PART # DESCRIPTION REF PART # DESCRIPTION 50 P07830...
Page 43 - Electrical Parts
G0783 (Mfd. Since 10/17) -41- BUY PARTS ONLINE AT GRIZZLY.COM ! Scan QR code to visit our Parts Store. REF PART # DESCRIPTION REF PART # DESCRIPTION 157 P0783157 E-STOP BUTTON TELE ZB2-BE102C 163 P0783163 GROUNDING BLOCK 3-TERMINAL 158 P0783158 ROTARY SWITCH CANSEN HZ5D-20 1/0/2 164 P0783164 PHLP HD...
Page 45 - WARRANTY CARD
C U T A LO N G D O T T E D LI N E Name _____________________________________________________________________________ Street _____________________________________________________________________________City _______________________ State _________________________ Zip _____________________Phone # _____...
Page 47 - WARRANTy AND RETURNS; WARRANTY AND RETURNS
WARRANTy AND RETURNS Grizzly Industrial, Inc. warrants every product it sells for a period of 1 year to the original purchaser from the date of purchase. This warranty does not apply to defects due directly or indirectly to misuse, abuse, negligence, accidents, repairs or alterations or lack of main...