Page 2 - TABLE OF CONTENTS
2 3 . . . . . . . . . . IMPORTANT SAFEGUARDS6 . . . . . . . . . . PARTS AND ACCESSORIES8 . . . . . . . . . . CONTROL DISPLAY9 . . . . . . . . . . SET UP AND USING Air Fryer Oven14 . . . . . . . . . COOKING PRESET CHART15 . . . . . . . . . INTERNAL TEMPERATURE CHART16 . . . . . . . . . TRUSSING A WHO...
Page 3 - IMPORTANT SAFEGUARDS
3 • NEVER IMMERSE the main unit housing in water, as it contains electrical components and heating elements . Do not rinse under the tap . • TO AVOID ELECTRIC SHOCK, DO NOT put liquid of any kind into the main unit housing containing the electrical components . • This appliance has a polarized plug ...
Page 6 - PARTS AND ACCESSORIES
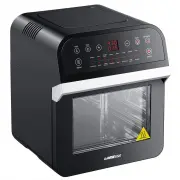
6 PARTS AND ACCESSORIES 1 . Top Air Intake Vent 2 . Control Display 3 . Side Air Intake Vents 4 . Unit Housing 5 . Power Cord + Plug 6 . Internal Heating Compartment 7 . Oven Door 8 . Air Outlet Vent MAKE SURE THE UNIT RESTS ON A FLAT LEVEL SURFACE 5 INCHES AWAY FROM ANY OTHER WALL OR APPLIANCE AND ...
Page 8 - CONTROL DISPLAY; USING THE DIGITAL CONTROLS
8 ON/OFF Powers the Unit ON and OFF STARTS and STOPS cooking process MENU Cycle through cooking PRESETS TEMP Adjust the temperature of cooking PRESETS TIME Increase or decrease cooking TIME +/- Buttons Increase or decrease TEMP and TIME LIGHT Turn the internal cooking light on or off ROTISSERIE Acti...
Page 9 - BEFORE FIRST USE; SET UP AND USING Air Fryer Oven; Inserting the Drip Pan
9 BEFORE FIRST USE 1 . Unbox the Unit and place on a counter top or flat surface away from any water source and near a polarized outlet . Before plugging in the Unit, remove accessories from the Internal Heating Compartment . Unwrap accessories . 2 . Rinse the accessories with warm water and dry tho...
Page 10 - Inserting Wire and Mesh Racks
10 Note: Choose the correct cooking rack per cooking application . The mesh rack is perfect for dehydration, but is also great for cooking crispy snacks and reheating pizza . The wire rack is best used for holding baking trays at the correct cooking distance from the internal heating element . CAUTI...
Page 11 - Attaching Rotisserie Rod and Skewer Racks; Rotisserie Skewer Assembly
11 Rotisserie Skewer: Use for cooking Kebabs . Attaching Rotisserie Rod and Skewer Racks 1 . Place the two Skewer Racks at each end of the Rotisserie Rod . Make sure thumb bolts are on the outer side of the Rotisserie Rod . 2 . Slightly tighten the thumb bolts . Do not over tighten as you may need t...
Page 12 - Rotisserie Steak Cage:; The GoWISE USA Air Fryer Oven Deluxe will only begin
12 SET UP AND USING Air Fryer Oven Rotisserie Steak Cage: Use for cooking tender meats like Fish and Steak 1 . Open Steak Cage by compressing handles of the Rotisserie Steak Cage and lifting the latch side out first . 2 . Place Fish or Steak into the Cage . 3 . Replace the Steak Cage lid, make sure ...
Page 13 - Removing Rotisserie Skewer, Rotisserie Rod from
13 Removing Rotisserie Skewer, Rotisserie Rod from Unit, and Steak Cage 1 . Open the oven door . 2 . While wearing oven mitts on both hands and using the Rotisserie Tongs, hook the bottom left and right sides of the Rotisserie Rod, in the gaps of the Rod and carefully lift the Rod out of the resting...
Page 14 - COOKING PRESET CHART; Warning
14 *Cooking time of a whole roasted chicken may vary depending on weight. Use a meat thermometer to check the internal temperature as per the chart below. COOKING PRESET CHART Preset Button Temperature Time Fries 430° 15 min Frozen food 340° 20 min Wings 400° 15 min Pizza 350° 10 min Steak 400° 12 m...
Page 15 - INTERNAL TEMPERATURE CHART; Food
15 This chart should be used to check the temperature of cooked meats. Always review USDA Food Safety Standards. INTERNAL TEMPERATURE CHART Food Type Internal Temperature Beef + Veal Ground Steaks, Roasts: Medium Steaks, Roasts: rare 160°F (70°C) 160°F (70°C) 145°F (63°C) Chicken + Turkey Breasts Gr...
Page 16 - TRUSSING A WHOLE CHICKEN
16 1 . Finding the right size chicken – be careful not use a chicken exceeding the 5lbs max . 2 . After preparing, i .e ., seasoning the chicken, truss the chicken using butcher’s twine . a . Place the chicken on its back with the legs facing toward you . b . Slide a piece of twine under the back of...
Page 19 - WARRANTY
19 WARRANTY General Warranty excludes refurbished / auction items .GoWISE USA has a 1-year limited warranty for all products . Products are warrantied against defects in materials and workmanship for 1 year from the date of purchase, when used in accordance with the instructions provided . This warr...
Page 21 - TROUBLESHOOTING; ERROR CODE
21 ERROR CODES & TROUBLESHOOTING ERROR CODE ISSUE E1 Sensor open circuit E2 S ensors short circuit E3 Circuit board connection error If your GoWISE USA Air Fry er Oven displays any of these Error Codes, please contact customer support . www.gowiseproducts.com [email protected] 855.233.9199