Page 2 - P a g e; Table of Contents
2 | P a g e Table of Contents Introduction…….…………………………………………………………………………………3 Receiving………….…………………………………………………………………………….…..4 Description Model G3 & G4……………………………………………………………...5/6 Water Production Flow Chart….…………………………………………………………..7 Positioning the Cooler………………….……………………………………………………..8 Water...
Page 3 - Introduction; Our coolers are connected to your city or well water supply to; G3 and G4 Models; Both of these models have two temperature; CAUTION: The filter version “F” must be used only with softened
3 | P a g e Introduction Congratulations on your purchase of our revolutionary Bottle-less Water Cooler! Our coolers are all designed to replace the conventional 5-gallon water bottles while eliminating the hassles of deliveries, lifting bottles, and by eliminating plastic bottles from landfills. Ou...
Page 4 - Receiving the Cooler; Unpacking; Global Water products are shipped completely assembled and; Inspection; The Models G3 and G4 both provide water at two temperatures.
4 | P a g e Receiving the Cooler Unpacking Global Water products are shipped completely assembled and ready to operate. Remove the top of the box and slide the water cooler out and save the box and packing materials. Inspection Inspect the cooler for shipping damage. Look at the exterior panels to s...
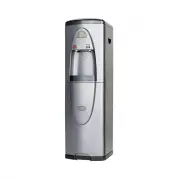
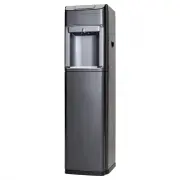
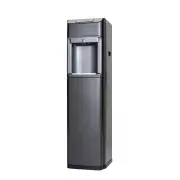
Page 5 - Description Model G3; Assembly Drawing Model G3
5 | P a g e Description Model G3 Figure 1. Assembly Drawing Model G3
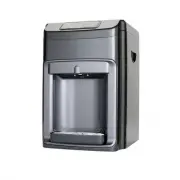
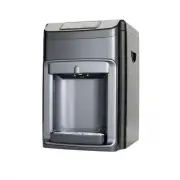
Page 6 - Description Model G4; Assembly Drawing Model G4
6 | P a g e Description Model G4 Figure 2. Assembly Drawing Model G4
Page 7 - Water Production Flow Chart Model G3 & G4; Figure 3
7 | P a g e Water Production Flow Chart Model G3 & G4 Figure 3 . Water Flow Chart
Page 8 - Positioning the Cooler
8 | P a g e Positioning the Cooler 1) It is not recommended to install this cooler in an area were water may cause severe or costly damage. 2) Do not position the cooler where it can be hit or bumped by vacuum cleaners or floor waxing machines. This can cause breaks in the waterline, connection fitt...
Page 9 - Water Cooler Connections; removed; before making all your connections. To remove the tube
9 | P a g e Water Cooler Connections When you receive the water cooler, the water connections on the back of the cooler have tube plugs in them. These tube sections must be removed before making all your connections. To remove the tube sections see Figure 7, “Disconnect”. The one-quarter inch plasti...
Page 10 - Feed Water Connections
Page 11 - Drain Connection; The black drain line in the back (Figure 4) must be hooked to the
11 | P a g e Drain Connection The drain connection applies to models with Reverse Osmosis, “RO.” The black drain line in the back (Figure 4) must be hooked to the drain line ahead of the normal sink water trap. See Figure 5 below. Place the two-part drain saddle on the drain pipe before the drain tr...
Page 12 - EZ Connections
12 | P a g e EZ Connections The standard tubing connections on the water coolers are EZ connect fittings. Use tubing and follow the instructions below in Figure 7 to make the connections. If you cut the tubing, make sure it is a square cut, fits squarely in the fitting, and seals properly. Cut the t...
Page 14 - Tank Flush; Flush tanks flush by draining all water through the drain plug; CAUTION. DO NOT TURN ON HOT OR COLD POWER CONTROLS YET; Back view of the Cooler Water Connections Model G3 & G4
14 | P a g e Tank Flush Flush tanks flush by draining all water through the drain plug located on the back of the cooler. The tanks drain water through the dispensing spigots. Fill and empty the tanks three times with the filtered water. This ensures great tasting water. When the tank has filled aga...
Page 15 - Cleaning and Maintenance; Fill the main water tank with water. Add one to two teaspoons of
15 | P a g e Cleaning and Maintenance Sanitize Fill the main water tank with water. Add one to two teaspoons of liquid chlorine bleach. Let stand for five to 10 minutes. Drain the water, then let water from filters refill tank and drain a second time. Remember to drain from dispensing spigots also. ...
Page 16 - Filter Replacement; The filter elements must be replaced at regular intervals to
16 | P a g e Filter Replacement The filter elements must be replaced at regular intervals to maintain the quality of the water. The G3F and G4F have three stages of mechanical filtration. The first stage is the 5-micron sediment filter. The second stage is the activated carbon filter. The third stag...
Page 17 - Reverse Osmosis Membrane Replacement; RO Membrane Installation
17 | P a g e Reverse Osmosis Membrane Replacement RO versions (RO) (every three years) a) Use the same procedure as above sec a-c. b) Remove the RO stage from the clips. Disconnect the white tubing from the RO housing cap. c) Remove the cap from the housing by unscrewing it. d) Using a pair of plier...
Page 18 - Trouble Shooting Guide; In the event of problems beyond the scope of the troubleshooting; PROBLEM; No Power
18 | P a g e Trouble Shooting Guide Note - In the event of problems beyond the scope of the troubleshooting described in the manual, please call your selling dealer. PROBLEM CAUSE SOLUTION No Power No electric current flowing. Make sure the cooler is plugged in and check for improper connections. Co...
Page 19 - Specifications; Dimensions; Warranty; All Global Water products are warranted to be free from defects in; Conditions of Warranty
19 | P a g e Specifications Model No. G3 G4 Voltage/Frequency AC110V AC110V Dimensions (L)13 x (W)15 x (H)42 (L)15 x (W)13 x (H)42 Weight (empty) 58 lb. 58 lb. Hot Water Tank Capacity .5 gal. .5 gal. Cold Water tank Capacity 1 gal. 1 gal. Power Consumption Hot Water: 500W Hot Water: 500W Cold Water:...
Page 20 - Cleaner, Healthier Water
20 | P a g e Cleaner, Healthier Water www.Bluline.com Tel. (866) 289-7518 Fax (786) 207-2570 E-mail [email protected]