Page 7 - GAS OVEN; DESCRIPTION OF CONTROLS
7 7 GAS OVEN DESCRIPTION OF CONTROLS Use the controls and knobs on the oven instrument panel to select the various functions. ‘TIMER’: Minute counter – rotate the knob to the desired time up to 60 minutes and a bell will ring at the end of the time period. For very short time periods turn the knob p...
Page 8 - On a gas oven there is no
8 8 GAS OVEN OVEN OPERATION 1. Open the oven door and remove the grill tray and leave it out. Lighting the Gas Oven The oven burner must be ignited with the DOOR OPEN. There is a safety device which prevents the oven lighting unless the door is in the open position 2. Press the ‘GAS OVEN’ knob and r...
Page 9 - ELECTRIC OVEN; Some models may have an electronic timer.
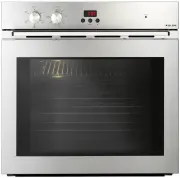
9 9 ELECTRIC OVEN DESCRIPTION OF CONTROLS Electric ovens have the advantage of being able to offer different types of heat to suit many cooking applications. Models vary according to the functions available. TIMER: Minute counter – rotate the knob to the desired time up to 60 minutes and a bell will...
Page 11 - COOKING TABLE
11 11 COOKING TABLE Dish Shelf Position 1=top Temp Degrees C Cooking Time Cakes Static Fan Oven Static Fan Oven Minutes Chocolate cake Creme Caramel Cup Cakes Fruit Cake Jam Tarts Nut Cake Scones Sponge Cake Swiss Roll 2 3 1 3 2 3 1 2 2 2 3 2 3 1 2 2 3 2 3 2 3 1 2 2 3 2 3 180-190 130-150 190-200 175...
Page 14 - NOTE: If the oven thermostat knob is turned accidently during the
14 14 NOTE: If the oven thermostat knob is turned accidently during the operation of the electric grill, a safety device will stop the functioning of the grill.
Page 15 - Glem models – GMF61MVI and GF64MEI
15 15 • Before introducing food inside the oven it is advisable to pre-heat the oven for at least 5 minutes. GRILLING TIPS: • Place the food to be grilled on the appropriate rack or tray, positioning it at the highest level depending on the volume of food and the amount of direct heat you want to ap...
Page 16 - The (–) button can also be used to change the volume of the beep.; The centre dot will start to flash on and off.
16 16 To set the timer just push the (+) or (-) button until you have set the required time in minutes and seconds. When the timer is operating the timer on indicator will be lit. Once the pre-set time has elapsed, the timer will beep Push the SET button to switch off. The (–) button can also be use...
Page 21 - REMOVING THE DOOR; OVEN INSTALLATION INSTRUCTIONS; Qualified and licenced technicians only.
21 21 REMOVING THE DOOR Open the door fully and flip over the locking tabs. Close the door gently until it stops on the hinge mechanism. Hold the two sides of the door placing your hands near the hinges. Lift the door upwards, forming an angle of about 45% and carefully lift it away from the oven. T...
Page 23 - Discharge of combustion products
23 23 LOCATION OF INSTALLATION The oven must be installed and operated in a suitable place and in conformity with the laws in force. Air flow requirement The installer must refer to the laws in force with regard to ventilation and discharge of combustion products. The place where the gas oven is ins...
Page 24 - INSTALLATION - ELECTRICAL CONNECTION; The electrical supply for the oven must be a 240 Volt 50 Hz.
24 24 INSTALLATION - ELECTRICAL CONNECTION This installation must be undertaken by a licensed and authorised technician. • The electrical supply for the oven must be a 240 Volt 50 Hz. • The fuse and electrical wiring of the dwelling must support the load of the oven. • The oven must be earthed. Conn...
Page 25 - GAS OVEN INSTALLATION - Gas Connection; Check connections are gas tight with soapy water or other
25 25 GAS OVEN INSTALLATION - Gas Connection WARNING! THIS OVEN MUST BE INSTALLED BY AN AUTHORISED PERSON – PROOF IS REQUIRED FOR WARRANTY SERVICE CLAIMS. The oven has been manufactured with a Natural Gas injector fitted. For use with LPG the oven must be converted by an authorised technician. The w...
Page 28 - If there is any doubt
28 28 CONVERSION TO ULPG The gas oven has been configured to operate on natural gas only. To operate on ULPG the oven must be converted. The conversion kit is provided with your oven. This is a relatively simple task but must be undertaken by a licensed gas fitter. No responsibility will be accepted...
Page 30 - PRODUCT WARRANTY
30 30 PRODUCT WARRANTY Thank you for choosing a Glem Gas Appliance, the purchase of this appliance is an important investment in your home and so to protect your investment we urge you to complete the registration card attached, please return it immediately. IT IS A WARRANTY REQUIREMENT THAT PROOF O...
Page 31 - WARRANTY FORM
31 31 THIS WARRANTY SHALL NOT APPLY: a) If the rating plate has been removed or the serial number or other details on it have been removed or rendered illegible. b) If the appliance is connected to any gas type or voltage other than shown on rating plate. c) If the appliance has been subjected to mi...
Page 32 - INSTALLERS CHECK LIST
32 32 INSTALLERS CHECK LIST You must test the oven after installation before you hand it over to the customer. On gas ovens you must have a manometer and a connecting tube to check that the gas pressure is correct. The following checks must be made to commission the oven and to activate the warranty...