Page 2 - THANK YOU FOR MAKING GE APPLIANCES A PART OF YOUR HOME.; card included in the packing material.
2 49-2000782 Rev. 3 THANK YOU FOR MAKING GE APPLIANCES A PART OF YOUR HOME. Whether you grew up with GE Appliances, or this is your first, we’re happy to have you in the family. We take pride in the craftsmanship, innovation and design that goes into every GE Appliances product, and we think you wil...
Page 3 - READ ALL INSTRUCTIONS BEFORE USING THE APPLIANCE; SAFETY; If the information in this manual is not followed exactly, a fire or; WARNING; WARNING
49-2000782 Rev. 3 3 READ AND SAVE THESE INSTRUCTIONS IMPORTANT SAFETY INFORMATION READ ALL INSTRUCTIONS BEFORE USING THE APPLIANCE SAFETY INFORMA TION ANTI-TIP DEVICE To reduce the risk of tipping the range, the range must be secured by a properly installed anti-tip bracket. See installation instruc...
Page 4 - GENERAL SAFETY INSTRUCTIONS; NEVER use this appliance; CAUTION
4 49-2000782 Rev. 3 SAFETY INFORMA T ION READ AND SAVE THESE INSTRUCTIONS IMPORTANT SAFETY INFORMATION READ ALL INSTRUCTIONS BEFORE USING THE APPLIANCE WARNING GENERAL SAFETY INSTRUCTIONS WARNING NEVER use this appliance as a space heater to heat or warm the room. Doing so may result in carbon monox...
Page 5 - KEEP FLAMMABLE MATERIALS AWAY FROM THE RANGE; Failure to do so may result in fire or personal injury.; READ AND SAVE THESE INSTRUCTIONS; IN THE EVENT OF A FIRE, TAKE THE FOLLOWING; COOKTOP SAFETY INSTRUCTIONS; NEVER Operate the
49-2000782 Rev. 3 5 WARNING KEEP FLAMMABLE MATERIALS AWAY FROM THE RANGE Failure to do so may result in fire or personal injury. Ŷ 'RQRWVWRUHRUXVHIODPPDEOHPDWHULDOVLQDQRYHQ or near the cooktop, including paper, plastic, pot holders, linens, wall coverings, curtains, drapes and gasoline or other flam...
Page 6 - SELF-CLEANING OVEN SAFETY INSTRUCTIONS; OVEN SAFETY INSTRUCTIONS; NEVER cover any slots,
6 49-2000782 Rev. 3 WARNING SELF-CLEANING OVEN SAFETY INSTRUCTIONS The self-cleaning feature operates the oven at temperatures high enough to burn away food soils in the oven. Follow these instructions for safe operation. Ŷ 'RQRWWRXFKRYHQVXUIDFHVGXULQJVHOIFOHDQ operation. Keep children away from the...
Page 7 - Remote Enable Equipment; How to Remove Protective Shipping Film and Packaging Tape
49-2000782 Rev. 3 7 READ AND SAVE THESE INSTRUCTIONS SAFETY INFORMA TION IMPORTANT SAFETY INFORMATION READ ALL INSTRUCTIONS BEFORE USING THE APPLIANCE Remote Enable Equipment 7KLVGHYLFHFRPSOLHVZLWKSDUWRIWKH)&&5XOHV2SHUDWLRQLVVXEMHFWWRWKHIROORZLQJWZRFRQGLWLRQV This device may not cause harmfu...
Page 8 - In Case of a Power Failure; RI; Types of Surface Burners; Surface Burners; Lighting a Surface Burner; Burners should be operated only; Using the Surface Burners; Selecting a Flame Size
8 49-2000782 Rev. 3 In Case of a Power Failure USING THE RANGE: ,Q &DVH RI D 3RZHU )DLOXUH 6XUIDFH %XUQHUV Types of Surface Burners Round Burner 8VHWKLVEXUQHUIRUJHQHUDO cooking purposes. Size cookware appropriately to the flames. Multi-Ring Burner (on some models) 8VHWKLVEXUQHUIRUODUJH cookware ...
Page 9 - Stove Top Grills; Using a Wok; Heatproof Glass Ceramic:
49-2000782 Rev. 3 9 USING THE RANGE: Surface Burners Surface Burners (Cont.) Multi-Ring Burner (some models) Side Views Of The Multi-Ring Burner Knob For large cookware, activate all rings by setting set the burner between Hi and Med. For small cookware or low heating applications, only activate the...
Page 10 - Griddle; Using Your Cast Iron Griddle; RQVRPHPRGHOV; Positioning Your Griddle; Preheating Your Griddle; Fire Hazard; Preseasoned Reversible Cast-Iron Griddle
49-2000782 Rev. 3 USING THE RANGE: Griddle Using Your Cast Iron Griddle RQVRPHPRGHOV The ribbed side of the reversible griddle can be used for food normally grilled. Your griddle provides an extra-large cooking surface for meats, pancakes and other foods usually prepared in a skillet. Before first u...
Page 11 - Using Your Nonstick Aluminum Griddle (on some models); Do not overheat the griddle; Nonstick Aluminum Griddle; Type of Food
49-2000782 Rev. 3 WARNING Fire Hazard Ŷ 8VHFDUHZKHQFRRNLQJJUHDV\IRRGV6SLOOHGJUHDVHPD\UHVXOWLQILUHŶ 1HYHUSODFHDQ\LWHPVRQWKHJULGGOHZKHQLWLVQRWLQXVH+HDWIURPVXUURXQGLQJEXUQHUVFDQKHDW the griddle and may result in fire. Ŷ 3ODFHDQGUHPRYHWKHJULGGOHRQO\ZKHQJULGGOHLVFRRODQGDOOVXUIDFHEXUQHUVDUHWXUQHG2)) Gridd...
Page 12 - Cooking; Oven Controls
49-2000782 Rev. 3 Oven Controls 1. Traditional Cooking Modes: Your oven has the following traditional cooking modes: Bake, Broil and Warm. See the Oven Cooking Modes section for more information. 2. Convection Cooking Modes (on some models): Convection cooking mode uses increased air circulation to ...
Page 13 - Connecting your WiFi Connect Enabled Oven; What you will need; Connect your GE Appliances oven; REMOTE STARTING YOUR OVEN; WiFi Connect
49-2000782 Rev. 3 Your oven is designed to provide you with two-way communication between your appliance and smart device. By using the WiFi Connect features, you will be able to control essential oven operations such as temperature settings, timers and cooking modes using your smartphone or tablet....
Page 14 - Special Features; Bake; Auto Recipe Conversion
49-2000782 Rev. 3 Special Features USING THE RANGE: Special Features There are several different special features on your range. To change the settings of these special features: Ŷ 3UHVVWKH Bake and Broil pads at the same time and hold until the special features menu is displayed. Ŷ 8VHWKH 2 or 8 nu...
Page 15 - Sabbath Mode - OU and CRC; zmantechnologies.com
49-2000782 Rev. 3 USING THE RANGE: 6DEEDWK0RGH28DQG&5& Sabbath Mode - OU and CRC 7KLVUDQJHRIIHUVDQ28DQG&5&6DEEDWKPRGHWKDWFRPSOLHVZLWKVWDQGDUGVVHWIRUWKE\2UWKRGR[8QLRQWKH Central Rabbinical Congress and Halacha Tech, and is FHUWLILHGWRWKHKLJKHVWKDODFKDVWDQGDUGV,QRUGHUWRHQDEOHWKH28DQG&a...
Page 16 - Sabbath Mode - Standard
49-2000782 Rev. 3 Sabbath Mode - Standard This range offers a standard Sabbath mode*. Some of the Sabbath mode features that will be noticed by the consumer include the disabling of tones and disabling of oven lights. Only continuous baking or timed baking is allowed in the Sabbath mode. Cooking in ...
Page 17 - Oven Racks; Aluminum Foil and Oven Liners
49-2000782 Rev. 3 The number of rack positions may vary by model. Oven Racks Recommended rack positions for various types of foods are provided in the Cooking Guide. Adjusting rack position is one way to impact cooking results. For example, if you would prefer darker tops on cakes, muffins, or cooki...
Page 18 - Cooking Modes
49-2000782 Rev. 3 Oven Cooking Modes Your new oven has a variety of cooking modes to help you get the best results. These modes are described below. Refer to the Cooking Guide section for rack position and other recommendations for specific modes and foods. Bake The traditional bake mode is intended...
Page 19 - Oven Cookware Guidelines; Oven Cooking Guide
49-2000782 Rev. 3 Oven Cooking Guide Cook food thoroughly to help protect against food borne illness. Minimum safe food temperature recommendations for food safety can be found at IsItDoneYet.gov 8VHDIRRGWKHUPRPHWHUWRPHDVXUHIRRGWHPSHUDWXUHV Oven Cookware Guidelines The material, finish, and size of ...
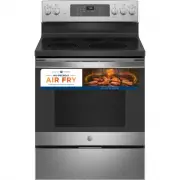
Page 21 - Air Fry Cooking Guide; Air Fry; Air Fry Cookware Guidelines
49-2000782 Rev. 3 Oven Cooking Guide Air Fry Cooking Guide Air Fry is a special, no-preheat, cooking mode that is designed to produce foods with a crispier exterior than traditional oven cooking. Select Air Fry , then input the desired set temperature and press Start . The WHPSHUDWXUHFDQEHVHWEHWZHHQ...
Page 22 - Control Lockout; Control Panel; Oven Exterior; Stainless Steel excluding Black Stainless Steel (on some models); Range – Exterior
22 49-2000782 Rev. 3 Range – Exterior WARNING If your range is removed for cleaning, servicing or any reason, be sure the anti-tip device is reengaged properly when the range is replaced. Failure to take this precaution could result in tipping of the range and can result in death or serious burns to...
Page 23 - Manual Cleaning; Self Clean Mode; CARE AND; Range – Interior
49-2000782 Rev. 3 23 The interior of your new oven can be cleaned manually or by using Steam Clean or Self Clean modes. Spillage of marinades, fruit juices, tomato sauces and basting liquids containing acids may cause discoloration and should be wiped up immediately. Let hot surfaces cool, then clea...
Page 24 - Removal of Surface Burners for Cleaning; Do not attempt to remove oval burner cap from the burner heads.; Cleaning the Surface Burners; Cleaning the Burner Caps; Replacing Surface Burners; all burner parts and grates in place.; Cooktop
24 49-2000782 Rev. 3 Removal of Surface Burners for Cleaning Turn all controls OFF. Allow cooktop to cool before removing grates and burner parts. When removing the burner caps and heads, remember their size and location. Replace them in the same location after cleaning. CAUTION Do not attempt to re...
Page 25 - Griddles; Burner Grates
49-2000782 Rev. 3 25 CARE AND CLEANING: Cooktop Cooktop (Cont.) Griddles Aluminum and Reversible Cast-Iron: Clean your reversible cast-iron griddle with a stiff brush and hot ZDWHU8VLQJVRDSLVQRWUHFRPPHQGHGDQGKDUVK detergents should never be used as they will remove the seasoning. Rinse with hot wate...
Page 26 - Removable Storage Drawer; To remove the drawer:; Cleaning the Oven Door; Cleaning the Door Interior; Cleaning the Door Exterior; Door and Drawer
26 49-2000782 Rev. 3 Removable Storage Drawer Most cleaning can be done with the drawer in place. However, the drawer may be removed if further cleaning LVQHHGHG8VHVRDSDQGZDUPZDWHUWRWKRURXJKO\FOHDQ To remove the drawer: 1. 3XOOGUDZHUVWUDLJKWRXWXQWLOLWVWRSV 2. 3UHVVWKHOHIWUDLOUHOHDVHXSDQGSUHVVWKHULJK...
Page 27 - SHOCK OR BURN HAZARD:; Oven Light; Replacing the Light Bulb:
49-2000782 Rev. 3 27 CARE AND CLEANING: Oven Light NOTE: The glass cover should be removed only when cold. Wearing latex gloves may offer a better grip. Before replacing the bulb, disconnect electrical power to the oven at the main fuse or circuit breaker panel. Let the bulb cool completely before r...
Page 28 - To Replace the Door:
28 49-2000782 Rev. 3 Oven Door For Model PGB355 The door is very heavy. Be careful when removing and lifting the door. Do not lift door by the handle. To Remove the Door: )XOO\RSHQWKHGRRU 3XOOWKHKLQJHORFNVXSDQGDZD\IURPWKHUDQJH frame to the unlocked position. 3. Firmly grasp both sides of the door ne...
Page 29 - Before you call for service; TROUBLESHOOTING TIPS
49-2000782 Rev. 3 29 Problem Possible Cause What To Do My new oven doesn't cook like my old one. Is something wrong with the temperature settings? Your new oven has a different cooking system from your old oven and therefore may cook differently than your old oven. For the first few uses, follow you...
Page 30 - Problem
49-2000782 Rev. 3 Troubleshooting Tips ... Before you call for service Problem Possible Cause What To Do Oven light does not work Light bulb is loose or defective. Tighten or replace bulb. See the Maintenance section for instructions on how to replace the bulb. Oven will not self-clean The temperatu...
Page 32 - Notes
Page 34 - What GE Appliances will not cover:; EXCLUSION OF IMPLIED WARRANTIES; Warrantor: GE Appliances, a Haier company; LIMITED W
34 49-2000782 Rev. 3 GEAppliances.com All warranty service is provided by our Factory Service Centers, or an authorized Customer Care ® technician. To schedule service online, visit us at geappliances.com/service RUFDOO*($SSOLDQFHVDW*(&$5(63OHDVH have your serial number and your model number ava...
Page 35 - ACCESSORIES; Looking For Something More?; Accessories; Cleaning Supplies
49-2000782 Rev. 3 35 ACCESSORIES Looking For Something More? GE Appliances offers a variety of accessories to improve your cooking and maintenance experiences! Refer to the Consumer Support page for phone numbers and website information. The following products and more are available: Accessories Acc...
Page 37 - COCINAS; a Gas con Función de Auto Limpieza
MANUAL DEL PROPIETARIO Escriba los números de modelo y de serie aquí: Nº de Modelo ____________ Nº de Serie ______________ Encontrará la etiqueta de calificación en el frente, detrás del cajón de la cocina. COCINAS a Gas con Función de Auto Limpieza GE es una marca registrada de General Electric Com...
Page 38 - GRACIAS POR HACER QUE GE APPLIANCES SEA PARTE DE SU HOGAR.; tenerlo en la familia.
2 49-2000782 Rev. 3 GRACIAS POR HACER QUE GE APPLIANCES SEA PARTE DE SU HOGAR. Ya sea que haya crecido usando GE Appliances, o que ésta es su primera vez, nos complace tenerlo en la familia. Sentimos orgullo por el nivel de arte, innovación y diseño de cada uno de los electrodomésticos de GE Applian...
Page 39 - DISPOSITIVO ANTI-VOLCADURAS; LEA Y GUARDE ESTAS INSTRUCCIONES; LEA TODAS LAS INSTRUCCIONES ANTES DE USAR ESTE ELECTRODOMÉSTICO; INFORMACIÓN DE SEGURIDAD; ADVERTENCIA; Si la información de este manual no se sigue exactamente, se podrá; ADVERTENCIA
49-2000782 Rev. 3 3 DISPOSITIVO ANTI-VOLCADURAS Para reducir el riesgo de volcar la cocina, ésta debe sujetarse mediante un soporte anti-volcaduras con una adecuada instalación. Ver las instrucciones de instalación enviadas con el soporte para obtener detalles completos antes de iniciar la instalaci...
Page 40 - INSTRUCCIONES GENERALES DE SEGURIDAD
4 49-2000782 Rev. 3 LEA Y GUARDE ESTAS INSTRUCCIONES INFORMACIÓN DE SEGURIDAD INFORMACIÓN IMPORTANTE DE SEGURIDAD LEA TODAS LAS INSTRUCCIONES ANTES DE USAR ESTE ELECTRODOMÉSTICO ADVERTENCIA INSTRUCCIONES GENERALES DE SEGURIDAD ADVERTENCIA NUNCA use este electrodoméstico para calentar el ambiente. Co...
Page 41 - MANTENGA LOS MATERIALES INFLAMABLES ALEJADOS DE LA COCINA
49-2000782 Rev. 3 5 LEA Y GUARDE ESTAS INSTRUCCIONES INFORMACIÓN DE SEGURIDAD INFORMACIÓN IMPORTANTE DE SEGURIDAD LEA TODAS LAS INSTRUCCIONES ANTES DE USAR ESTE ELECTRODOMÉSTICO ADVERTENCIA INSTRUCCIONES DE SEGURIDAD DE LA PARTE SUPERIOR DE LA COCINA ADVERTENCIA NUNCA Pierda de Vista la Sección Supe...
Page 42 - INSTRUCCIONES DE SEGURIDAD DEL HORNO CON FUNCIÓN DE; INSTRUCCIONES DE SEGURIDAD; INSTRUCCIONES DE SEGURIDAD DE LA PARTE SUPERIOR DE LA
6 49-2000782 Rev. 3 LEA Y GUARDE ESTAS INSTRUCCIONES INFORMACIÓN DE SEGURIDAD INFORMACIÓN IMPORTANTE DE SEGURIDAD LEA TODAS LAS INSTRUCCIONES ANTES DE USAR ESTE ELECTRODOMÉSTICO ADVERTENCIA INSTRUCCIONES DE SEGURIDAD DEL HORNO CON FUNCIÓN DE AUTO LIMPIEZ La función de auto limpieza usa el horno en t...
Page 43 - Equipo de Acceso Remoto Instalado
49-2000782 Rev. 3 7 LEA Y GUARDE ESTAS INSTRUCCIONES INFORMACIÓN DE SEGURIDAD INFORMACIÓN IMPORTANTE DE SEGURIDAD LEA TODAS LAS INSTRUCCIONES ANTES DE USAR ESTE ELECTRODOMÉSTICO Equipo de Acceso Remoto Instalado Este dispositivo cumple con la Parte 15 de la Normativa de la FCC. Su funcionamiento est...
Page 44 - En Caso de Corte de Corriente; USO DE LA; GH; Tipos de Quemadores Superficiales; Quemadores; Iluminación de un Quemador Superficial; Uso de los Quemadores; Selección del Tamaño de la Llama
8 49-2000782 Rev. 3 En Caso de Corte de Corriente USO DE LA COCINA: (Q &DVR GH &RUWH GH &RUULHQWH 4XHPDGRUHV Tipos de Quemadores Superficiales Quemadores En el caso de un corte de luz, el horno quedará inoperable y no se deberá intentar usarlo. Sin embargo, los quemadores superficiales s...
Page 45 - XHPDGRUHV; Utensilio sobre la Cocina; Parrillas para la Parte Superior de la Cocina
49-2000782 Rev. 3 9 USO DE LA COCINA: 4XHPDGRUHV 4XHPDGRUHV&RQWLQ~D 4XHPDGRUGH$QLOORV0~OWLSOHVHQDOJXQRVmodelos) 9LVWD/DWHUDOGHOD3HULOODGHO4XHPDGRUGH$QLOORV0~OWLSOHV Para utensilios grandes, active todos los anillos configurando HOTXHPDGRUHQWUH+L$OWR\0HG0HGLR Para utensilios pequeños o aplicacion...
Page 46 - Plancha; Uso de su Plancha de Hierro Fundido; HQDOJXQRVPRGHORV; Posicionamiento de la Plancha; Plancha Precurada de Hierro Fundido Reversible
10 49-2000782 Rev. 3 USO DE LA COCINA:: Plancha Plancha (en algunos modelos) Uso de su Plancha de Hierro Fundido HQDOJXQRVPRGHORV El lado acanalado de la plancha reversible puede ser usado para comidas normalmente cocinadas a la plancha. Su plancha le brinda una superficie de cocción extra grande pa...
Page 47 - Uso de la Plancha de Aluminio No Adherente (en algunos modelos); Plancha de Aluminio No Adherente
49-2000782 Rev. 3 11 Plancha (en algunos modelos) ADVERTENCIA Riesgo de Incendio Ŷ 7HQJDFXLGDGRDOFRFLQDUFRPLGDVFRQJUDVD/DJUDVDHVSDUFLGDSXHGHSURYRFDUXQLQFHQGLR Ŷ 1XQFDFRORTXHQLJXDUGHXQDUWtFXORHQODSODQFKDLQFOXVRFXDQGRQRHVWpHQXVR(OFDORUGHORVGHPiV quemadores puede calentar la plancha y provocar un incen...
Page 48 - Controles del Horno
12 49-2000782 Rev. 3 Controles del Horno 1. Traditional Cooking Modes (Modos de Cocción Tradicionales): Su horno cuenta con ORVVLJXLHQWHVPRGRVGHFRFFLyQWUDGLFLRQDOHV%DNH+RUQHDU%URLO$VDUDQG:DUP&DOHQWDU3DUDPiV información, consulte la sección de Modos de Cocción al Horno. 2. Convection Cooking Mode...
Page 49 - Conexión de su Horno con Opción de WiFi Connect; Conexión WiFi
49-2000782 Rev. 3 13 USO DE LA COCINA: Conexión WiFi * Se requiere el uso de dispositivos y de una red WiFi hogareña que sean compatibles con Apple o Android. Su horno de está diseñado para brindarle una comunicación recíproca entre su electrodoméstico y dispositivos inteligentes. Mediante el uso de...
Page 50 - Funciones Especiales; Ajuste de la Temperatura del Horno (OFSt)
14 49-2000782 Rev. 3 Funciones Especiales USO DE LA COCINA: Funciones Especiales Su cocina cuenta con varias funciones especiales diferentes. Para modificar las configuraciones de estas funciones especiales: Ŷ 3UHVLRQHODVWHFODV Bake (Hornear) y Broil (Asar) al mismo tiempo y espere a que el menú de ...
Page 52 - Configuración del Modo Sabático; Inicie un Horneado por Tiempo; Salir del Modo Sabático; Modo Sabático - Estándar
16 49-2000782 Rev. 3 Modo Sabático - Estándar (VWDFRFLQDRIUHFHXQPRGR6DEEDWK6DEiWLFRHVWiQGDU$OJXQDVGHODVIXQFLRQHVGHOPRGR6DEEDWK6DEiWLFRREVHUYDGDV por el consumidor incluirán la desactivación de tonos y desactivación de las luces del horno. Sólo el horneado continuo y el horneado por tiempo están perm...
Page 53 - Estantes del Horno; PRECAUCIÓN; Papel de Aluminio y Cobertores del Horno; UQ
49-2000782 Rev. 3 17 El horno cuenta con seis posiciones de estantes. En la Guía de Cocción, se brindan recomendaciones de posiciones de los estantes para diferentes tipos de comidas. Se ajusta un estante en una dirección para afectar los resultados de cocción. Por ejemplo, si se prefieren partes su...
Page 54 - Modos de Cocción en Horno
18 49-2000782 Rev. 3 Su horno posee una variedad de modos de cocción para que pueda obtener los mejores resultados. Estos modos se describen a continuación. Para acceder a recomendaciones para comidas específicas, consulte la sección de la Guía de Cocción. Recuerde que es posible que su nuevo horno ...
Page 55 - Guía de Cocción del Horno; Pautas de Uso de Utensilios
49-2000782 Rev. 3 19 USO DE LA COCINA: Modos de Cocción en Horno Guía de Cocción del Horno Cocine la comida completamente para evitar que se produzcan enfermedades a partir de la comida. Puede encontrar recomendaciones sobre temperatura mínima para cocinar de forma segura en IsItDoneYet.gov 8VHXQWHU...
Page 57 - Modo de Cocción para Freír con Aire
49-2000782 Rev. 3 21 Guía de Cocción del Horno Modo de Cocción para Freír con Aire $LU)U\)UHtUFRQ$LUHHVXQPRGRGHFRFFLyQHVSHFLDOVLQ precalentamiento, que fue diseñado para producir comidas que en su exterior queden más crocantes que en la cocción en KRUQRVWUDGLFLRQDOHV6HOHFFLRQH$LU)U\)UHtUFRQ$LU\OXHJR...
Page 58 - Bloqueo del Control; Panel de control; Exterior del Horno; CUIDADO Y
22 49-2000782 Rev. 3 Cocina - Exterior ADVERTENCIA Si se quita la cocina para efectuar una limpieza, reparaciones o cualquier otra razón, verifique que el dispositivo anti-volcaduras se coloque de manera adecuada cuando vuelva a instalarse la cocina. Si no toma esta precaución, la cocina puede volca...
Page 59 - Modo de Limpieza Automática; Estantes
49-2000782 Rev. 3 23 CUIDADO Y LIMPIEZA: Cocina - Interior Cocina - Interior (OLQWHULRUGHVXQXHYRKRUQRSXHGHVHUOLPSLDGRGHIRUPDPDQXDORXWLOL]DQGRORVPRGRV6WHDP&OHDQ/LPSLH]DFRQ9DSRUR6HOI&OHDQ/LPSLH]D$XWRPiWLFD El derrame de adobo, jugos de fruta, salsas de tomate y líquidos para humedecer que cont...
Page 60 - Retiro de los Quemadores Superficiales para su Limpieza; Limpieza de los Quemadores Superficiales; LITE; Placa de Cocción
24 49-2000782 Rev. 3 Retiro de los Quemadores Superficiales para su Limpieza Apague todos los controles. Espere a que la placa de cocción se enfríe antes de retirar las rejillas y las partes del quemador. Al retirar las tapas y cabezas de los quemadores, recuerde su tamaño y ubicación. Vuelva a colo...
Page 61 - Protectores de Soportes de Rejillas (en algunos modelos); Parrillas de Quemadores
49-2000782 Rev. 3 25 CUIDADO Y LIMPIEZA: Placa de Cocción 3ODFDGH&RFFLyQ&RQWLQ~D Plancha Aluminio y Hierro Forjado Reversible: Limpie su plancha de hierro fundido reversible o del chef con un cepillo duro y agua caliente. No se recomienda el uso de jabón, y nunca se deben usar detergentes po...
Page 62 - Cajón de Almacenamiento Extraíble; Limpieza de la Puerta del Horno; Puerta y el Cajón
26 49-2000782 Rev. 3 Cajón de Almacenamiento Extraíble La mayor parte de la limpieza se puede realizar con el cajón en su lugar. Sin embargo, el cajón puede ser retirado si es QHFHVDULRFRQWLQXDUFRQODOLPSLH]D8VHDJXDFDOLHQWH\MDEyQ para limpiar a fondo. Para retirar el cajón: 1. Empuje el cajón hacia a...
Page 63 - Luz del Horno
49-2000782 Rev. 3 27 CUIDADO Y LIMPIEZA: Luz del Horno NOTA: La tapa de vidrio deberá ser retirada sólo cuando esté fría. Si usa guantes de látex, tendrá un mejor agarre. Antes de reemplazar la lámpara, desconecte la conexión eléctrica del horno del fusible principal o del panel del disyuntor. Deje ...
Page 64 - Para el Modelo PGB355; Puerta del Horno
28 49-2000782 Rev. 3 Para el Modelo PGB355 La puerta es muy pesada. Tenga cuidado al retirar y levantar la puerta. No levante la puerta usando la manija. Para retirar la puerta: 1. Abra la puerta totalmente.2. Empuje los bloqueos de la bisagra hacia arriba y afuera de la estructura de la cocina, has...
Page 65 - Antes de solicitar el servicio técnico; CONSEJOS PARA LA SOLUCIÓN DE PROBLEMAS
49-2000782 Rev. 3 29 Problema Causa Posible Qué Hacer Mi horno nuevo no cocina como el anterior. ¢+D\DOJ~QSUREOHPDFRQlas configuraciones de temperatura? Su horno nuevo cuenta con un sistema de cocción diferente con relación al anterior y, por lo tanto, es posible que cocine de forma diferente. Duran...
Page 66 - Problema
30 49-2000782 Rev. 3 Consejos para la Solución de Problemas... Antes de solicitar el servicio técnico Problema Causa Posible Qué Hacer La luz del horno no funciona La lámpara está floja o presenta defectos. Ajuste o reemplace la lámpara. Para acceder a instrucciones sobre cómo reemplazar la lámpara,...
Page 68 - Qué no cubrirá GE Appliances:; GARANTÍA; EXCLUSIÓN DE GARANTÍAS IMPLÍCITAS; Garantías Extendidas:
32 49-2000782 Rev. 3 Abroche su recibo aquí. Para acceder al servicio técnico de acuerdo con la garantía deberá contar con la prueba de la fecha original de compra. GEAppliances.com Todo el servicio de garantía es provisto por nuestros Centros de Servicio de Fabricación, o un técnico autorizado de C...
Page 69 - Accesorios
49-2000782 Rev. 3 33 ACCESORIOS ¿Busca Algo Más? ¡GE Appliances ofrece una variedad de accesorios para mejorar sus experiencias de cocción y mantenimiento! Para acceder a números telefónicos e información de sitios Web, consulte la página de Soporte para el Consumidor. Estos y otros productos están ...


 GE JAS640RMSS
User Manual
GE JAS640RMSS
User Manual
 GE JB256DMBB
User Manual
GE JB256DMBB
User Manual
 GE JB256DMWW
User Manual
GE JB256DMWW
User Manual
 GE JB256RTSS
User Manual
GE JB256RTSS
User Manual
 GE JB258DMWW
User Manual
GE JB258DMWW
User Manual
 GE JB480DTBB
User Manual
GE JB480DTBB
User Manual
 GE JB625DKBB
User Manual
GE JB625DKBB
User Manual
 GE JB625DKWW
User Manual
GE JB625DKWW
User Manual
 GE JB625RKSS
User Manual
GE JB625RKSS
User Manual
 GE JB645DKBB
User Manual
GE JB645DKBB
User Manual
 GE JB645DKWW
User Manual
GE JB645DKWW
User Manual
 GE JB645RKSS
User Manual
GE JB645RKSS
User Manual
 GE JB655SKSS
User Manual
GE JB655SKSS
User Manual
 GE JB655YKFS
User Manual
GE JB655YKFS
User Manual
 GE JB700EJES
User Manual
GE JB700EJES
User Manual
 GE JB735SPSS
User Manual
GE JB735SPSS
User Manual
 GE JBS160DMBB
User Manual
GE JBS160DMBB
User Manual
 GE JBS160DMWW
User Manual
GE JBS160DMWW
User Manual
 GE JBS360DMBB
User Manual
GE JBS360DMBB
User Manual