Page 2 - Oven Safety; YOUR SAFETY AND THE SAFETY OF
Oven Safety YOUR SAFETY AND THE SAFETY OF OTHERS ARE VERY IMPORTANT. We have provided many important safety messages in this manual and on your appliance. Always read and obey all safety messages. This is the safety alert symbol. This symbol alerts you to potential hazards that can kill or hurt you ...
Page 3 - Read all instructions before using; WARNING
Warnings For Electric Installation Important Safety Instructions Read all instructions before using WARNING: To reduce the risk of fire, electrical shock, injury to persons, or damage when using the oven, follow basic precautions, including the following: Proper installation: 1. This appliance must ...
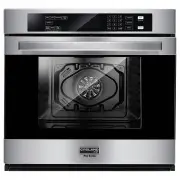
Page 6 - Part And Features
Part And Features A . Oven Vent C. Control Panel E. Convection Fan and Element G. Door Gasket I. Oven Rack Back(3 racks included) K. Broiler Pan B. Broil Element D. Halogen Light F. Bottom Element(not visible) H. Temperature Probe J. Oven Rack Front I J K A D H G F E B C 05 www.gaslandchef.com 3330-...
Page 7 - Control Panel; Display
Control Panel Oven mode controls: Bake, broil, convec, warm/proof Select from Bake, Broil, Convec and Warm/Proof oven modes. Note: The Warm/Proof control toggles between the two oven modes. Display When power is first supplied to the oven or if a power failure occurs, “12:00” will appear on the disp...
Page 11 - Degrees Fahrenheit and Celsius
Number of tones: 4 • End of TIMER To turn on/off sound: The oven sound is factory preset for On but can be changed to Off. 1. Press SETTINGS. The various Options will appear in the display. 2. Press “3” on the number keypad. “SOUND” and “ON” will appear in the display. 3. Press “1” on the number key...
Page 12 - Sabbath mode; Language
Sabbath mode Note: The oven is factory preset with Sabbath Mode Off. To turn on/off sabbath mode: 1. Make sure the oven is turned Off, and the meat probe is not plugged in. Note: Sabbath mode cannot be set when the oven is On. The oven will not recognize the meat probe while in Sabbath mode. 2. Pres...
Page 13 - Demo mode; Oven Use; Before using the oven
Demo mode 1. Press SETTINGS and Press START to go to the next page. 2. Press “0” on the number keypad. “DEMO MODE” and “OFF" will appear in the display. 3. Press “1” to toggle between ON/OFF. 4. Press SETTINGS to confirm. Note: Oven does not heat in DEMO MODE. The display counts down quickly. Ov...
Page 18 - Broil
Notes: • The temperature can be changed at any time during cooking. Press STOP/ CLEAR to clear the settings. Select oven mode, then enter the desired temperature by pressing the number keypad, and then press START. • After selecting an Oven Mode and Temperature, you have the option to set a Cook Tim...
Page 23 - Bake tips
Meats(only) It is not necessary to preheat the oven for the Convection Conversion MEATS option. Preheating can cause overcooking. If preheat is required for the recipe, add 15 minutes to the Cook Time, and place food in the oven at the appropriate time. 1. Place food in the oven and close the oven d...
Page 24 - Bake chart
Food Item Cake • Cupcake • Bundt cake • Angel food Pie • 2 crust, fresh, 9" • 2 crust, frozen fruit, 9"Cookies • Sugar • Chocolate chip • BrowniesBreads • Yeast bread loaf, 9x5 • Yeast rolls • Biscuits • MuffinsPizza • Frozen • Fresh Rack Position 211 22 222 2222 22 Time(MIN.) 19-2240-4535-3...
Page 25 - Convection bake tips
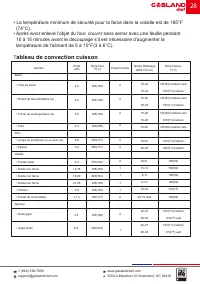
Convection bake tips Reduce recipe baking temperatures by 25°F(15°C). • For best results, foods should be cooked uncovered, in lowsided pans to take advantage of the forced air circulation. Use shiny aluminum pans for best results unless otherwise specified. • Heatproof glass or ceramic can be used....
Page 26 - Convection bake chart
Foods recommended for convection bake mode: • Appetizers, Biscuits, Coffee Cakes • Cookies(2 to 4 racks), Yeast Breads • Cream Puffs, Popovers • Casseroles and One-Dish Entrees • Oven Meals(rack positions 1, 2, 3) • Air-Leavened Foods(Souffles, Meringue, Meringue-Topped Desserts, Angel Food Cakes, C...
Page 28 - Convection broast tips; Convection roast chart
Convection broast tips • Place rack in the required position needed before turning on the oven. • Use Convection Broil mode with the oven door closed. • Do not preheat oven. • Use the 2-piece broil pan. • Turn meats once halfway through the cooking time(see convection broil chart). Meat Beef • Rib r...
Page 29 - Dehydrate tips; Convection broil chart
* Broiling and convection broiling times are approximate and may vary slightly. Cooking times are indicative and also depend on the thickness and the starting temperature of the meat before cooking. Dehydrate tips The circulating heated air at a lower temperature slowly removes the moisture for food...
Page 33 - Oven Care; General cleaning
Oven Care General cleaning Important: Before Cleaning, make sure all controls are off and the oven is cool. Always follow the instructions printed on the label of the cleaning products. Using the cleaning chart 1. Locate the number of the part to be cleaned in the following illustration. 2. Find the...
Page 34 - Oven finishes/cleaning methods; Stainless steel oven
Oven finishes/cleaning methods The entire oven can be safely cleaned with a soapy sponge, rinsed and dried. If stubborn soil remains, follow the recommended cleaning methods below. • Always use the mildest cleaner that will do the job. • Rub metal finishes in the direction of the grain. • Use clean,...
Page 36 - BURN HAZARD
This oven features a self-clean function that eliminates the need to manually scrub the oven interior. During self-clean, the oven uses very high temperatures, burning soil to a powdery ash. Important: The health of some birds is extremely sensitive to the fumes given off during the self-clean cycle...
Page 38 - Oven door removal
6. Press START. After the door is locked, “SELF CLEAN” will scroll in the selected text area until the clean cycle is finished. When the self-clean Cycle Ends: “COMPLETE” appears in the display and the oven door unlocks. Note: SELF CLEAN can be canceled by pressing STOP/CLEAR. The oven door will rem...
Page 40 - Troubleshooting
2. Using a Phillips-head screwdriver, remove the screw, and then remove the cover. 3. Remove the burned out bulb from the socket. Note: To avoid damage or decreasing the life of the new bulb, do not touch bulb with bare fingers. Wear cotton gloves or use a tissue when replacing the light bulb. 4. Re...
Page 41 - Baking and roasting
Baking and roasting With either Bake or Convection Bake and Convection Roast poor results can occur for many reasons other than a malfunction of the oven. Check the chart below for causes of the most common problems. Since the size, shape and material of baking utensils directly affect the baking re...
Page 42 - Operation
Operation Problem Possible Cause Solution F03 or F04 Error appears in the display window. A problem with latch mechanism occurred. Turn off power at the main power supply(fuse or breaker box), wait a few seconds and turn it back on again. The oven should run a latch auto–test. If condition persists,...
Page 45 - FOUR SIMPLE MURAL; Instructions D'installation
3330-A Marathon Ct Charleston, SC 29418 1 (844) 538-7890www.gaslandchef.com[email protected] FOUR SIMPLE MURAL Instructions D'installation Modèle No.: Pro ES710TS
Page 46 - Importantes Instructions De Sécurité; Lisez toutes les instructions avant utilisation
Importantes Instructions De Sécurité Lisez toutes les instructions avant utilisation Avertissement: Afin de réduire le risque d’incendie, de choc électrique, de blessures corporelles ou de dommage lors de l’utilisation du four, il convient d’observer certaines précautions fondamentales, notamment: L...
Page 49 - Caractéristiques De Votre Four
Caractéristiques De Votre Four A. Évent du four C. Panneau de contrôle E. Ventilateur et élément de convection G. Joint de porte I. Dos de la grille du four (3 grilles incluses) K. Poêle à griller B . Élément de gril D . Lumière halogène F . Élément inférieur(non visible) H . Sonde de température J ...
Page 50 - Tableau De Commande; Affichage
Tableau De Commande Commandes d’activation des modes du fours: Bake, broil, convec, warm/proof Faire un choix parmi les modes Bake(Cuisson au four), Broil(Cuisson au gril), Convection(Cuisson par convection) et Warm/Proof(Maintien au chaud/levée). Remarque: La commande Warm/Proof(Maintien au chaud/l...
Page 51 - Verrouillage du tableau de commande
Verrouillage du tableau de commande Le tableau de commande du four peut être verrouillé afin d’éviter l’utilisation involontaire du four. Remarques: • Les commandes ne peuvent pas être verrouillées si le fourest en cours d’utilisation ou si la fonction Cook Time(Duréed e cuisson) est activée. • L’he...
Page 53 - RISQUE D’INTOXICATION ALIMENTAIRE; AVERTISSEMENT
6. Placer les aliments dans le four et fermer la porte du four. 7. Appuyer sur START(Mise en marche). La fonction Heure de démarrage effectuera un compte à rebours jusqu’à ce que l’heure programmée soit atteinte. Remarque: Une fois la durée de cuisson réglée écoulée, le four s’éteint automa- tiqueme...
Page 54 - Signaux sonores; Nombre de signaux sonores: 1
5. Appuyer sur SETTINGS(Réglages) pour valider; l’heure est réglée. Pour faire passer l’horloge au format de 24 heures: 1. Appuyer sur SETTINGS(Réglages). Les diverses options s’affichent. 2. Appuyer sur “5” sur le clavier numérique. “12/24 HOUR”(12/24 heures) et “12” s’affichent. 3. Appuyer sur la ...
Page 57 - Le mode de démonstration; Utilisation Du Four; Avant d’utiliser le four
Le mode de démonstration 1. Appuyer sur SETTINGS et appuyer sur START pour aller à la page suivante. 2. Appuyer sur “0” sur le clavier numérique. “DEMO MODE" et “OFF” apparais sent sur l'affichage. 3. Appuyer sur “1” pour basculer entre ON/OFF. 4. Appuyer sur SETTINGS pour confirmer. Remarque: L...
Page 59 - Ustensiles; Cuisson à haute altitude
4. Régler la température du four à l’aide des touches du clavier numérique. 5. Appuyer sur START(Mise en marche). La température du four réglée reste affichée pendant toute la cuisson. 6. Régler la température interne souhaitée des aliments au moyen des touches du clavier numérique, puis appuyer de ...
Page 62 - Modes de four
3. Appuyer sur la touche numérique “3” pour augmenter la température ou sur la touche numérique “6” pour la diminuer par tranches de 5°F (3°C). L’ajuste ment peut être réglé entre 30°F (18°C) et - 30 °F (- 18°C). 4. Appuyer sur SETTINGS(Réglages) pour enregistrer le réglage et quitter le menu de cal...
Page 67 - Cuisson au gril par convection
Réglage de la cuisson au four par convection: 1. Appuyer sur CONVEC. “Convection” et “Press 1-3 To Choose”(Appuyer sur 1 à 3 pour choisir) s’affichent. 2. Appuyer sur “1” pour Convect Bake(Cuisson au four par convection) sur l’écran du menu. “Set temp or Press START”(Rég. temp. ou appuyer sur mise e...
Page 71 - Tableau de convection
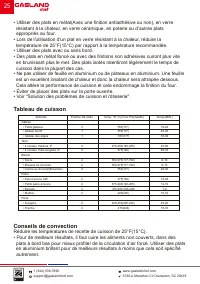
• Le verre résistant à la chaleur et la céramique peuvent être utilisés. Réduire encore la température de 25°F(15°C) si vous Utiliser un verre résistant à la chaleur, donc une réduction totale de 50°(30°C). • Les plats en métal foncé peuvent être utilisés. Notez que la nourriture peut brunir plus vi...
Page 73 - ableau de convection cuisson
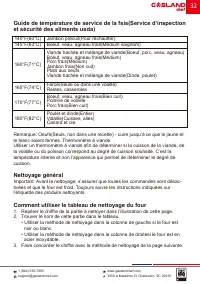
• La température minimum de sécurité pour la farce dans la volaille est de 165°F (74°C). • Après avoir enlevé l’objet du four, couvrir sans serrer avec une feuille pendant 10 à 15 minutes avant le découpage s’il est nécessaire d’augmenter la température de l’aliment de 5 à 10°F(3 à 6°C). T ableau de...
Page 75 - Tableau De Grillade À Déshydratation
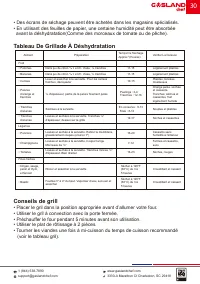
• Des écrans de séchage peuvent être achetés dans les magasins spécialisés. • En utilisant des feuilles de papier, une certaine humidité peut être absorbée avant la déshydratation(Comme des morceaux de tomate ou de pêche). Tableau De Grillade À Déshydratation Conseils de grill • Placer le gril dans ...
Page 76 - Tableau de grill
* Les temps de gril à convection sont approximatifs et peuvent varier. Les temps de cuisson sont indiqués et ils dépendent également de l’épaisseur de la viande et de la température de départ de celle-ci avant la cuisson. Aliments Et ÉpaisseurBoeuf • Steak(³/ 4 "-1") - Médium saignant - Médi...
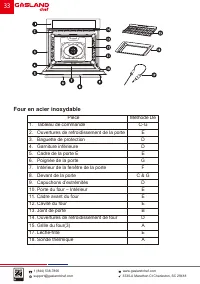
Page 78 - Four en acier inoxydable
Pièce1. Tableau de commande2. Ouvertures de refroidissement de la porte3. Baguette de protection4. Garniture inférieure5. Cadre de la porte E6. Poignée de la porte7. Intérieur de la fenêtre de la porte8. Devant de la porte9. Capuchons d’extrémités10. Porte du four – Intérieur11. Cadre avant du four1...
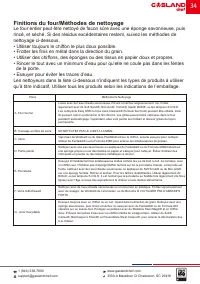
Page 79 - Finitions du four/Méthodes de nettoyage
Finitions du four/Méthodes de nettoyage Le four entier peut être nettoyé de facon sûre avec une éponge savonneuse, puis rincé, et séché. Si des résidus excédentaires restent, suivez les méthodes de nettoyage ci-dessous. • Utiliser toujours le chiffon le plus doux possible. • Frotter les finis en mét...
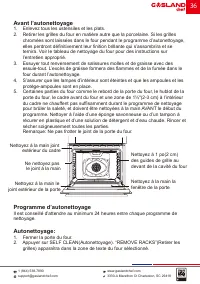
Page 80 - RISQUE DE BRÛLURES; Autonettoyage automatique
Ce four est doté d’une fonction d’autonettoyage qui élimine le besoin de récurer manuellement la cavité du four. Durant le programme d’autonettoyage, le four utilise des températures très élevées, brûlant les saletés pour les réduire en cendres. Important: La santé de certains oiseaux est très sensi...
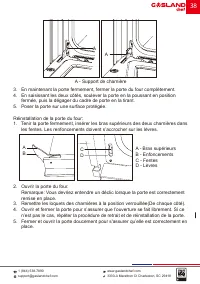
Page 84 - Remplacement d’une ampoule du four
La lampe du four est une ampoule standard de 25 watts(G9) pour appareils électroménagers. Important: Avant de procéder au remplacement, s’assurer que le four est froid et que les commandes sont désactivées. 1. Couper l’alimentation électrique de l'alimentation principale(Fusible ou disjoncteur). 2. ...
Page 85 - Cuisson et rôtissage
Cuisson et rôtissage Avec la cuisson comme la cuisson à convection, des problèmes de cuisson peuvent arriver pour de nombreuses raisons autre qu’un mauvais fonctionnement du four. Vérifiez le tableau cidessous qui répond à la plupart des problèmes communs. Étant donné que la taille, la forme et le m...
Page 86 - Fonctionnement
Fonctionnement Problème Cause Possible Solution Un code d’erreur F03 ou F04 apparaît sur la fenêtre d’affichage. Un problème s’est produit avec le mécanisme du loquet. Déconnecter la source de courant électrique principale(Fusible ou boîtier de disjoncteurs), attendre quelques secondes et remettre e...