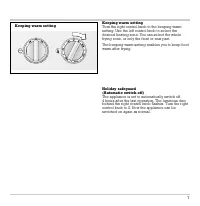
Page 3 - And now we wish you lots of fun frying!
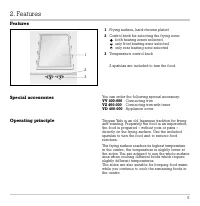
2 Congratulations on buying your new “Vario” appliance. Before switching your appliance on for the first time, we would like you to familiarize yourself withyour new appliance. In this manual you will findimportant notes on safety and operation. Thesewill serve to ensure your personal safety and the...
Page 4 - For your safety; Do not operate the appliance if it is damaged.
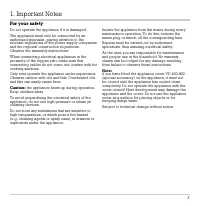
3 For your safety Do not operate the appliance if it is damaged. The appliance must only be connected by anauthorised specialist, paying attention to therelevant regulations of the power supply companiesand the regional construction regulations. Observe the assembly instructions! When connecting ele...
Page 5 - do not hit the frying surface with a pointed
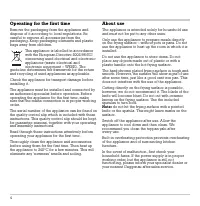
4 Operating for the first time Remove the packaging from the appliance anddispose of it according to local regulations. Becareful to remove all accessories from thepackaging. Keep packaging elements and plasticbags away from children. This appliance is labelled in accordancewith the European Directi...
Page 9 - Visual signals
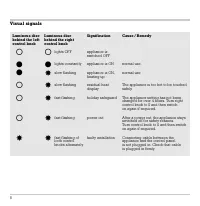
Visual signals 8 Luminous disc Luminous disc Signification Cause / Remedy behind the left behind the right control knob control knob lights OFF appliance is switched OFF lights constantly appliance is ON normal use slow flashing appliance is ON, normal use heating up slow flashing residual heat The ...
Page 10 - Settings table
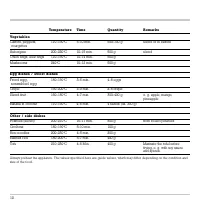
Settings table 9 Te m p e r a t u r e T i m e Q u a n t i t y R e m a r k s M e a t / Po u l t r y Rump steak 240 °C 3–6 min. each side 4 steaks (ca. 800 g) The steak is medium, when meat juices appear. For longer frying times (well-done) reduce the heat setting to 230 °C aftersearing. Roast neck of...
Page 11 - scrambled egg
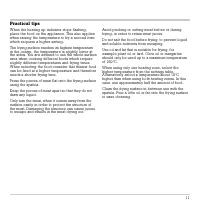
10 Te m p e r a t u r e T i m e Q u a n t i t y R e m a r k s Ve g e t a b l e s Carrots, peppers, 170–190 °C 5–10 min. 500–700 g sliced or in batons courgettes Aubergine 200–220 °C 10–15 min. 500 g sliced Onion rings, leek rings 170–190 °C 10–14 min. 500 g Mushrooms 240 °C 10–12 min. 500 g E g g d ...
Page 12 - Practical tips
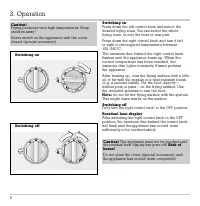
Practical tips When the heating up indicator stops flashing,place the food on the appliance. This also applieswhen raising the temperature to fry a second itemwhich requires a higher setting. The frying surface reaches its highest temperaturein the centre, the temperature is slightly lower atthe sid...
Page 15 - Subject to technical change without notice.
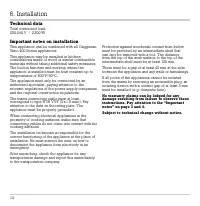
Technical data Total connected load: 220-240 V / 2 300 W Important notes on installation This appliance can be combined with all Gaggenau Vario 400 Series appliances. This appliance may be installed in kitchencombinations made of wood or similar combustiblematerials without taking additional safety ...
Page 16 - Preparing the cabinet; • Cut out the recess for the hob in your worktop.
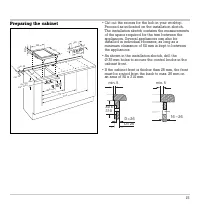
Preparing the cabinet • Cut out the recess for the hob in your worktop. Proceed as indicated on the installation sketch.The installation sketch contains the measurementsof the space required for the trim between theappliances. Several appliances can also beinstalled in individual recesses, as long a...
Page 17 - Installing the control panel; • Before installation, remove all styrofoam
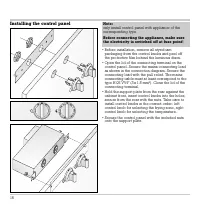
Installing the control panel • Before installation, remove all styrofoam packaging from the control knobs and peel off the protective film behind the luminous discs. • Open the lid of the connecting terminal on the control panel. Secure the mains connecting leadas shown in the connection diagram. Se...
Page 18 - Installing the appliance
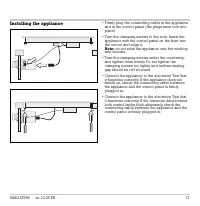
Installing the appliance • Firmly plug the connecting cable in the appliance and in the control panel (the plugs must lock intoplace). • T urn the clamping screws to the side. Insert the appliance with the control panel on the front intothe cut-out and align it. Note: do not stick the appliance onto...