Page 3 - Important safeguards
V K 411-610 1 Important safeguards Page 3 1. Important Notes Page 4-5 For your safety Page 4 Operating for the first time Page 4 About use Page 5 2. Features Page 6 Features Page 6 Special accessories Page 6 3. Operation Page 7-10 Operating principle Page 7 Hooking in the special handle Page 7 Switc...
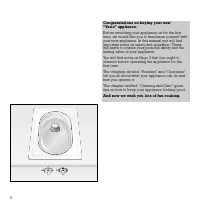
Page 4 - And now we wish you lots of fun cooking.
2 Congratulations on buying your new “Vario” appliance. Before switching your appliance on for the first time, we would like you to familiarize yourself withyour new appliance. In this manual you will findimportant notes on safety and operation. Thesewill serve to ensure your personal safety and the...
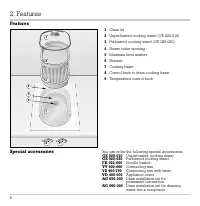
Page 6 - For your safety; Do not operate the appliance if it is damaged.; Operating for the first time
4 For your safety Do not operate the appliance if it is damaged. The appliance must only be connected by an authorised specialist, paying attention to the relevant regulations of the power supply companies and the regional construction regulations. Observe the assembly instructions! The appliance co...
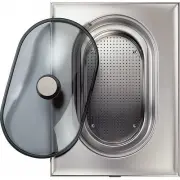
Page 7 - About use
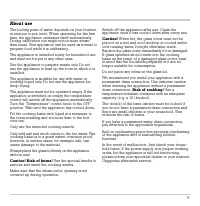
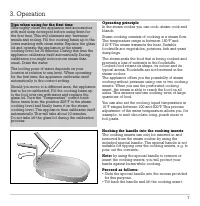
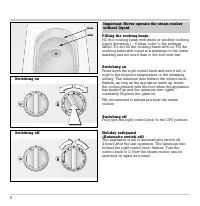
5 About use The boiling point of water depends on your locationin relation to sea level. When operating for the firsttime, the appliance calibrates itself automatically.During calibration you might notice more steamthan usual. Your appliance can be used as normal toprepare food while it is calibrati...
Page 11 - Closing the drain valve
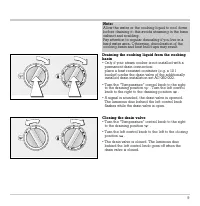
9 Draining the cooking liquid from the cookingbasin • Only if your steam cooker is not installed with a permanent drain connection: place a heat resistant container (e.g. a 10 lbucket) under the drain valve of the additionally installed drain installation set AG 060-000. • T urn the “Temperature"...
Page 12 - Visual signals
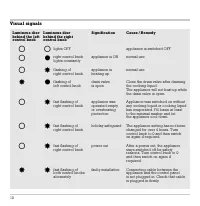
Visual signals 10 Luminous disc Luminous disc Signification Cause / Remedy behind the left behind the right control knob control knob lights OFF appliance is switched OFF right control knob appliance is ON normal use lights constantly flashing of appliance is normal use right control knob heating up...
Page 14 - Setting: steam cooking
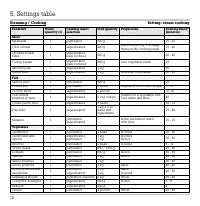
12 5. Settings table Steaming / Cooking Setting: steam cooking Foodstuff Water Cooking insert Food quantity Preparation Cooking times* quantity ( l ) selection (minutes) Meat Meatballs 1 perforated 500 g 15 - 20 Fillet of beaf 1 unperforated 400 g place herbs, e.g. 1/2 teasp. 15 - 20 thyme in the co...
Page 15 - Cooking table; Simmering
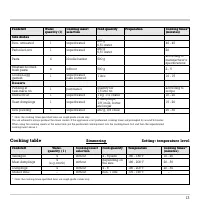
13 Foodstuff Water Cooking insert Food quantity Preparation Cooking times* quantity ( l ) selection (minutes) Side dishes Rice, untreated 1 unperforated 250 g 40 - 45 0,5 l water Parboiled-rice 1 unperforated 250 g 20 0,5 l water Pasta 4 Noodle basket 500 g according tomanufacturer’sspecifications S...
Page 18 - There must be a gap of at least 40 mm (1
16 Technical data Total connected load: 2 200WAC 208/220-240 V / 60 Hz Important notes on installation This appliance can be combined with all Gaggenau Vario 400 Series appliances. Note: do not install the appliance directly nextto a deep fryer! This appliance may be installed in kitchen combi-natio...
Page 19 - Preparing the cabinet; The minimum spaces
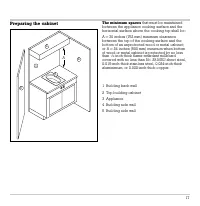
Preparing the cabinet The minimum spaces that must be maintained between the appliance cooking surface and the horizontal surface above the cooking top shall be: A = 30 inches (762 mm) minimum clearance between the top of the cooking surface and the bottom of an unprotected wood or metal cabinet; or...
Page 20 - • Cut out the recess for one or several Vario
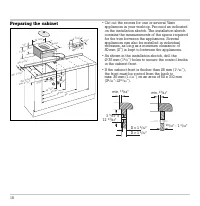
Preparing the cabinet • Cut out the recess for one or several Vario appliances in your worktop. Proceed as indicatedon the installation sketch. The installation sketchcontains the measurements of the space requiredfor the trim between the appliances. Several appliances can also be installed in indiv...
Page 21 - Installing the control panel; • Before installation, remove all styrofoam
Installing the control panel • Before installation, remove all styrofoam packaging from the control knobs and peel off the protective film behind the luminous discs. • Hold the support plate from the rear against the cabinet front, insert control knobs into the holes,secure from the rear with the nu...
Page 22 - Installing the appliance; • Firmly plug the connecting cable in the cooktop
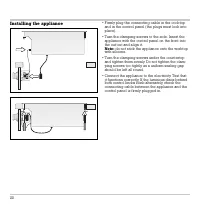
Installing the appliance • Firmly plug the connecting cable in the cooktop and in the control panel (the plugs must lock intoplace). • T urn the clamping screws to the side. Insert the appliance with the control panel on the front intothe cut-out and align it. Note: do not stick the appliance onto t...
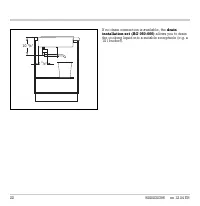
Page 23 - Drain installation; A permanent drain connection using our
Drain installation A permanent drain connection using our drain installation set (AG 050-000) is recommended. This requires a drain connection in the base cabi-net. A non-return valve must be installed. It can beconnected permanently or with a free fall. 21 11 7 / 8 '' 4 3 / 4 ''