Page 3 - Sommario
Sommario 1 1. Descrizione dei comandi __________________________________ 2 2. Istruzioni d'uso ________________________________________ 12 3. Pulizia e manutenzione__________________________________ 26 4. Rimedi alle anomalie di funzionamento _____________________ 30 Vi ringraziamo per avere scelto ...
Page 4 - Istruzioni per l'utente; Descrizione dei comandi; Il pannello superiore; , la spia accesa indica la mancanza del; PULSANTE; Premere il pulsante per attivare/disattivare l’opzione.; (leggere paragrafo “OPZIONI SUPPLEMENTARI”)
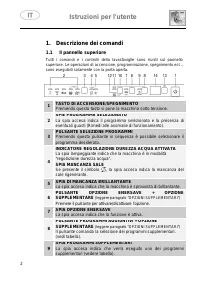
Istruzioni per l'utente 2 1. Descrizione dei comandi 1.1 Il pannello superiore Tutti i comandi e i controlli della lavastoviglie sono riuniti sul pannello superiore. Le operazioni di accensione, programmazione, spegnimento ecc., sono eseguibili solamente con la porta aperta. 1 TASTO DI ACCENSIONE/SP...
Page 5 - 4 DISPLAY INFORMAZIONI
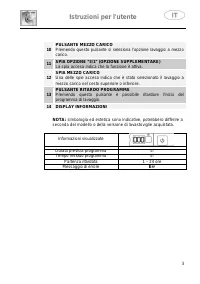
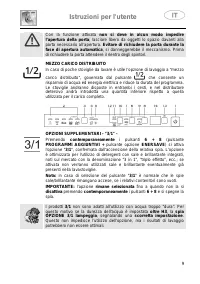
Istruzioni per l'utente 3 10 PULSANTE MEZZO CARICO Premendo questo pulsante si seleziona l’opzione lavaggio a mezzo carico. 11 SPIA OPZIONE “3/1” (OPZIONE SUPPLEMENTARE) La spia accesa indica che la funzione è attiva. 12 SPIA MEZZO CARICO Una delle spie accesa indica che è stato selezionato il lavag...
Page 8 - PROGRAMMI VELOCI; (leggere il paragrafo che ne spiega il funzionamento)
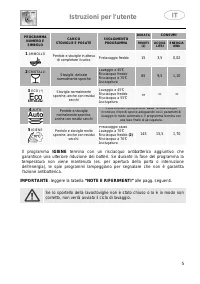
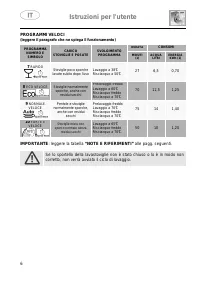
Istruzioni per l'utente 6 PROGRAMMI VELOCI (leggere il paragrafo che ne spiega il funzionamento) PROGRAMMA NUMERO E SIMBOLO CARICO STOVIGLIE E POSATE SVOLGIMENTO PROGRAMMA DURATA CONSUMI MINUTI (1) ACQUA LITRI ENERGIA KWh (1) 7 RAPIDO + Stoviglie poco sporche lavate subito dopo l’uso Lavaggio a 38°C...
Page 9 - NOTE E RIFERIMENTI; Vedere foglio a corredo; RIFERIMENTI a ENERGY LABEL a corredo della lavastoviglie:; Le informazioni sono riferite al programma STANDARD
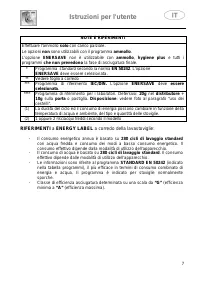
Istruzioni per l'utente 7 NOTE E RIFERIMENTI Effettuare l'ammollo solo con carico parziale. Le opzioni non sono utilizzabili con il programma ammollo. L’opzione ENERSAVE non è utilizzabile con ammollo, hygiene plus e tutti i programmi che non prevedono la fase di asciugatura finale. * Programma stan...
Page 10 - Programmi di lavaggio; Prima di avviare un programma di lavaggio verificare che:; OPZIONE PROGRAMMI VELOCI; disattiva automaticamente al termine del programma.; OPZIONE ENERSAVE
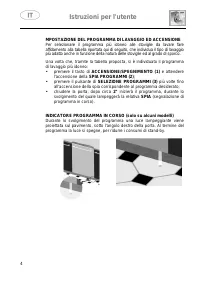
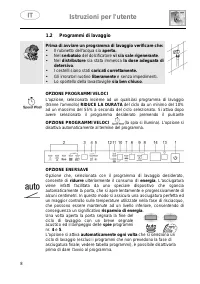
Istruzioni per l'utente 8 1.2 Programmi di lavaggio Prima di avviare un programma di lavaggio verificare che: • Il rubinetto dell'acqua sia aperto. • Nel serbatoio del dolcificatore vi sia sale rigenerante. • Nel distributore sia stata immessa la dose adeguata di detersivo. • I cestelli siano stati ...
Page 11 - MEZZO CARICO DISTRIBUITO; carico distribuito”, governata dal pulsante
Istruzioni per l'utente 9 Con la funzione attivata non si deve in alcun modo impedire l’apertura della porta; lasciare libero da oggetti lo spazio davanti alla porta necessario all’apertura. Evitare di richiudere la porta durante la fase di apertura automatica, si danneggerebbe il meccanismo. Prima ...
Page 12 - RITARDO DEL PROGRAMMA; Richiudere la porta.; MODIFICA DEL PROGRAMMA; PER RISPARMIARE ENERGIA! ... E RISPETTARE L'AMBIENTE
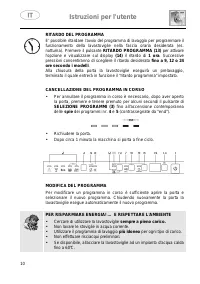
Istruzioni per l'utente 10 RITARDO DEL PROGRAMMA E’ possibile ritardare l’avvio del programma di lavaggio per programmare il funzionamento della lavastoviglie nella fascia oraria desiderata (es. notturna). Premere il pulsante RITARDO PROGRAMMA (13) per attivare l’opzione e visualizzare sul display (...
Page 13 - non versare il detersivo direttamente sulle stoviglie.; GESTIONE DELL’ENERGIA
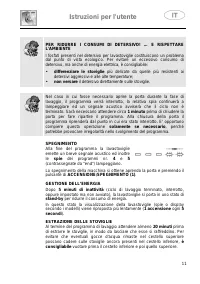
Istruzioni per l'utente 11 PER RIDURRE I CONSUMI DI DETERSIVO! … E RISPETTARE L'AMBIENTE I fosfati presenti nel detersivo per lavastoviglie costituiscono un problema dal punto di vista ecologico. Per evitare un eccessivo consumo di detersivo, ma anche di energia elettrica, è consigliabile: • differe...
Page 14 - Uso del dolcificatore dell'acqua
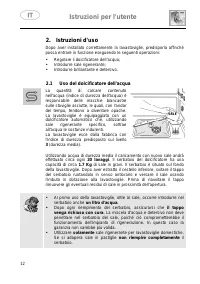
Istruzioni per l'utente 12 2. Istruzioni d'uso Dopo aver installato correttamente la lavastoviglie, predisporla affinché possa entrare in funzione eseguendo le seguenti operazioni: • Regolare il dolcificatore dell’acqua; • Introdurre sale rigenerante; • Introdurre brillantante e detersivo. 2.1 Uso d...
Page 15 - REGOLAZIONE DEL DOLCIFICATORE
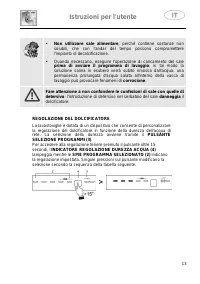
Istruzioni per l'utente 13 • Non utilizzare sale alimentare, perché contiene sostanze non solubili, che con l'andar del tempo possono compromettere l'impianto di decalcificazione. • Quando necessario, eseguire l'operazione di caricamento del sale prima di avviare il programma di lavaggio; in tal mod...
Page 16 - TABELLA DUREZZA DELL'ACQUA; REGOLAZIONE; Uso del distributore di brillantante e detersivo
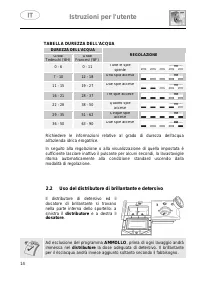
Istruzioni per l'utente 14 TABELLA DUREZZA DELL'ACQUA DUREZZA DELL'ACQUA REGOLAZIONE Gradi Tedeschi (°dH) Gradi Francesi (°dF) 0 - 6 0 - 11 Tutte le spie spente 7 - 10 12 - 18 Una spia accesa 11 - 15 19 - 27 Due spie accese 16 - 21 28 - 37 Tre spie accese 22 - 28 38 - 50 Quattro spie accese 29 - 35 ...
Page 17 - AGGIUNTA DEL BRILLANTANTE PER IL RISCIACQUO
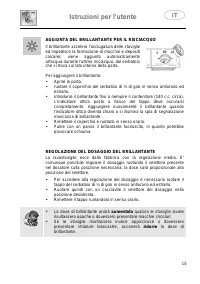
Istruzioni per l'utente 15 AGGIUNTA DEL BRILLANTANTE PER IL RISCIACQUO Il brillantante accelera l'asciugatura delle stoviglie ed impedisce la formazione di macchie e depositi calcarei; viene aggiunto automaticamente all'acqua durante l'ultimo risciacquo, dal serbatoio che si trova sul lato interno d...
Page 18 - CARICAMENTO DEL DETERSIVO
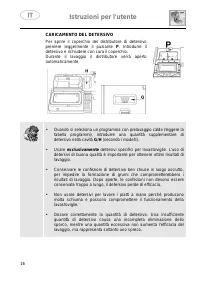
Istruzioni per l'utente 16 CARICAMENTO DEL DETERSIVO Per aprire il coperchio del distributore di detersivo premere leggermente il pulsante P. Introdurre il detersivo e richiudere con cura il coperchio. Durante il lavaggio il distributore verrà aperto automaticamente. • Quando si seleziona un program...
Page 19 - Avvertenze e consigli generali; Prima di posizionare le stoviglie nei cesti è necessario:
Istruzioni per l'utente 17 L’introduzione di detersivo, anche liquido, nel serbatoio del brillantante, provocherà il danneggiamento della lavastoviglie. 2.3 Avvertenze e consigli generali Prima di procedere al primo lavaggio con la lavastoviglie è opportuno leggere i seguenti suggerimenti riguardant...
Page 20 - Argenteria: le stoviglie in argento possono macchiarsi
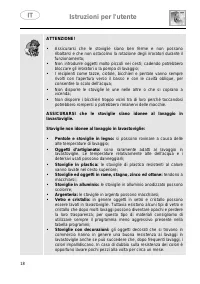
Istruzioni per l'utente 18 ATTENZIONE! • Assicurarsi che le stoviglie siano ben ferme e non possano ribaltarsi e che non ostacolino la rotazione degli irroratori durante il funzionamento; • Non introdurre oggetti molto piccoli nei cesti; cadendo potrebbero bloccare gli irroratori o la pompa di lavag...
Page 21 - Uso dei cestelli; Con supporti fissi; INSERTI CESTO INFERIORE
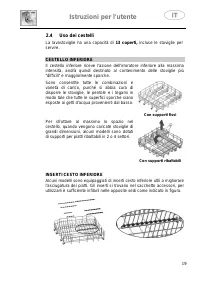
Istruzioni per l'utente 19 2.4 Uso dei cestelli La lavastoviglie ha una capacità di 13 coperti, incluse le stoviglie per servire. CESTELLO INFERIORE Il cestello inferiore riceve l'azione dell'irroratore inferiore alla massima intensità, andrà quindi destinato al contenimento delle stoviglie più "...
Page 22 - CARICAMENTO DEL CESTELLO INFERIORE
Istruzioni per l'utente 20 CARICAMENTO DEL CESTELLO INFERIORE Sistemare con cura e verticalmente i piatti piani, fondi, da dessert e da portata. Le pentole, i tegami e i relativi coperchi vanno collocati capovolti. Sistemare i piatti fondi e da dessert avendo cura che rimanga sempre uno spazio tra e...
Page 23 - CESTINO PORTAPOSATE
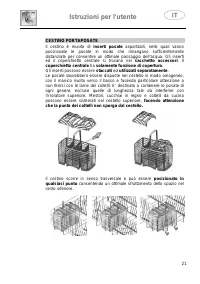
Istruzioni per l'utente 21 CESTINO PORTAPOSATE Il cestino è munito di inserti posate asportabili, nelle quali vanno posizionate le posate in modo che rimangano sufficientemente distanziate per consentire un ottimale passaggio dell’acqua. Gli inserti ed il coperchietto centrale si trovano nel sacchet...
Page 24 - CESTINO PORTAPOSATE SUPERIORE
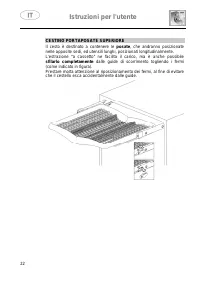
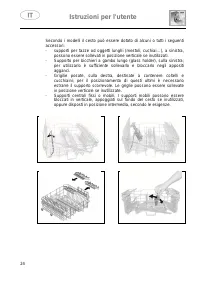
Istruzioni per l'utente 22 CESTINO PORTAPOSATE SUPERIORE Il cesto è destinato a contenere le posate, che andranno posizionate nelle apposite sedi, ed utensili lunghi, posizionati longitudinalmente. L’estrazione “a cassetto” ne facilita il carico, ma è anche possibile sfilarlo completamente dalle gui...
Page 25 - CESTELLO SUPERIORE
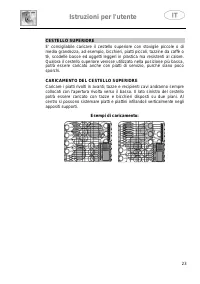
Istruzioni per l'utente 23 CESTELLO SUPERIORE E' consigliabile caricare il cestello superiore con stoviglie piccole o di media grandezza, ad esempio, bicchieri, piatti piccoli, tazzine da caffè o tè, scodelle basse ed oggetti leggeri in plastica ma resistenti al calore. Qualora il cestello superiore...
Page 27 - Versione A: ad estrazione regolabile su due posizioni.; Estrarre entrambe le guide cestello.
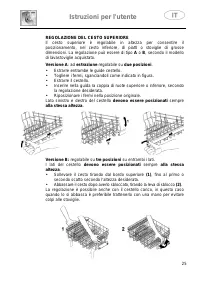
Istruzioni per l'utente 25 REGOLAZIONE DEL CESTO SUPERIORE Il cesto superiore è regolabile in altezza per consentire il posizionamento, nel cesto inferiore, di piatti o stoviglie di grosse dimensioni. La regolazione può essere di tipo A o B, secondo il modello di lavastoviglie acquistato. Versione A...
Page 28 - Pulizia e manutenzione
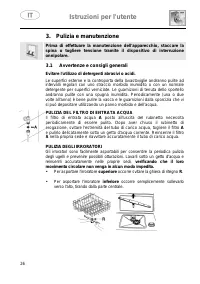
Istruzioni per l'utente 26 3. Pulizia e manutenzione Prima di effettuare la manutenzione dell'apparecchio, staccare la spina o togliere tensione tramite il dispositivo di interruzione onnipolare. 3.1 Avvertenze e consigli generali Evitare l'utilizzo di detergenti abrasivi o acidi. Le superfici ester...
Page 29 - PULIZIA DEL GRUPPO FILTRANTE; togliere il filtro centrale sollevandolo.
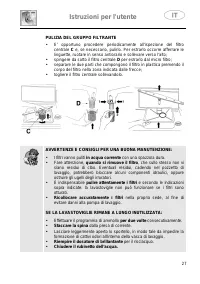
Istruzioni per l'utente 27 PULIZIA DEL GRUPPO FILTRANTE • E' opportuno procedere periodicamente all'ispezione del filtro centrale C e, se necessario, pulirlo. Per estrarlo occorre afferrare le linguette, ruotare in senso antiorario e sollevare verso l'alto; • spingere da sotto il filtro centrale D p...
Page 30 - Reinserire la spina alla presa di corrente.
Istruzioni per l'utente 28 PRIMA DI RIUTILIZZARE LA LAVASTOVIGLIE DOPO UNA LUNGA SOSTA: • Controllare che nella tubazione non siano depositati fanghiglia o ruggine, in tal caso, lasciare scorrere l'acqua dal rubinetto di alimentazione per alcuni minuti. • Reinserire la spina alla presa di corrente. ...
Page 31 - vi sia brillantante nell’apposito contenitore
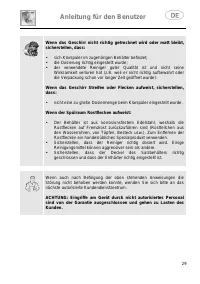
Istruzioni per l'utente 29 Se le stoviglie non si asciugano o rimangono opache verificare che: • vi sia brillantante nell’apposito contenitore; • la regolazione dell’erogazione dello stesso sia corretta; • il detersivo utilizzato sia di buona qualità e non abbia perso le sue caratteristiche (per.es....
Page 32 - Rimedi alle anomalie di funzionamento; ANOMALIA
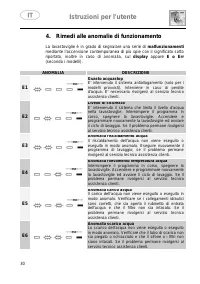
Istruzioni per l'utente 30 4. Rimedi alle anomalie di funzionamento La lavastoviglie è in grado di segnalare una serie di malfunzionamenti mediante l’accensione contemporanea di più spie con il significato sotto riportato, inoltre in caso di anomalia, sul display appare E o Err (secondo i modelli). ...
Page 33 - Spia spenta
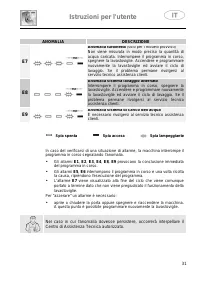
Istruzioni per l'utente 31 ANOMALIA DESCRIZIONE E7 Anomalia turbinetta (solo per i modelli provvisti) Non viene misurata in modo preciso la quantità di acqua caricata. Interrompere il programma in corso, spegnere la lavastoviglie. Accendere e programmare nuovamente la lavastoviglie ed avviare il cic...
Page 34 - DATI TECNICI; 3 coperti standard; Pressione acqua di alimentazione; Vedere targhetta caratteristiche
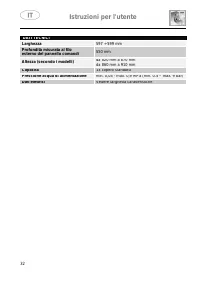
Istruzioni per l'utente 32 DATI TECNICI Larghezza 597 ÷ 599 mm Profondità misurata al filo esterno del pannello comandi 550 mm Altezza (secondo i modelli) da 820 mm a 870 mm da 860 mm a 910 mm Capacità 13 coperti standard Pressione acqua di alimentazione min. 0,05 - max. 0,9 MPa (min. 0.5 – max. 9 b...
Page 35 - Contents
Contents 1 1. Description of the controls ________________________________ 2 2. Operating instructions ___________________________________ 12 3. Cleaning and maintenance _______________________________ 26 4. Troubleshooting _______________________________________ 30 Thank you for choosing one of our...
Page 36 - User instructions; Description of the controls; Upper panel; symbol is present, illumination of this light denotes a; regenerating salt warning level.
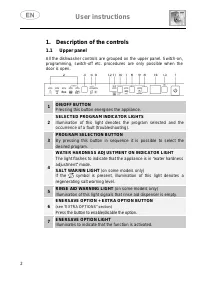
User instructions 2 1. Description of the controls 1.1 Upper panel All the dishwasher controls are grouped on the upper panel. Switch-on, programming, switch-off etc. procedures are only possible when the door is open. 1 ON/OFF BUTTON Pressing this button energises the appliance. 2 SELECTED PROGRAM ...
Page 37 - EXTRA PROGRAM + EXTRA OPTION BUTTON
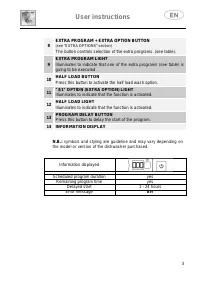
User instructions 3 8 EXTRA PROGRAM + EXTRA OPTION BUTTON (see “EXTRA OPTIONS” section) The button controls selection of the extra programs. (see table). 9 EXTRA PROGRAM LIGHT Illuminates to indicate that one of the extra programs (see table) is going to be executed. 10 HALF LOAD BUTTON Press this b...
Page 38 - SETTING THE WASHING PROGRAM AND SWITCHING ON
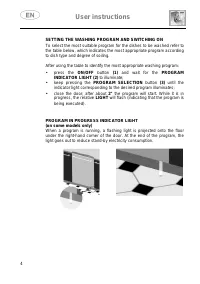
User instructions 4 SETTING THE WASHING PROGRAM AND SWITCHING ON To select the most suitable program for the dishes to be washed refer to the table below, which indicates the most appropriate program according to dish type and degree of soiling. After using the table to identify the most appropriate...
Page 39 - IMPORTANT: see “NOTES AND REFERENCES” table on the following pages.
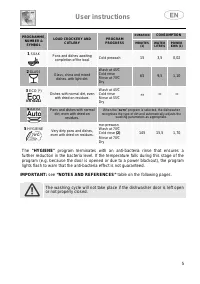
User instructions 5 PROGRAMME, NUMBER & SYMBOL LOAD CROCKERY AND CUTLERY PROGRAM PROGRESS DURATION CONSUMPTION MINUTES (1) WATER LITRES POWER KWh (1) 1 SOAK Pans and dishes awaiting completion of the load. Cold prewash 15 3,5 0,02 2 GLASS Glass, china and mixed dishes, with light dirt. Wash at 4...
Page 40 - QUICK PROGRAMS; (see relevant section for explanation of functioning modes)
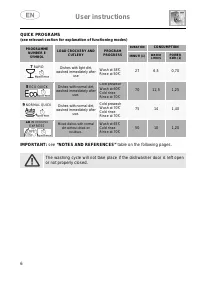
User instructions 6 QUICK PROGRAMS (see relevant section for explanation of functioning modes) PROGRAMME NUMBER E SYMBOL LOAD CROCKERY AND CUTLERY PROGRAM PROGRESS DURATION CONSUMPTION MINUTI (1) WATER LITRES POWER KWh (1) 7 RAPID + Dishes with light dirt, washed immediately after use Wash at 38°C R...
Page 41 - NOTES AND REFERENCES; See information sheet provided; REFERENCES for the ENERGY LABEL supplied with the dishwasher:; Information refers to the; EN 50242 STANDARD programme (identified in
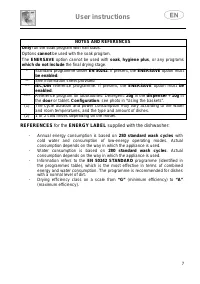
User instructions 7 NOTES AND REFERENCES Only run the soak program with half loads. Options cannot be used with the soak program. The ENERSAVE option cannot be used with soak, hygiene plus, or any programs which do not include the final drying stage. * Standard programme under EN 50242. If present, ...
Page 42 - Washing programs; Before starting a washing program make sure that:; option, press the QUICK PROGRAMS OPTION button
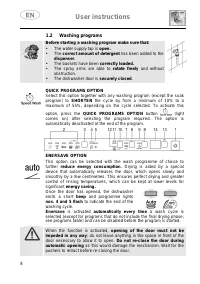
User instructions 8 1.2 Washing programs Before starting a washing program make sure that: • The water supply tap is open. • The correct amount of detergent has been added to the dispenser. • The baskets have been correctly loaded. • The spray arms are able to rotate freely and without obstruction. ...
Page 43 - SPREAD HALF LOAD; When there are not many dishes to be watched, the “spread half load”; DELAYED START
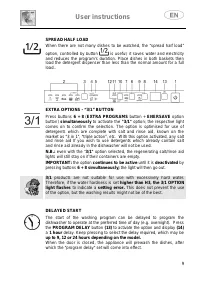
User instructions 9 SPREAD HALF LOAD When there are not many dishes to be watched, the “spread half load” option, controlled by button is useful; it saves water and electricity and reduces the program’s duration. Place dishes in both baskets then load the detergent dispenser than less than the norma...
Page 44 - CANCELLING THE CURRENT PROGRAM; TO SAVE ON ENERGY! ... AND PROTECT THE ENVIRONMENT
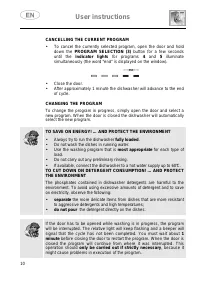
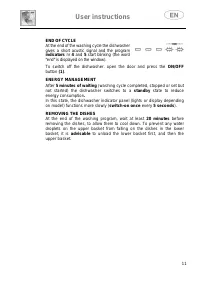
User instructions 10 CANCELLING THE CURRENT PROGRAM • To cancel the currently selected program, open the door and hold down the PROGRAM SELECTION (3) button for a few seconds until the indicator lights for programs 4 and 5 illuminate simultaneously (the word "end" is displayed on the window)...
Page 45 - ENERGY MANAGEMENT
User instructions 11 END OF CYCLE At the end of the washing cycle the dishwasher gives a short acustic signal and the program indicators nr 4 and 5 start blinking (the word "end" is displayed on the window). To switch off the dishwasher, open the door and press the ON/OFF button (1). ENERGY ...
Page 46 - Operating instructions; Adjust the water softening system; Using the water softening system
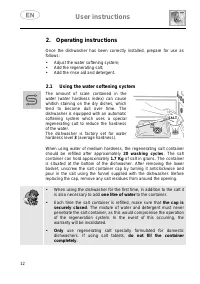
User instructions 12 2. Operating instructions Once the dishwasher has been correctly installed, prepare for use as follows: • Adjust the water softening system; • Add the regenerating salt; • Add the rinse aid and detergent. 2.1 Using the water softening system The amount of scale contained in the ...
Page 47 - ADJUSTING THE WATER SOFTENING SYSTEM
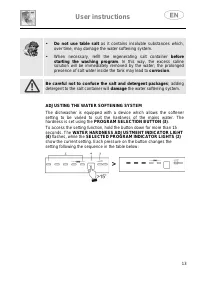
User instructions 13 • Do not use table salt as it contains insoluble substances which, over time, may damage the water softening system. • When necessary, refill the regenerating salt container before starting the washing program. In this way, the excess saline solution will be immediately removed ...
Page 48 - WATER HARDNESS TABLE; WATER HARDNESS; Using the rinse aid and detergent dispensers; The
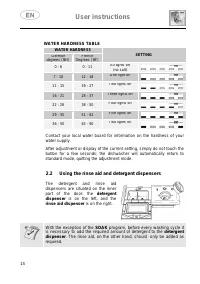
User instructions 14 WATER HARDNESS TABLE WATER HARDNESS SETTING German degrees (°dH) French Degrees (°dF) 0 - 6 0 - 11 All lights off (no salt) 7 - 10 12 - 18 One light on 11 - 15 19 - 27 Two lights on 16 - 21 28 - 37 Three lights on 22 - 28 38 - 50 Four lights on 29 - 35 51 - 62 Five lights on 36 ...
Page 49 - ADDING THE RINSE AID; Rotate the container cap anticlockwise by 1⁄4 of a turn and remove it.; ADJUSTING THE RINSE AID DISPENSER SETTING
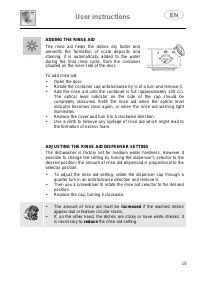
User instructions 15 ADDING THE RINSE AID The rinse aid helps the dishes dry faster and prevents the formation of scale deposits and staining; it is automatically added to the water during the final rinse cycle, from the container situated on the inner side of the door. To add rinse aid: • Open the ...
Page 50 - ADDING THE DETERGENT; - Detergents containing phosphates are more effective against
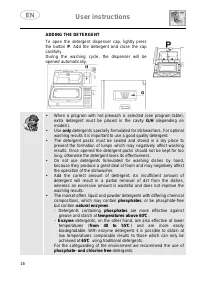
User instructions 16 ADDING THE DETERGENT To open the detergent dispenser cap, lightly press the button P. Add the detergent and close the cap carefully. During the washing cycle, the dispenser will be opened automatically. • When a program with hot prewash is selected (see program table), extra det...
Page 51 - General warnings and recommendations
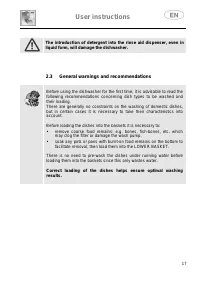
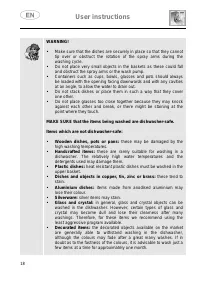
User instructions 17 The introduction of detergent into the rinse aid dispenser, even in liquid form, will damage the dishwasher. 2.3 General warnings and recommendations Before using the dishwasher for the first time, it is advisable to read the following recommendations concerning dish types to be...
Page 53 - Using the baskets; With fixed supports; BOTTOM BASKET INSERTS
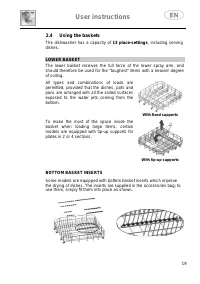
User instructions 19 2.4 Using the baskets The dishwasher has a capacity of 13 place-settings, including serving dishes. LOWER BASKET The lower basket receives the full force of the lower spray arm, and should therefore be used for the “toughest” items with a heavier degree of soiling. All types and...
Page 54 - LOADING THE LOWER BASKET
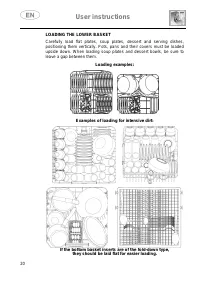
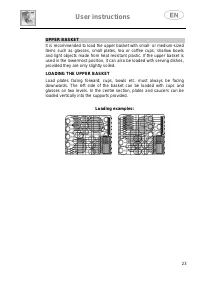
User instructions 20 LOADING THE LOWER BASKET Carefully load flat plates, soup plates, dessert and serving dishes, positioning them vertically. Pots, pans and their covers must be loaded upside down. When loading soup plates and dessert bowls, be sure to leave a gap between them. Loading examples: E...
Page 55 - CUTLERY BASKET
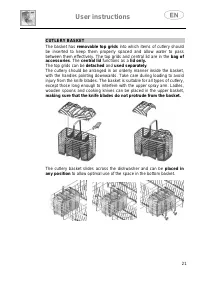
User instructions 21 CUTLERY BASKET The basket has removable top grids into which items of cutlery should be inserted to keep them properly spaced and allow water to pass between them effectively. The top grids and central lid are in the bag of accessories. The central lid functions as a lid only. T...
Page 56 - TOP CUTLERY BASKET
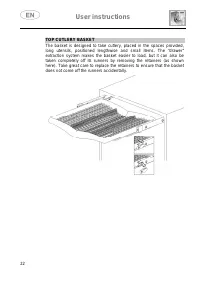
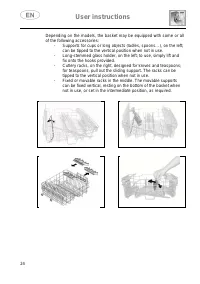
User instructions 22 TOP CUTLERY BASKET The basket is designed to take cutlery, placed in the spaces provided, long utensils, positioned lengthwise and small items. The “drawer” extraction system makes the basket easier to load, but it can also be taken completely off its runners by removing the ret...
Page 57 - UPPER BASKET
User instructions 23 UPPER BASKET It is recommended to load the upper basket with small- or medium-sized items such as glasses, small plates, tea or coffee cups, shallow bowls and light objects made from heat resistant plastic. If the upper basket is used in the lowermost position, it can also be lo...
Page 59 - ADJUSTING THE UPPER BASKET; Pull out both the basket guides.; Return the stops to their original position.
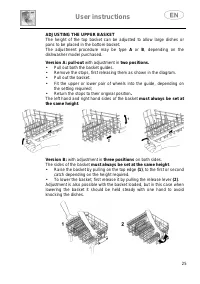
User instructions 25 ADJUSTING THE UPPER BASKET The height of the top basket can be adjusted to allow large dishes or pans to be placed in the bottom basket. The adjustment procedure may be type A or B, depending on the dishwasher model purchased. Version A: pull-out with adjustment in two positions...
Page 60 - Cleaning and maintenance
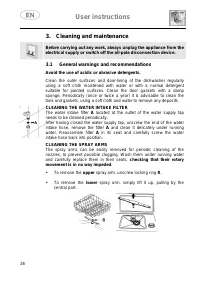
User instructions 26 3. Cleaning and maintenance Before carrying out any work, always unplug the appliance from the electrical supply or switch off the all-pole disconnection device. 3.1 General warnings and recommendations Avoid the use of acidic or abrasive detergents. Clean the outer surfaces and...
Page 61 - CLEANING THE FILTER UNIT; remove the centre filter by lifting it upwards.
User instructions 27 CLEANING THE FILTER UNIT • It is advisable to periodically inspect the centre filter C and, if necessary, to clean it. To remove the filter, grip the tabs, turn them anticlockwise and lift upwards; • push the centre filter D from the underside to remove it from the micro-filter:...
Page 62 - Plug the power cord back into the socket.
User instructions 28 BEFORE STARTING THE DISHWASHER AFTER PROLONGED DISUSE: • Check that there are no deposits of sludge or rust inside the water pipe: if there are, allow the water to run from the water supply tap for a few minutes. • Plug the power cord back into the socket. • Reconnect the water ...
Page 63 - there is rinse aid inside the special container
User instructions 29 If the dishes fail to dry or remain dull, check that: • there is rinse aid inside the special container; • the rinse aid dispenser setting is correct; • the detergent used is of good quality and has not lost its effectiveness (for example, through incorrect storage, with the box...
Page 64 - FAULT
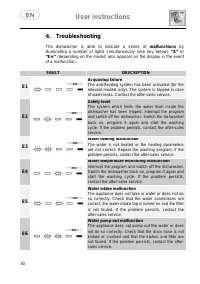
User instructions 30 4. Troubleshooting The dishwasher is able to indicate a series of malfunctions by illuminating a number of lights simultaneously (see key below); “E” or “Err” (depending on the model) also appears on the display in the event of a malfunction. FAULT DESCRIPTION E1 Acquastop failu...
Page 65 - Light off
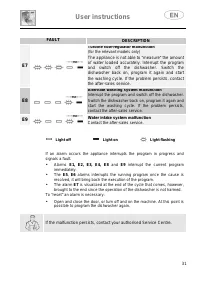
User instructions 31 FAULT DESCRIPTION E7 Turbine flow-regulator malfunction (for the relevant models only) The appliance is not able to "measure" the amount of water loaded accurately. Interrupt the program and switch off the dishwasher. Switch the dishwasher back on, program it again and s...
Page 66 - TECHNICAL DATA; 3 Standard place settings; Water supply pressure; See rating plate
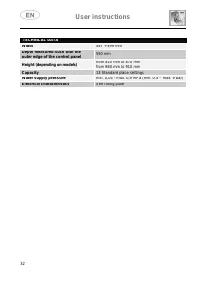
User instructions 32 TECHNICAL DATA Width 597 ÷ 599 mm Depth measured flush with the outer edge of the control panel 550 mm Height (depending on models) from 820 mm to 870 mm from 860 mm to 910 mm Capacity 13 Standard place settings Water supply pressure min. 0,05 - max. 0,9 MPa (min. 0.5 – max. 9 b...
Page 67 - Index
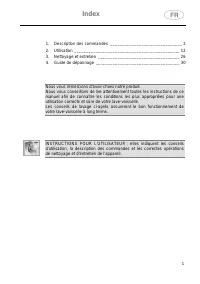
Index 1 1. Description des commandes ______________________________ 2 2. Utilisation ____________________________________________ 12 3. Nettoyage et entretien __________________________________ 26 4. Guide de dépannage ___________________________________ 30 Nous vous remercions d’avoir choisi notre ...
Page 68 - Instructions pour l'utilisateur; Description des commandes; Le bandeau de commandes supérieur; est présent, le voyant allumé indique le manque; TOUCHE OPTION ENERSAVE + OPTION SUPPLÉMENTAIRE; (lire paragraphe « OPTIONS SUPPLÉMENTAIRES »); Appuyer sur cette touche active/désactive l’option.; (lire le paragraphe « OPTIONS SUPPLÉMENTAIRES »)
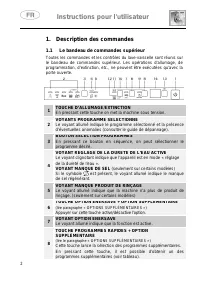
Instructions pour l'utilisateur 2 1. Description des commandes 1.1 Le bandeau de commandes supérieur Toutes les commandes et les contrôles du lave-vaisselle sont réunis sur le bandeau de commandes supérieur. Les opérations d’allumage, de programmation, d’extinction, etc., ne peuvent être exécutées q...
Page 69 - 4 AFFICHEURS INFORMATIONS
Instructions pour l'utilisateur 3 9 VOYANT PROGRAMMES RAPIDES Le voyant allumé indique l’exécution de l’un des cinq programmes supplémentaires (voir tableau). 10 TOUCHE DEMI-CHARGE En pressant cette touche, on sélectionne l’option lavage demi-charge. 11 VOYANT OPTION « 3/1 » (OPTION SUPPLÉMENTAIRE) ...
Page 71 - Prélavage à froid
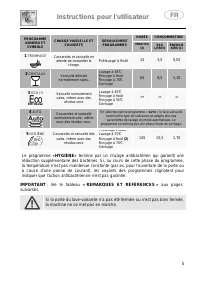
Instructions pour l'utilisateur 5 PROGRAMME NUMERO ET SYMBOLE CHARGE VAISSELLE ET COUVERTS DÉROULEMENT PROGRAMMES DURÉE CONSOMMATION MINUTES (1) EAU LITRES ÉNERGIE KWh (1) 1 TREMPAGE Casseroles et vaisselle en attente de compléter la charge. Prélavage à froid 15 3,5 0,02 2 CRISTAUX Vaisselle délicat...
Page 72 - PROGRAMMES RAPIDES; (lire le paragraphe pour les explications)
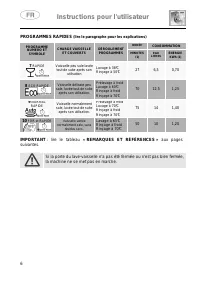
Instructions pour l'utilisateur 6 PROGRAMMES RAPIDES (lire le paragraphe pour les explications) PROGRAMME NUMERO ET SYMBOLE CHARGE VAISSELLE ET COUVERTS DÉROULEMENT PROGRAMMES DURÉE CONSOMMATION MINUTES (1) EAU LITRES ÉNERGIE KWh (1) 7 RAPIDE + Vaisselle peu sale lavée tout de suite après son utilis...
Page 73 - REMARQUES ET RÉFÉRENCES; Voir feuille jointe; RÉFÉRENCES à l’ÉTIQUETAGE ÉNERGÉTIQUE jointes au lave-vaisselle :; Les informations se rapportent au programme STANDARD
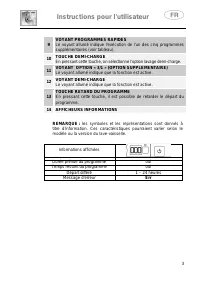
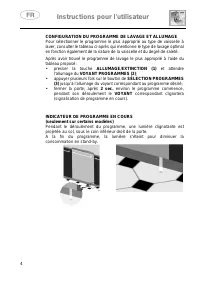
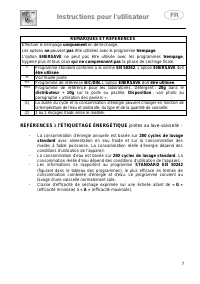
Instructions pour l'utilisateur 7 REMARQUES ET RÉFÉRENCES Effectuer le trempage uniquement en demi-charge. Les options ne peuvent pas être utilisées avec le programme trempage. L’option ENERSAVE ne peut pas être utilisée avec les programmes trempage, hygiene plus et tous ceux qui ne comprennent pas ...
Page 74 - Programmes de lavage
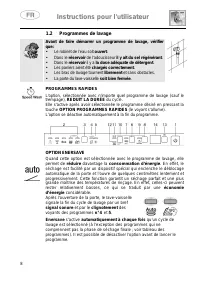
Instructions pour l'utilisateur 8 1.2 Programmes de lavage Avant de faire démarrer un programme de lavage, vérifier que: • Le robinet de l’eau soit ouvert. • Dans le réservoir de l’adoucisseur il y ait du sel régénérant. • Dans le réservoir il y a la dose adéquate de détergent. • Les paniers aient é...
Page 75 - DEMI-CHARGE DISTRIBUÉE; , sera utile et permettra une économie d’eau et d’énergie électrique.
Instructions pour l'utilisateur 9 Si l’option est activée, ne pas bloquer l’ouverture de la porte. Dégager l’espace devant la porte pour permettre l’ouverture. Éviter de refermer la porte pendant l’ouverture automatique, car le mécanisme pourrait s’abîmer. Attendre que les pousseurs soient rentrés a...
Page 76 - DÉPART DIFFÉRÉ; Après 1 minute environ, la machine finit son cycle.; MODIFICATION DU PROGRAMME; POUR ÉCONOMISER
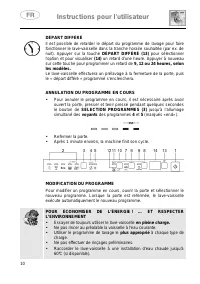
Instructions pour l'utilisateur 10 DÉPART DIFFÉRÉ Il est possible de retarder le départ du programme de lavage pour faire fonctionner le lave-vaisselle dans la tranche horaire souhaitée (par ex. de nuit). Appuyer sur la touche DÉPART DIFFÉRÉ (13) pour sélectionner l’option et pour visualiser (14) un...
Page 77 - de ne pas verser le détergent directement sur la vaisselle.; ARRET
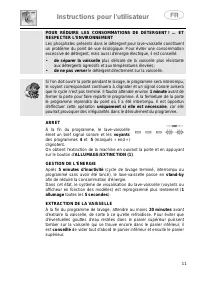
Instructions pour l'utilisateur 11 POUR RÉDUIRE LES CONSOMMATIONS DE DÉTERGENT ! … ET RESPECTER L’ENVIRONNEMENT Les phosphates présents dans le détergent pour lave-vaisselle constituent un problème du point de vue écologique. Pour éviter une consommation excessive de détergent, mais aussi d’énergie ...
Page 78 - Utilisation de l’adoucisseur d’eau
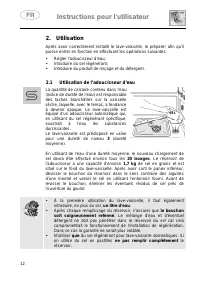
Instructions pour l'utilisateur 12 2. Utilisation Après avoir correctement installé le lave-vaisselle, le préparer afin qu’il puisse entrer en fonction en effectuant les opérations suivantes: • Régler l’adoucisseur d’eau; • Introduire du sel régénérant; • Introduire du produit de rinçage et du déter...
Page 79 - RÉGLAGE DE L’ADOUCISSEUR
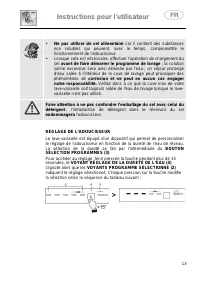
Instructions pour l'utilisateur 13 • Ne pas utiliser de sel alimentaire car il contient des substances non solubles qui peuvent, avec le temps, compromettre le fonctionnement de l'adoucisseur. • Lorsque cela est nécessaire, effectuer l’opération de chargement du sel avant de faire démarrer le progra...
Page 80 - TABLEAU DE LA DURETÉ DE L’EAU; DURETÉ DE L’EAU; Utilisation du distributeur du produit de lavage et
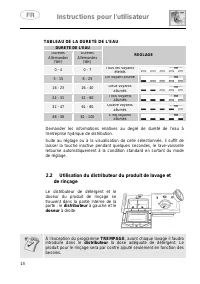
Instructions pour l'utilisateur 14 TABLEAU DE LA DURETÉ DE L’EAU DURETÉ DE L’EAU REGLAGE Duretés Allemandes (°dH) Duretés Allemandes (°dH) 0 - 4 0 - 7 Tous les voyants éteints 5 - 15 8 - 25 Un voyant allumé 16 - 23 26 - 40 Deux voyants allumés 24 - 31 41 - 60 Trois voyants allumés 32 - 47 61 - 80 Qu...
Page 81 - ADDITION DU PRODUIT POUR LE RINÇAGE; Pour ajouter le produit de rinçage:; car il pourrait produire de la mousse.; Remettre le bouchon en le tournant en sens horaire.
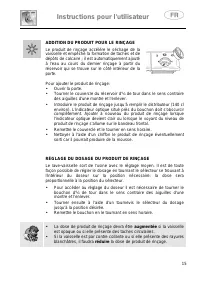
Instructions pour l'utilisateur 15 ADDITION DU PRODUIT POUR LE RINÇAGE Le produit de rinçage accélère le séchage de la vaisselle et empêche la formation de taches et de dépôts de calcaire ; il est automatiquement ajouté à l’eau au cours du dernier rinçage à partir du réservoir qui se trouve sur le c...
Page 82 - CHARGEMENT DU DÉTERGENT; Les détergents avec phosphates agissent plus sur les graisses et
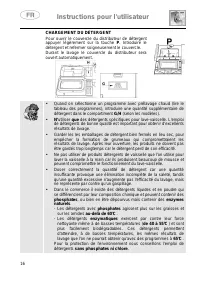
Instructions pour l'utilisateur 16 CHARGEMENT DU DÉTERGENT Pour ouvrir le couvercle du distributeur de détergent appuyer légèrement sur la touche P. Introduire le détergent et refermer soigneusement le couvercle. Durant le lavage le couvercle du distributeur sera ouvert automatiquement. • Quand on s...
Page 83 - Avertissements et conseils généraux; Avant de disposer la vaisselle dans les paniers, il est nécessaire :
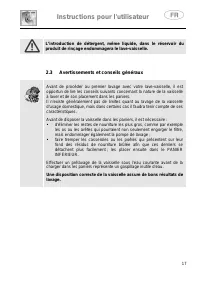
Instructions pour l'utilisateur 17 L’introduction de détergent, même liquide, dans le réservoir du produit de rinçage endommagera le lave-vaisselle. 2.3 Avertissements et conseils généraux Avant de procéder au premier lavage avec votre lave-vaisselle, il est opportun de lire les conseils suivants co...
Page 84 - Argenterie : la vaisselle en argent peut se tacher
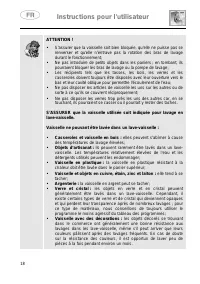
Instructions pour l'utilisateur 18 ATTENTION ! • S’assurer que la vaisselle soit bien bloquée, qu’elle ne puisse pas se renverser et qu’elle n’entrave pas la rotation des bras de lavage durant le fonctionnement; • Ne pas introduire de petits objets dans les paniers ; en tombant, ils pourraient bloqu...
Page 85 - Utilisation des paniers; Avec supports fixes; SUPPORTS PANIER INFÉRIEUR
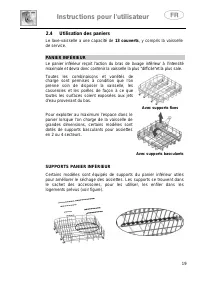
Instructions pour l'utilisateur 19 2.4 Utilisation des paniers Le lave-vaisselle a une capacité de 13 couverts, y compris la vaisselle de service. PANIER INFÉRIEUR Le panier inférieur reçoit l’action du bras de lavage inférieur à l’intensité maximale et devra donc contenir la vaisselle la plus "...
Page 86 - CHARGEMENT DU PANIER INFÉRIEUR
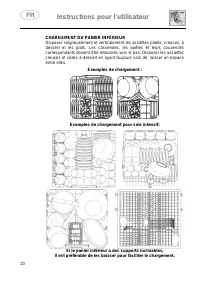
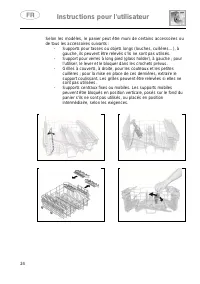
Instructions pour l'utilisateur 20 CHARGEMENT DU PANIER INFÉRIEUR Disposer soigneusement et verticalement les assiettes plates, creuses, à dessert et les plats. Les casseroles, les poêles et leurs couvercles correspondants doivent être retournés vers le bas. Disposer les assiettes creuses et celles ...
Page 87 - PANIER A COUVERTS
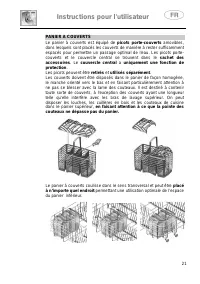
Instructions pour l'utilisateur 21 PANIER A COUVERTS Le panier à couverts est équipé de picots porte-couverts amovibles, dans lesquels sont placés les couverts de manière à rester suffisamment espacés pour permettre un passage optimal de l’eau. Les picots porte-couverts et le couvercle central se tr...
Page 88 - PANIER À COUVERTS SUPÉRIEUR
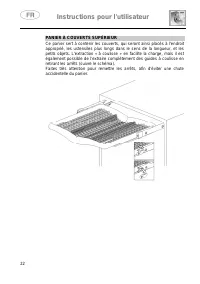
Instructions pour l'utilisateur 22 PANIER À COUVERTS SUPÉRIEUR Ce panier sert à contenir les couverts, qui seront ainsi placés à l'endroit approprié, les ustensiles plus longs dans le sens de la longueur, et les petits objets. L’extraction « à coulisse » en facilite la charge, mais il est également ...
Page 89 - PANIER SUPÉRIEUR
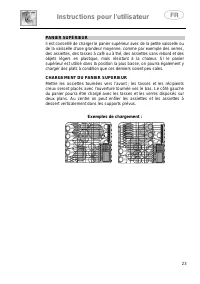
Instructions pour l'utilisateur 23 PANIER SUPÉRIEUR Il est conseillé de charger le panier supérieur avec de la petite vaisselle ou de la vaisselle d’une grandeur moyenne, comme par exemple des verres, des assiettes, des tasses à café ou à thé, des assiettes sans rebord et des objets légers en plasti...
Page 91 - RÉGLAGE DU PANIER SUPÉRIEUR; Extraire les deux rails à glissière du panier ; Repositionner les butées dans la position d’origine
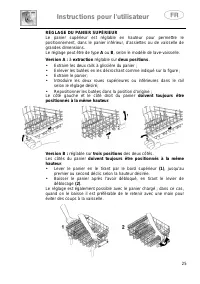
Instructions pour l'utilisateur 25 RÉGLAGE DU PANIER SUPÉRIEUR Le panier supérieur est réglable en hauteur pour permettre le positionnement, dans le panier inférieur, d’assiettes ou de vaisselle de grandes dimensions. Le réglage peut être de type A ou B, selon le modèle de lave-vaisselle. Version A ...
Page 92 - Nettoyage et entretien; du lave-vaisselle devront être
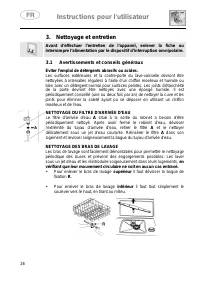
Instructions pour l'utilisateur 26 3. Nettoyage et entretien Avant d’effectuer l’entretien de l’appareil, enlever la fiche ou interrompre l’alimentation par le dispositif d’interruption omnipolaire. 3.1 Avertissements et conseils généraux Éviter l’emploi de détergents abrasifs ou acides. Les surface...
Page 93 - NETTOYAGE DU GROUPE FILTRANT; retirer le filtre central en le soulevant.
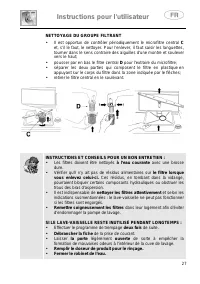
Instructions pour l'utilisateur 27 NETTOYAGE DU GROUPE FILTRANT • Il est opportun de contrôler périodiquement le microfiltre central C et, s’il le faut, le nettoyer. Pour l’enlever, il faut saisir les languettes, tourner dans le sens contraire des aiguilles d'une montre et soulever vers le haut; • p...
Page 94 - Rebrancher la fiche dans la prise de courant.
Instructions pour l'utilisateur 28 AVANT DE RÉUTILISER LE LAVE-VAISSELLE APRÈS UN ARRÊT PROLONGÉ : • Contrôler qu’il n’y ait pas de dépôts de boue ou de rouille à l’intérieur de la tuyauterie ; si tel est le cas, laisser couler l’eau du robinet d’alimentation pendant quelques minutes. • Rebrancher l...
Page 95 - il y ait du produit de rinçage dans le distributeur spécifique
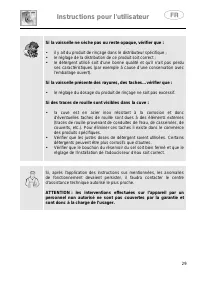
Instructions pour l'utilisateur 29 Si la vaisselle ne sèche pas ou reste opaque, vérifier que : • il y ait du produit de rinçage dans le distributeur spécifique ; • le réglage de la distribution de ce produit soit correct ; • le détergent utilisé soit d’une bonne qualité et qu’il n’ait pas perdu ses...
Page 96 - Guide de dépannage; ANOMALIE; du
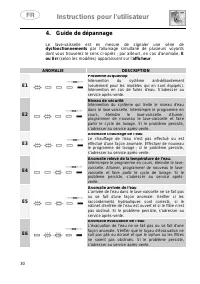
Instructions pour l'utilisateur 30 4. Guide de dépannage Le lave-vaisselle est en mesure de signaler une série de dysfonctionnements par l’allumage simultané de plusieurs voyants dont vous trouverez le sens ci-après ; par ailleurs, en cas d’anomalie, E ou Err (selon les modèles) apparaissent sur l’a...
Page 97 - Voyant éteint
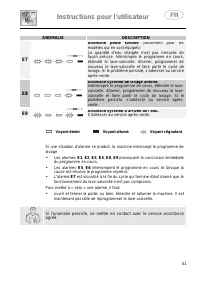
Instructions pour l'utilisateur 31 ANOMALIE DESCRIPTION E7 Anomalie petite turbine (seulement pour les modèles qui en sont équipés) La quantité d’eau chargée n’est pas mesurée de façon précise. Interrompre le programme en cours, éteindre le lave-vaisselle. Allumer, programmer de nouveau le lave-vais...
Page 98 - DONNÉES TECHNIQUES; 3 Couverts standards; Pression eau d’alimentation; Voir plaque des caractéristiques
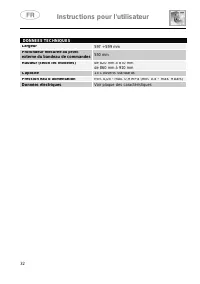
Instructions pour l'utilisateur 32 DONNÉES TECHNIQUES Largeur 597 ÷ 599 mm Profondeur mesurée au profil externe du bandeau de commandes 550 mm Hauteur (selon les modèles) de 820 mm à 870 mm de 860 mm à 910 mm Capacité 13 Couverts standards Pression eau d’alimentation min. 0,05 - max. 0,9 MPa (min. 0...
Page 99 - Inhaltsverzeichnis
Inhaltsverzeichnis 1 1. Beschreibung der Bedieneinrichtungen ______________________ 2 2. Gebrauchsanleitung ____________________________________ 12 3. Reinigung und Pflege ___________________________________ 26 4. Abhilfe bei Fehlfunktionen _______________________________ 30 Wir danken Ihnen, dass S...
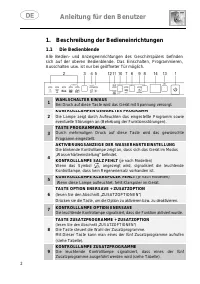
Page 100 - Anleitung für den Benutzer; Beschreibung der Bedieneinrichtungen; Die Bedienblende; , angezeigt wird, signalisiert die leuchtende; Kontrolllampe, dass kein Regeneriersalz vorhanden ist.; KONTROLLLAMPE OPTION ENERSAVE; (lesen Sie den Abschnitt „ZUSATZOPTIONEN“)
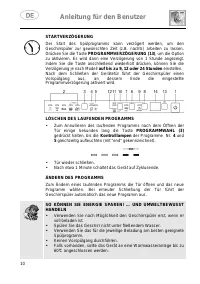
Anleitung für den Benutzer 2 1. Beschreibung der Bedieneinrichtungen 1.1 Die Bedienblende Alle Bedien- und Anzeigeeinrichtungen des Geschirrspülers befinden sich auf der oberen Bedienblende. Das Einschalten, Programmieren, Ausschalten usw. ist nur bei geöffneter Tür möglich. 1 WAHLSCHALTER EIN/AUS B...
Page 101 - KONTROLLAMPE HALBE BELADUNG; Drückt man diese Taste, kann man den Start des Programm um bis zu; Err
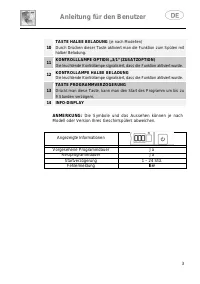
Anleitung für den Benutzer 3 10 TASTE HALBE BELADUNG (je nach Modellen) Durch Drücken dieser Taste aktiviert man die Funktion zum Spülen mit halber Beladung. 11 KONTROLLLAMPE OPTION „3/1“ (ZUSATZOPTION) Die leuchtende Kontrollampe signalisiert, dass die Funktion aktiviert wurde. 12 KONTROLLAMPE HALB...
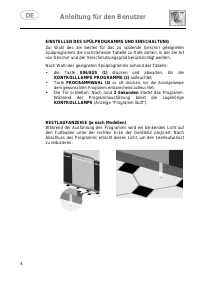
Page 102 - EINSTELLEN DES SPÜLPROGRAMMS UND EINSCHALTUNG
Anleitung für den Benutzer 4 EINSTELLEN DES SPÜLPROGRAMMS UND EINSCHALTUNG Zur Wahl des am besten für das zu spülende Geschirr geeigneten Spülprogramms die nachstehende Tabelle zu Rate ziehen, in der die Art von Geschirr und der Verschmutzungsgrad berücksichtigt werden. Nach Wahl des geeigneten Spül...
Page 104 - ZUSATZPROGRAMME; ÖKO
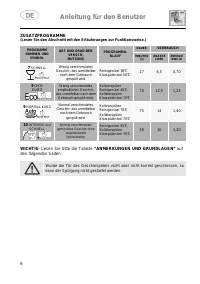
Anleitung für den Benutzer 6 ZUSATZPROGRAMME (Lesen Sie den Abschnitt mit den Erläuterungen zur Funktionsweise.) PROGRAMM NUMMER UND SYMBOL ART UND GRAD DER VERSCH- MUTZUNG PROGRAMMA- BLAUF DAUER VERBRAUCH MINUTEN (1) WASSER LITER ENERGIE KWh (1) 7 SCHNELL + Wenig verschmutztes Geschirr, das unmitte...
Page 105 - ANMERKUNGEN UND GRUNDLAGEN; Siehe das Beiblatt
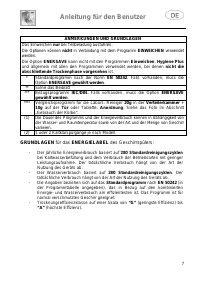
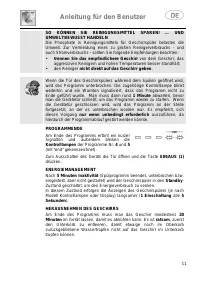
Anleitung für den Benutzer 7 ANMERKUNGEN UND GRUNDLAGEN Das Einweichen nur bei Teilbeladung ausführen. Die Optionen können nicht in Verbindung mit dem Programm EINWEICHEN verwendet werden. Die Option ENERSAVE kann nicht mit den Programmen Einweichen, Hygiene Plus und allgemein mit allen den Programm...
Page 106 - Spülprogramme; der Wasserhahn geöffnet ist; OPTION KURZ PROGRAMM
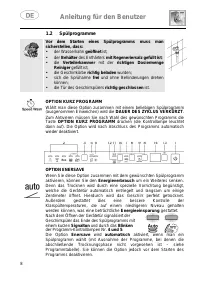
Anleitung für den Benutzer 8 1.2 Spülprogramme Vor dem Starten eines Spülprogramms muss man sicherstellen, dass: • der Wasserhahn geöffnet ist; • der Behälter des Enthärters mit Regeneriersalz gefüllt ist; • die Verteilerkammer mit der richtigen Dosiermenge Reiniger gefüllt ist; • die Geschirrkörbe ...
Page 108 - STARTVERZÖGERUNG; Spülen Sie das Geschirr nicht unter fließendem Wasser.
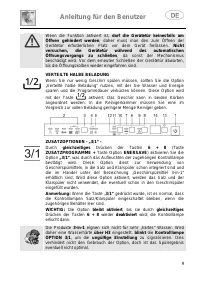
Anleitung für den Benutzer 10 STARTVERZÖGERUNG Der Start des Spülprogramms kann verzögert werden, um den Geschirrspüler zur gewünschten Zeit (z.B. nachts) arbeiten zu lassen. Drücken Sie die Taste PROGRAMMVERZÖGERUNG (13), um die Option zu aktivieren. Es wird dann eine Verzögerung von 1 Stunde angez...
Page 109 - den Reiniger nicht direkt auf das Geschirr geben.; PROGRAMMENDE; und; ENERGIEMANAGEMENT
Anleitung für den Benutzer 11 SO KÖNNEN SIE REINIGUNGSMITTEL SPAREN! … UND UMWELTBEWUSST HANDELN Die Phosphate in Reinigungsmitteln für Geschirrspüler belasten die Umwelt. Zur Vermeidung eines zu großen Reinigerverbrauchs - und auch Stromverbrauchs - sollten Sie folgende Empfehlungen beachten: • tre...
Page 110 - Gebrauchsanleitung; Gebrauch des Wasserenthärters; Ausschließlich
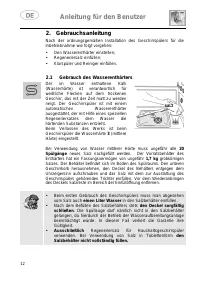
Anleitung für den Benutzer 12 2. Gebrauchsanleitung Nach der ordnungsgemäßen Installation des Geschirrspülers für die Inbetriebnahme wie folgt vorgehen: • Den Wasserenthärter einstellen; • Regeneriersalz einfüllen; • Klarspüler und Reiniger einfüllen. 2.1 Gebrauch des Wasserenthärters Der im Wasser ...
Page 111 - EINSTELLUNG DES ENTHÄRTERS
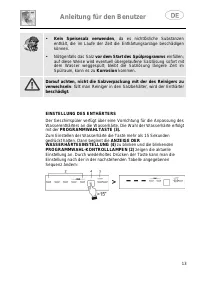
Anleitung für den Benutzer 13 • Kein Speisesalz verwenden, da es nichtlösliche Substanzen enthält, die im Laufe der Zeit die Enthärtungsanlage beschädigen können. • Nötigenfalls das Salz vor dem Start des Spülprogramms einfüllen; auf diese Weise wird eventuell übergelaufene Salzlösung sofort mit dem...
Page 112 - WASSERHÄRTE; Gebrauch
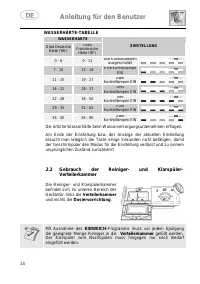
Anleitung für den Benutzer 14 WASSERHÄRTE-TABELLE WASSERHÄRTE EINSTELLUNG Grad Deutsche Härte (°dH) Grad Französische Härte (°dF) 0 - 6 0 - 11 Alle Kontrolllampen ausgeschaltet 7 - 10 12 - 18 Eine Kontrolllampe EIN 11 - 15 19 - 27 Zwei Kontrolllampen EIN 16 - 21 28 - 37 Drei Kontrolllampen EIN 22 - ...
Page 113 - EINFÜLLEN DES KLARSPÜLERS FÜR DAS NACHSPÜLEN; Zum Hinzufügen des Klarspülers:; EINSTELLUNG DER DOSIERMENGE DES KLARSPÜLERS; Den Deckel wieder aufsetzen und im Uhrzeigersinn drehen.
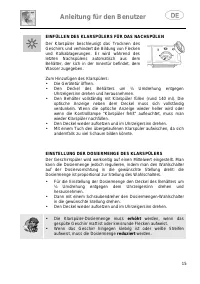
Anleitung für den Benutzer 15 EINFÜLLEN DES KLARSPÜLERS FÜR DAS NACHSPÜLEN Der Klarspüler beschleunigt das Trocknen des Geschirrs und verhindert die Bildung von Flecken und Kalkablagerungen. Er wird während des letzten Nachspülens automatisch aus dem Behälter, der sich in der Innentür befindet, dem ...
Page 114 - EINFÜLLEN DES REINIGERS; über 60°C ihre Wirkung gegen Fette und Stärke.
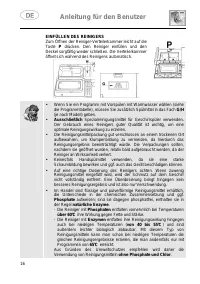
Anleitung für den Benutzer 16 EINFÜLLEN DES REINIGERS Zum Öffnen der Reiniger-Verteilerkammer leicht auf die Taste P drücken. Den Reiniger einfüllen und den Deckel sorgfältig wieder schließen. Die Verteilerkammer öffnet sich während des Reinigens automatisch. • Wenn Sie ein Programm mit Vorspülen mi...
Page 115 - Sicherheitshinweise und allgemeine Ratschläge; Bevor man das Geschirr in den Körben anordnet, muss man:
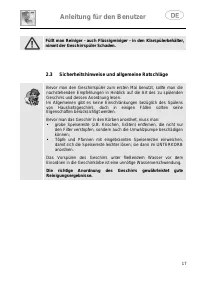
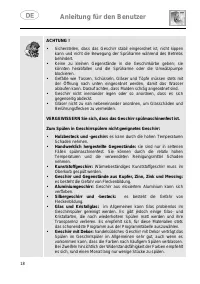
Anleitung für den Benutzer 17 Füllt man Reiniger - auch Flüssigreiniger - in den Klarspülerbehälter, nimmt der Geschirrspüler Schaden. 2.3 Sicherheitshinweise und allgemeine Ratschläge Bevor man den Geschirrspüler zum ersten Mal benutzt, sollte man die nachstehenden Empfehlungen in Hinblick auf die ...
Page 117 - Gebrauch der Geschirrkörbe; Mit festen Halterungen; EINSÄTZE FÜR DEN UNTERKORB
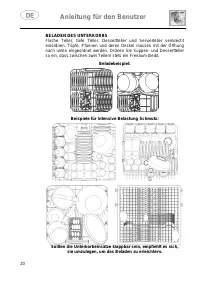
Anleitung für den Benutzer 19 2.4 Gebrauch der Geschirrkörbe Der Geschirrspüler hat ein Fassungsvermögen von 13 Maßgedecken einschließlich des Serviergeschirrs. UNTERKORB Der Unterkorb ist aufgrund der besonders intensiven Reinigungswirkung des unteren Sprüharms für das "schwierigste" und am...
Page 118 - BELADEN DES UNTERKORBS
Anleitung für den Benutzer 20 BELADEN DES UNTERKORBS Flache Teller, tiefe Teller, Dessertteller und Servierteller senkrecht einordnen. Töpfe, Pfannen und deren Deckel müssen mit der Öffnung nach unten eingeordnet werden. Ordnen Sie Suppen- und Dessertteller so ein, dass zwischen zwei Tellern stets e...
Page 119 - BESTECKKORB
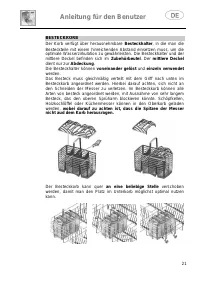
Anleitung für den Benutzer 21 BESTECKKORB Der Korb verfügt über herausnehmbare Besteckhalter, in die man die Besteckteile mit einem hinreichenden Abstand einsetzen muss, um die optimale Wasserzirkulation zu gewährleisten. Die Besteckhalter und der mittlere Deckel befinden sich im Zubehörbeutel. Der ...
Page 120 - OBERER BESTECKKORB
Anleitung für den Benutzer 22 OBERER BESTECKKORB Das normale Besteck muss in den hierfür vorgesehenen Aufnahmen angeordnet werden und langes Kochbesteck in Längsrichtung. Da der Besteckkorb wie eine Schublade herausgezogen werden kann, lässt er sich bequem beladen. Allerdings kann man ihn auch aus d...
Page 121 - OBERKORB
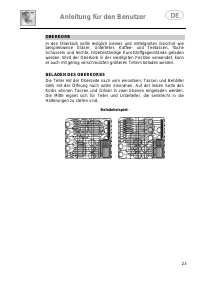
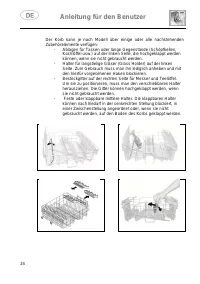
Anleitung für den Benutzer 23 OBERKORB In den Oberkorb sollte lediglich kleines und mittelgroßes Geschirr wie beispielsweise Gläser, Unterteller, Kaffee- und Teetassen, flache Schüsseln und leichte, hitzebeständige Kunststoffgegenstände geladen werden. Wird der Oberkorb in der niedrigsten Position v...
Page 123 - EINSTELLEN DES OBERKORBS
Anleitung für den Benutzer 25 EINSTELLEN DES OBERKORBS Die Höhe des Oberkorbs kann verstellt werden, damit man im Unterkorb große Teller und großes Geschirr unterbringen kann. Der Verstellmechanismus entspricht je nach Geschirrspülermodell dem A oder B. Version A: In zwei Positionen ausziehbar. • Zi...
Page 124 - Reinigung und Pflege
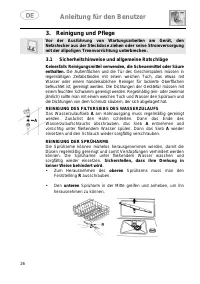
Anleitung für den Benutzer 26 3. Reinigung und Pflege Vor der Ausführung von Wartungsarbeiten am Gerät, den Netzstecker aus der Steckdose ziehen oder seine Stromversorgung mit der allpoligen Trennvorrichtung unterbrechen. 3.1 Sicherheitshinweise und allgemeine Ratschläge Keinesfalls Reinigungsmittel...
Page 125 - REINIGUNG DER FILTERGRUPPE; Den mittleren Filter zum Herausnehmen anheben.
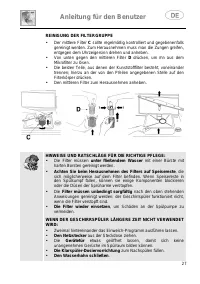
Anleitung für den Benutzer 27 REINIGUNG DER FILTERGRUPPE • Der mittlere Filter C sollte regelmäßig kontrolliert und gegebenenfalls gereinigt werden. Zum Herausnehmen muss man die Zungen greifen, entgegen dem Uhrzeigersinn drehen und anheben. • Von unten gegen den mittleren Filter D drücken, um ihn a...
Page 126 - Den Netzstecker wieder in die Steckdose stecken.
Anleitung für den Benutzer 28 VOR DER ERNEUTEN VERWENDUNG DES GESCHIRRSPÜLERS NACH EINER LÄNGEREN NICHTVERWENDUNG: • Sicherstellen, dass sich in der Wasserleitung weder Schlamm noch Rost abgelagert haben; hierzu das Wasser aus dem Zufuhrhahn einige Minuten lang fließen lassen. • Den Netzstecker wied...
Page 128 - Abhilfe bei Fehlfunktionen; FEHLFUNKTION; den
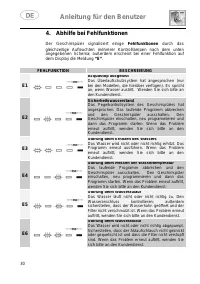
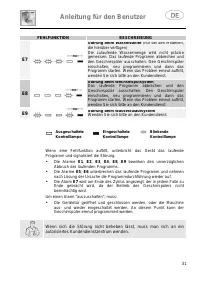
Anleitung für den Benutzer 30 4. Abhilfe bei Fehlfunktionen Der Geschirrspüler signalisiert einige Fehlfunktionen durch das gleichzeitige Aufleuchten mehrerer Kontrolllampen nach dem unten angegebenen Schema; außerdem erscheint bei einer Fehlfunktion auf dem Display die Meldung “E”. FEHLFUNKTION BES...
Page 130 - TECHNISCHE DATEN; 3 Maßgedecke; Zulaufwasserdruck; Siehe Typenschild
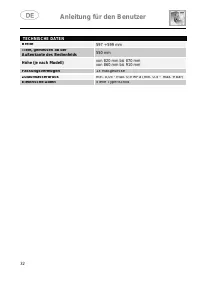
Anleitung für den Benutzer 32 TECHNISCHE DATEN Breite 597 ÷ 599 mm Tiefe, gemessen ab der Außenkante des Bedienfelds 550 mm Höhe (je nach Modell) von 820 mm bis 870 mm von 860 mm bis 910 mm Fassungsvermögen 13 Maßgedecke Zulaufwasserdruck min. 0,05 - max. 0,9 MPa (min. 0.5 – max. 9 bar) Elektrische ...
Page 132 - FULGOR MILANO
FULGOR MILANO ® Meneghetti S.p.a. Via Borgo Lunardon, 8 36027 Rosà (Vicenza) - Italy • http://www.fulgor-milano.com e-mail: [email protected] • 192902035 00