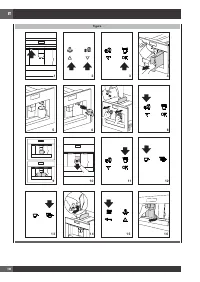
Page 5 - Avvertenze fondamentali per la sicurezza; SOLO PER MERCATI EUROPEI:
IT 3 2 - Sicurezza Avvertenze fondamentali per la sicurezza L’apparecchio non può essere utilizzato da persone (incluso i bambini) con ridotte capacità fisiche, sensoriali o mentali o con mancanza di esperienza e di conoscenza, a meno che non siano sorvegliati o istruiti all’utilizzo in sicurezza de...
Page 7 - 935/2004 riguardante i materiali e gli oggetti destinati a; Smaltimento; Non smaltire l’apparecchio insieme ai rifiuti domestici ma
IT 5 Pulizia e manutenzione dei materiali a contatto con alimenti • Al primo utilizzo, oppure dopo 3 o 4 giorni di inutilizzo, ri sciacquare con acqua calda tutti gli accessori rimovibili che sono destinati al contatto con acqua o latte. • Dopo 3 o 4 giorni di inutilizzo si consiglia di procedere al...
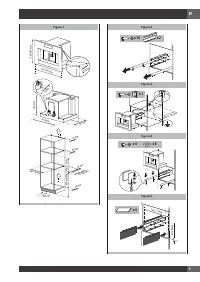
Page 8 - - Installazione ad Incasso
IT 6 3 - Installazione ad Incasso Verificare le misure minime necessarie per la corretta installazione dell’elettrodomestico. La macchina da caffè deve essere installata in una colonna e tale colonna deve essere saldamente fissata alla parete con staffe commerciali. ATTENZIONE! • Importante: qualsia...
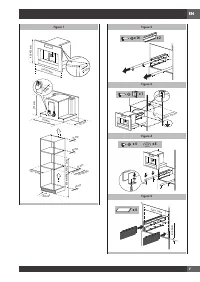
Page 9 - x 8
IT 7 Figura 1 m m 5 54- 05 4 594-597 mm 19-22 m 361 mm 528 mm 372 mm 30 mm 45 mm 45 mm 45 mm 45 mm 450 + 2 mm ni M m m 0 58 500 mm 545 mm Min. 200 cm2 560 + 8 mm h 378 mm m m8 73 594 mm 21 mm 412 mm 45 mm 45 mm 45 mm 45 mm 374 + 2 mm ni M m m 0 58 500 mm 545 mm Min. 200 cm2 560 + 8 mm h 375 mm m m5 ...
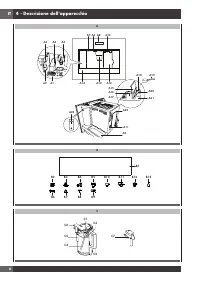
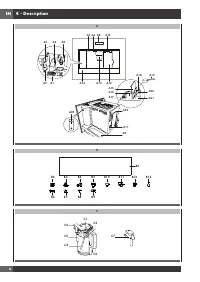
Page 10 - - Descrizione dell’apparecchio
IT 8 4 - Descrizione dell’apparecchio A C7 C6 C1 C3 C2 C5 C4 A18 A20 A17 A16 A15 A19 A21 A22 A23 A1 A2 A3 A4 A5 A12 A13 A14 A8 A10 A7 A6 A11 B1 B2 B3 B4 B5 B6 B7 B8 B9 B10 B11 B12 B13 A9 B C7 C6 C1 C3 C2 C5 C4 A18 A20 A17 A16 A15 A19 A21 A22 A23 A1 A2 A3 A4 A5 A12 A13 A14 A8 A10 A7 A6 A11 B1 B2 B3 B...
Page 14 - - Prima messa in funzione dell’apparecchio
IT 12 5 - Prima messa in funzione dell’apparecchio • La macchina è stata controllata in fabbrica utilizzando del caffè per cui è del tutto normale trovare qualche traccia di caffè nel macinino. • Personalizzare al più presto la durezza dell’acqua seguendo la procedura “Programmazione della durezza a...
Page 15 - - Accensione e preriscaldamento
IT 13 6 - Accensione e preriscaldamento Ogni volta che si accende l’apparecchio, viene eseguito automaticamente un ciclo di preriscaldamento e di risciacquo che non può essere interrotto. L’apparecchio è pronto all’uso solo dopo l’esecuzione di questo ciclo. PERICOLO SCOTTATURE! Durante il risciacqu...
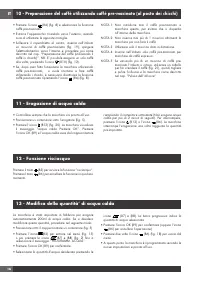
Page 16 - - Preparazione del caffè (utilizzando il caffè in chicchi)
IT 14 7 - Preparazione del caffè (utilizzando il caffè in chicchi) 1 La macchina è impostata in fabbrica per erogare caffè con gusto normale. È possibile richiedere caffè con gusto extra-leggero, leggero, forte, oppure extra-forte, con opzione del caffè premacinato. Per scegliere il gusto desiderato...
Page 19 - 4 - Preparazione del cappuccino
IT 17 14 - Preparazione del cappuccino NOTA BENE: La quantità di caffè che si desidera utilizzare per preparare il cappuccino, va impostata nella funzione del menù “Programm. cappuccino”. • Selezionare il gusto del caffè che si desidera utilizzare per preparare il cappuccino, premendo l’icona (B4). ...
Page 20 - 5 - Modifica della quantità’ di latte e di caffè’ per il cappuccino; Modificare la quantità di latte
IT 18 15 - Modifica della quantità’ di latte e di caffè’ per il cappuccino La macchina è stata pre-impostata in fabbrica per erogare automaticamente un cappuccino standard. Se si desidera modificare queste quantità, procedere nel seguente modo: Modificare la quantità di latte • Riempire il contenito...
Page 22 - Pulizia dell’infusore; Pulizia del contenitore latte
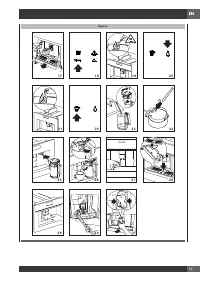
IT 20 Pulizia dell’infusore L’infusore dev’essere pulito almeno una volta al mese. ATTENZIONE! L’infusore (A5) non può essere estratto quando la macchina è accesa. Non tentare di togliere l’infusore con forza. 1. Assicurarsi che la macchina abbia eseguito correttamente lo spegnimento (vedi “Spegnime...
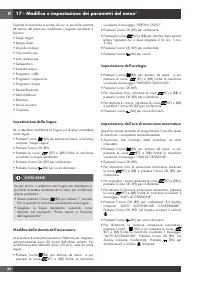
Page 24 - 7 - Modifica e impostazione dei parametri del menu’; Impostazione della lingua
IT 22 17 - Modifica e impostazione dei parametri del menu’ Quando la macchina è pronta all’uso, è possibile operare all’interno del menù per modificare i seguenti parametri o funzioni:• Scegli lingua• Spegni dopo• Imposta orologio• Ora accensione• Auto accensione• Temperatura• Durezza acqua• Program...
Page 27 - 8 - Spegnimento dell’apparecchio; PERICOLO SCOTTATURE!
IT 25 18 - Spegnimento dell’apparecchio 19 - Dati tecnici Ogni volta che si spegne l’apparecchio, viene eseguito un risciacquo automatico, che non può essere interrotto. PERICOLO SCOTTATURE! Durante il risciacquo, dai beccucci dell’erogatore del caffè fuoriesce un po’ di acqua calda. Prestare attenz...
Page 28 - 0 - Messaggi visualizzati sul display
IT 26 20 - Messaggi visualizzati sul display MESSAGGIO VISUALIZZATO POSSIBILE CAUSA RIMEDIO RIEMPIRE IL SERBATOIO Il serbatoio dell’acqua è vuoto oppure è male inserito. Riempire il serbatoio dell’acqua e/o inserirlo correttamente, premendolo a fondo. MACINATO TROPPO FINE REGOLARE MACININO E (altern...
Page 29 - 1 - Risoluzione dei problemi
IT 27 21 - Risoluzione dei problemi In basso sono elencati alcuni possibili malfunzionamenti. Se il problema non può essere risolto nel modo descritto, si deve contattare l’Assistenza Tecnica. PROBLEMA POSSIBILE CAUSA RIMEDIO Il caffè non è caldo. Le tazze non sono state pre-riscaldate. L’infusore s...
Page 33 - Fundamental safety warnings; FOR EUROPEAN MARKETS ONLY:; Keep all packaging (plastic bags, polystyrene
EN 3 2 - Safety Fundamental safety warnings The appliance is not intended for use by persons (including children) with reduced physical, sensory or mental capabilities, or lack of experience and knowledge, unless they have been given supervision or instruction concerning use of the appliance by a pe...
Page 34 - CHOKING HAZARD; The appliance might contain small parts.; The appliance has a cooling fan.; Cleaning and maintenance of materials in contact
EN 4 CHOKING HAZARD The appliance might contain small parts. Some of those small parts might be required to get disassembled during cleaning and maintenance operations. Handle with care and keep small parts out of reach of children. DANGER OF BURNS! This appliance produces hot water and steam may fo...
Page 42 - - Using the appliance for the first time
EN 12 5 - Using the appliance for the first time • Coffee has been used to factory test the appliance and it is therefore completely normal for there to be traces of coffee in the mill. • Customise water hardness as soon as possible following the instructions in the “Setting water hardness” section....
Page 43 - - Turning on and heating up
EN 13 6 - Turning on and heating up Each time the appliance is turned on, it performs an automatic preheat and rinse cycle which cannot be interrupted. The appliance is ready for use only after completion of this cycle. DANGER OF BURNS! During rinsing, a little hot water flows from the coffee spouts...
Page 44 - - Making coffee using coffee beans
EN 14 7 - Making coffee using coffee beans 1 The appliance is preset to make coffee with a normal taste. You can also choose coffee with an extra-mild, mild, strong or extra-strong taste. There is also a pre- ground coffee option. To choose the required taste, press the icon (B4) (fig. 8) a number o...
Page 47 - 4 - Making cappuccino
EN 17 14 - Making cappuccino N.B.: Set the quantity of coffee you want to use to make the cappuccino in the “Program cappuccino” function in the menu. • Select the taste of the coffee you want to use to make the cappuccino by pressing the icon (B4). • Remove the lid of the milk container.• Fill the ...
Page 48 - 5 - Changing the quantity of coffee and milk for cappuccino; Changing the quantity of milk
EN 18 15 - Changing the quantity of coffee and milk for cappuccino The appliance is set by default to automatically deliver a normal cappuccino. To change these quantities, proceed as follows: Changing the quantity of milk • Fill the container with milk up to the maximum level indicated on the conta...
Page 50 - Cleaning the brewing unit; Cleaning the milk container
EN 20 Cleaning the brewing unit The brewing unit must be cleaned at least once a month. IMPORTANT! The brewing unit (A5) must not be removed when the appliance is on. Do not use force to remove the brewing unit. 1. Make sure the machine is correctly turned off (see “Turning the appliance off”). 2. O...
Page 52 - 7 - Changing and setting menu parameters
EN 22 17 - Changing and setting menu parameters When the appliance is ready, you can use the internal menu to modify the following parameters and functions:• Choose language• Shut-Off Time• Set clock• Start time• Auto-start • Temperature• Water hardness• Program coffee• Program cappuccino• Program h...
Page 56 - 0 - Displayed Messages
EN 26 20 - Displayed Messages DISPLAYED MESSAGE POSSIBLE CAUSE REMEDY FILL TANK! The water tank is empty or positioned incorrectly. Fill the tank with water and/or insert it correctly, pushing it as far as it will go. GROUND TOO FINE ADJUST MILL AND alternating with PRESS OK The grinding is too fine...
Page 57 - 1 - Turning the appliance off
EN 27 21 - Turning the appliance off Below is a list of some of the possible malfunctions. If the problem cannot be resolved as described, contact Customer Services. PROBLEM POSSIBLE CAUSE REMEDY The coffee is not hot The cups were not preheated. The brewing unit has cooled down because 2/3 minutes ...