Page 2 - Contents; IMPORTANT NOTE; FOTILE YouTube; FOTILE America LLC; US WeChat Service
- 21 - Thank you! Dear User, thank you for purchasing the Fotile Range Hood. At Fotile, we manufacture exquisite appliances that are expertly crafted with the finest materials. Before using the Fotile Range Hood, please take some time to read through this Product Manual (manual). It will familiarize...
Page 3 - SAFETY INFORMATION
- 22 - - 23 - will prevail, and installation personnel must conform to these requirements. • The operating temperature of the range hood should not exceed 104 ℉ (40 ℃ ). • Please do not place anything on top of the product. Anything placed on top may fall off or incline. For example, if you place se...
Page 4 - OPERATION; Warning; Product Information
- 24 - - 25 - where it started. • The fire department is being called.• You can fight the fire with your back to an exit Risk of Injury• This appliance is not intended for use by persons (including children) with reduced physical, sensory or mental capabilities, or lack of experience and knowledge, ...
Page 5 - CLEANING AND MAINTENANCE; Operation
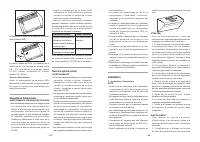
- 26 - - 27 - Important Note: Reattach the grease filter after cleaning and maintenance of the range hood. Do not operate the appliance without the grease filter, as it may cause safety hazards. Caution: Risk of demager due to corrosion.• Always switch on the appliance while cooking t o a v o i d c ...
Page 6 - Replacing LED Lights:; Risk of Electric Shock:; FAQ; Possible Cause; SERVICE INFORMATION; Preparations before Cleaning:
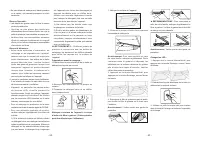
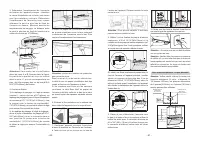
- 28 - - 29 - Replacing LED Lights: 1.Lightly press the POWER button; then, press the LIGHTING button. After the LIGHTING button is pressed, the smoke baffle plate will open. 2. Unplug the range hood or turn off the power socket. 3. Use a small flat-head screwdriver to gently pry the LED assembly ou...
Page 7 - Product Dimensions; INSTALLATION
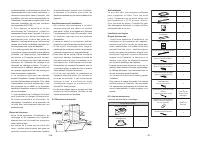
- 30 - - 31 - Warning: • In order to reduce the risk of fire, electric shock, or injury to persons, please carefully read the following: 1. The installation and wiring of the appliance should only be carried out by a professional electrician in accordance with current national or local electric safe...
Page 8 - Ductwork Installation; • The range hood may have sharp edges. Be
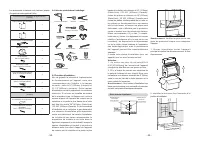
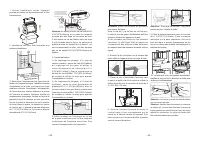
- 32 - - 33 - 6.4 Installation Tools: 6.5 Installation Procedure: In order to secure the safe use of the range hood and maximize its ability to ventilate cooking fumes, the installation height is suggested as follows: The distance from the countertop of the gas stove to the top board of the range ho...
Page 9 - Installation of the Fotile Range Hood with
- 34 - - 35 - down on the bottom of the upper cabinet, and then drill the holes as indicated on the hole-drilling template. Caution: Wear safety goggles when drilling. In case of batten at the wall facing the bottom plate, the rear wall side of the paper template shall be cut as per the thickness of...
Page 10 - Please confirm the height of the top; Please wear the qualified protective
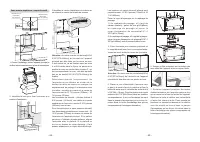
- 36 - - 37 - The upper edge (the fixed surface between the decorative sheet and the board of the top cabinet) of the bottom board of the top cabinet shall be deemed as the location datum. 5 11/16" (143.6mm) or 7 11/16" (194.4mm) Caution: One of the wood screws(#10×2 9/16"(ST5×65mm)) for...
Page 11 - o n e o f t h e w o o d s c r e w s ( # 1 0 × 2
- 38 - - 39 - Installation Instructions for the Decorative Cover Without Upper Cabinet Diameter of smoke tube Φ 6" (152.5mm) Diameter of hole digging Φ 6 1/2" (165mm) 1. Unpack the appliance and check the List of Accessories. 2. Locate the wooden beam and mark the location with a pencil. Fra...
Page 13 - Explosive View
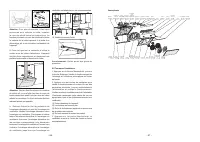
- 42 - - 43 - Explosive View Box Exhaust Outlet Hood Upper Gasket Lid of Electrical Box Power Panel Assembly Switch Box Control Panel Power Cable Gasket Ring Upper Glass Grease Filter Glass for Smoke D ecorative Plate Push Rod Bracket Electric Grease Cup Volute Grease Guide Board Motor Tightfisted n...
Page 14 - Sommaire; FOTILE Magasin phare à Toronto; Compte officiel
- 45 - Merci ! Cher utilisateur, merci d’avoir choisi ce produit FOTILE créé spécialement pour vous. Pour vous familiariser avec toutes les indications concernant la sécurité, le fonctionnement et l’entretien de la hotte, veuillez lire attentivement la présente la présente « Notice d’utilisation et ...
Page 15 - Danger d’électrocution; Consignes de sécurité
- 46 - - 47 - ATTENTION: • L o r s q u e l e s r é g l e m e n t a t i o n s l o c a l e s a p p l i c a b l e s c o m p r e n n e n t l e s e x i g e n c e s d ’ i n s t a l l a t i o n s e t / o u d e c e r t i f i c a t i o n p l u s restrictives, lesdites exigences prévalent sur celles de ce doc...
Page 17 - Risque d’électrocution :; Nettoyage et entretient; AVERTISSEMENTS; Informations du produit
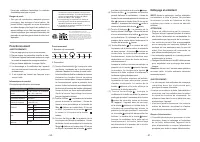
- 50 - - 51 - le moteur et la lumière de la touche baisse. (4) Touche de Min. : La pression de la touche permet d’allumer le ventiallateur : l’écran de fumée s’ouvre automatiquement et la touche de Min. s’allume en lumière forte. Si l’on est en vitessse 1, la pression de la touche arrête le moteur e...
Page 18 - Préparations avant le nettoyage :; Risque de blessures :
- 52 - - 53 - ★ RECOMMANDATIONS : Pour votre santé et celle de votre famille, nettoyez régulièrement le filtre à graisse. Le filtre à graisse peut être plié et nettoyé au lave-vaisselle. Avertissement: Veillez porter des gants de protection. Changer les LED : 1. Appuyez sur la touche Marche/Arrêt, p...
Page 19 - Questions fréquentes; AVERTISSEMENTS : RISQUE D’ELECTROCUTION; Installation; Dysfonctionnement; AVERTISSEMENT
- 54 - - 55 - Questions fréquentes AVERTISSEMENTS : RISQUE D’ELECTROCUTION • Des réparations inexpertes sont dangereuses. Les réparations et le remplacement des câbles d’alimentation endommagés sont exclusivement réservés à nos centres de services agréés ou aux électriciens qualifiés. S i l ' a p p ...
Page 21 - Liste des produits dans l’emballage :; Une hauteur d'installation trop; Avec armoire supérieure :; Veuillez toujours porter des
- 58 - - 59 - 6.4 Liste des produits dans l’emballage : Marteau Crayon Tasseau Niveau à bulle 1 Détecteur de bois Ciseaux Tournevis cruciforme Équerre à dessine Perceuse Lunettes de protection Cisailles Mètre Gants Ruban adhésif Scie Tournevis électriquev 6.5 Procédure d’installation : Afin de garan...
Page 24 - Sans armoire supérieure + capot décoratif
- 64 - - 65 - Les hauteurs du capot décoratif allongé sont respectivement : 27 9/16 pouces (700mm) et 35 7/16 (900mm).Poser le tuyau d’expansion sur le repérage de perçage:1 ) A u r e p é r a g e d e p e r ç a g e , s ’ i l s ’ a g i t d e carreau (marbre) : percer de trou φ3/8"(φ8mm) a u r e p ...
Page 25 - Vue explosée; ventilateur soit attachée aux vis correspondantes.; Test après l’installation; Pour plus de sécurité, il faut deux
- 66 - - 67 - Vue explosée Machine principale couvercle dí orifice dí Èchappement joint dí ÈtanchÈitÈ supÈrieur couvercle du boÓtier Èlectrique ensemble de la plaque dí alimentation Èlectrique plaque de pression boÓte de commutation panneau de contrÙle lignes Èlectrique joints verre supÈrieur filtre...
Page 27 - 感谢您; 目 录; 重要提示——; 产 品 特 征 和 参 数 会 在 无 通 知 情 况 下 随 时 更 改, 并 且; 方太美国分公司; 美国微信客服
- 1 - 感谢您 ! 尊 敬 的 用 户, 您 好! 感 谢 您 选 购 方 太 公 司 为您精心制造的方太系列产品。使用前请通读本 《使用安装说明书》(以下简称说明书),此说 明书将有利于您熟悉油烟机安全信息、操作和保 养维修等,并让您享受到全新的下厨乐趣。 请您在使用前务必认真阅读说明书,并遵从 说明书要求进行使用。本说明书的操作说明对于 维持产品的良好工作状况十分重要,若因使用不 当造成产品故障,您将丧失免费保修的权利,任 何直接或间接的免费保修申请将不被本公司各地 授权的服务中心所接受。同时我们建议您在质量 保证期内及保证期后,如有需要维修时请与方太 公司当地授权的服务中心联系,这对...
Page 28 - 安全信息; 重要提示:
- 2 - - 3 - 安全信息 为避免任何对油烟机的意外风险和损害,请在开 始安装和使用前仔细阅读此产品说明书。只有这 样您才能安全正确地操作此产品,降低火灾、电 击或者人身伤害等风险。请保留此产品说明书, 以供今后使用或后续用户使用。 重要提示: 本产品仅用于家庭室内使用,不可用于室外。 仅按照制造商的方式使用本产品,若您在室外 或特殊场合使用本产品,方太将不承担任何责 任。如果您有任何问题,请联系方太授权的服 务中心。 使 用 此 新 产 品 之 前 请 开 封 检 查 此 产 品 是 否 受 损,如果发现此产品有明显的损坏,请勿安装 使用,请您立即联系方太授权的服务中心。 请保持此油烟...
Page 29 - 清洁保养; 电击危险:; 操作
- 4 - - 5 - 清洁保养 重要提示: 清洁完油网后,请将油网重新安装归 位。请勿在没有油网的情况下操作油烟机,可能会有安全隐患。 注意: 腐蚀造成损坏危险。 烹饪时请总是打开油烟机,以防冷凝。冷凝可 造成腐蚀损坏。 清洁不当会造成表面损坏,请仅沿不锈钢表面 纹路进行清洁,请不要使用任何不锈钢清洁剂清洁控制装置。 强效或磨砂清洁剂会造成表面损坏。 请更换故障 LED 灯,以免其余灯过载。 警告: 如果不按此说明书规定的方法清洗,油烟机有 起火的危险。 清洁时应防止电机、各控制键等电气部件进水。 水气进入电路会造成损坏危险。 切勿使用汽油、酸性物质、苯、溶剂或任何其 他化学药剂清洗油烟机。...
Page 30 - 常见问题解答; 清洗前准备:; 更换 LED 灯步骤:; 售后服务
- 6 - - 7 - 常见问题解答 警告:电击危险 不正确维修很危险。仅由方太授权的服务中心或 有资质的电工才可维修和更换受损电源线。如果 产品有缺陷,请拨下电源插头或者切断油烟机插 座电源,以免触电。请联系方太授权的服务中心。 在更换 LED 灯前,请先拨下电源插头或者切断油烟机插座电源,以免触电。 如果您在使用中发现异常状况,请停止使用,请 拨下电源插头或者切断油烟机插座电源,检查以 下内容: 故障现象 可能原因 按开关,油烟机不工作,灯不亮 未接通电源 电机转动但灯不亮 LED 灯损坏 当上述故障排除后,油烟机仍不能正常工作,请与 方太授权的服务中心联系维修。 2. 不要让污渍在油烟机...
Page 31 - 安装烟管; 三、零配件一览表; 装箱单; 警告:; 人身伤害危险; 二、产品尺寸; 墙面安装
- 8 - - 9 - 安装烟管 人身伤害危险:在油烟机进行安装、清洁或者 修理前,务必切断电源,以免触电。油烟机可 能有非常锋利的边,在进行安装、清洁或修理 时,应佩戴合格的防护手套,以防被油烟机内 金属板快口等划伤和擦伤。 当在墙上或天花板上开凿或钻孔时,请注意不 要损坏电线以及其他隐藏的产品。 安装管道的烟机必须总是外排。 为了避免火灾的发生,请将废气排到室外。请 不要将废气排到墙面或天花板内空间, 或者阁楼、 窄小空间或车库中。 三、零配件一览表 装箱单 标准配置 主机 1 台 出风罩 1 个 密封垫 1 个 油杯 1 个 使用说明书 1 本 开孔尺寸纸 1 张 保修卡 1 张 主机挂...
Page 35 - 爆炸图; 六、安装后调试:
- 16 - - 17 - 6. 把整机两侧不锈钢表面和油杯保护膜撕掉。 7. 抬起主机将背部上端的挂钩孔挂上挂钩,将油 烟机挂稳并用水平尺确保水平,再把安全挡块固 定在油烟机上方(安全挡块在装饰罩组件包装箱 中的附件包内)。 注意: 为了安全你需要两个人来安装这个油烟机。 请按要求安装安全挡块。安全挡块主要作用为,防止油烟机被意外上抬导致脱出挂钩,造成掉落 风险。 8. 把烟管固定在出风罩上并用铝箔胶带做好密封。 确保整机水平并插上电源插头。 注意: 铝箔胶带密封后,请开机测试烟管是否有 漏风。烟管尽量能够拉直。 9. 首先撕掉装饰罩、风机外罩上的保护膜,把装 饰罩放入风机外罩里。然后同时拿...