Page 3 - AMPLIFICATEUR IMPULSE 4.320; M a n u e l d ' i n s t a l l a t i o n; l’installation par un professionnel.; Français; Pour validation de la garantie Focal-JMlab,
AMPLIFICATEUR IMPULSE 4.320 M a n u e l d ' i n s t a l l a t i o n 3 Nous vous remercions d’avoir choisi Focal et de partager avec nous notre passion du son, de la musique, révélés avec précision et pureté : “Listen Beyond”. Ces haut-parleurs de haute technicité intègrent les perfectionnements Foca...
Page 5 - Installation de votre amplificateur IMPULSE 4.320
AMPLIFICATEUR IMPULSE 4.320 M a n u e l d ' i n s t a l l a t i o n 5 Installation de votre amplificateur IMPULSE 4.320 L’installation de ce produit requiert des compétences techniques et de l’expérience. En cas d’incertitude sur l’aptitude à installer l’amplificateur, confiez cette tâche à un reven...
Page 6 - I - Mise en place de votre amplificateur IMPULSE 4.320
AMPLIFICATEUR IMPULSE 4.320 M a n u e l d ' i n s t a l l a t i o n 6 Avant de commencer l’installation, merci de suivre scrupuleusement les règles suivantes : 1. Après lecture intégrale du manuel d’utilisation, assurez-vous d’avoir compris l’ensemble des instructions avant d’installer votre amplifi...
Page 7 - limiter ainsi les pertes de signal.
AMPLIFICATEUR IMPULSE 4.320 M a n u e l d ' i n s t a l l a t i o n 7 ATTENTION Evitez de faire passer les câbles d’alimentation près des câbles d’entrée bas niveau (LOW LEVEL INPUTS) et haut niveau (HI LEVEL INPUTS), de l’antenne, des équipements et faisceaux sensibles. Les fils d’alimentation tran...
Page 9 - en
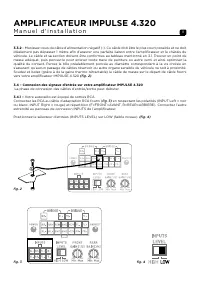
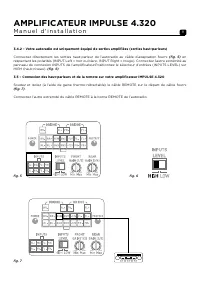
AMPLIFICATEUR IMPULSE 4.320 M a n u e l d ' i n s t a l l a t i o n 9 3.4.2 – Votre autoradio est uniquement équipé de sorties amplifiées (sorties haut-parleurs) Connectez directement les sorties haut-parleur de l’autoradio au câble d’adaptation fourni (fig. 5) en respectant les polarités (INPUT Lef...
Page 10 - le départ de câble fourni; tiquement présenter une impédance supérieure à 2 ohms.; MISE EN GARDE; connexions et polarités indiquées ci-dessous
AMPLIFICATEUR IMPULSE 4.320 M a n u e l d ' i n s t a l l a t i o n 10 Enfin, connectez les câbles haut-parleurs à l’amplificateur en respectant les polarités (+ sur + ; - sur -) sur le départ de câble fourni (fig. 8) fig. 8 MISE EN GARDE Les haut-parleurs ou kits de haut-parleurs câblés sur votre a...
Page 11 - Le câble reliant la borne positive (+) de la batterie au bornier; – Démarrage et vérifications
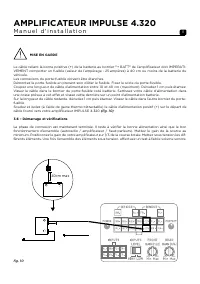
AMPLIFICATEUR IMPULSE 4.320 M a n u e l d ' i n s t a l l a t i o n 11 MISE EN GARDE Le câble reliant la borne positive (+) de la batterie au bornier " + BATT " de l’amplificateur doit IMPERATI- VEMENT comporter un fusible (valeur de l’ampérage : 25 ampères) à 40 cm ou moins de la batterie d...
Page 12 - – Panneaux de contrôle et connexions; produit, se reporter aux dépannages en 5.
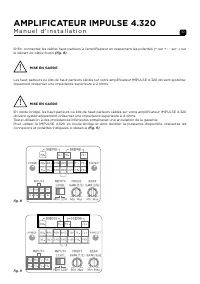
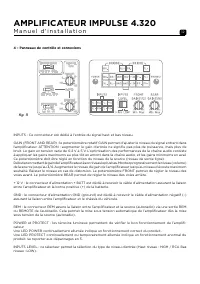
AMPLIFICATEUR IMPULSE 4.320 M a n u e l d ' i n s t a l l a t i o n 12 4 – Panneaux de contrôle et connexions fig. 11 INPUTS : Ce connecteur est dédié à l'entrée du signal haut et bas niveau. GAIN (FRONT AND REAR) : le potentiomètre rotatif GAIN permet d'ajuster le niveau du signal entrant dans l'am...
Page 14 - – Spécifications techniques
AMPLIFICATEUR IMPULSE 4.320 M a n u e l d ' i n s t a l l a t i o n 14 6 – Spécifications techniques IMPULSE 4.320 Amplificateur Classe D 4/3/2 canaux Entrées haut-niveau / RCA bas niveau √ Puissance CEA (4 ohms) 4 x 55 Wrms Puissance max (2 ohms) 4 x 80 Wrms Puissance max (bridgé 4 ohms) 2 x 160 Wr...
Page 15 - U s e r m a n u a l; CAUTION; English; Please validate your Focal-JMlab warranty,
Thank you for choosing Focal and sharing our passion for sound and for music, expressed with precision and purity: “Listen Beyond”. These high-tech speaker drivers incorporate enhanced Focal features in speaker driver design to achieve a powerful, high-quality sound. To get the very best out of your...
Page 17 - Installing your IMPULSE 4.320 amplifier
IMPULSE 4.320 AMPLIFIER U s e r m a n u a l 17 Installing your IMPULSE 4.320 amplifier Installation of this product requires technical knowledge and experience. If you are uncertain of your ability to correctly install the amplifier, we strongly recommend you contact your Focal dealer who will insta...
Page 18 - – Positioning of your IMPULSE 4.320 amplifier
IMPULSE 4.320 AMPLIFIER U s e r m a n u a l 18 Before beginning the installation, please follow these rules carefully: 1. After thoroughly reading the user manual, make sure you have understood all the instructions before installing your amplifier. 2. Disconnect the battery’s negative wire before in...
Page 19 - the vehicle
IMPULSE 4.320 AMPLIFIER U s e r m a n u a l 19 WARNING Avoid routing power cables close to low-level input cables (LOW-LEVEL INPUTS) and high-level input cables (HIGH-LEVEL INPUTS), close to the car aerial or close to sensitive equipment and harnesses. High-current power supply cables can cause stat...
Page 20 - – Connecting the input signals to your IMPULSE 4.320 amplifier
IMPULSE 4.320 AMPLIFIER U s e r m a n u a l 20 3.3.2 – Get the negative power cable (-). This cable should be as short as possible and ideally shouldn’t be any longer than 3ft (1m), to ensure a perfect connection between the amplifier and the chassis of the vehicle. The cable and wire gauge must com...
Page 21 - the INPUTS LEVEL to HIGH (
IMPULSE 4.320 AMPLIFIER U s e r m a n u a l 21 3.4.2 – Your head unit is only equipped with amplified outputs (speaker driver outputs). Connect the speaker driver outputs of the head unit directly to the adapter cable supplied (fig. 5) ensuring the polarities are respected. Connect the other end to ...
Page 22 - have a minimum impedance of 2 Ohms.; WARNING; systematically have a minimum impedance of 4 Ohms.
IMPULSE 4.320 AMPLIFIER U s e r m a n u a l 22 Finally, connect the speaker driver cables to the amplifier, making sure the polarities on the wiring harness supplied are respected (+ with +; - with -) (fig. 8) . WARNING The speaker drivers or speaker driver kits wired to your IMPULSE 4.320 amplifier...
Page 23 - The connections on the fuse-holder must be fully insulated.
IMPULSE 4.320 AMPLIFIER U s e r m a n u a l 23 WARNING The cable connecting the positive (+) terminal of the battery to the “+ BATT” terminal on the ampli- fier MUST be fused (ampere rating: 25 amperes) at less than 15" (40cm) away from the battery of the vehicle. The connections on the fuse-hol...
Page 24 - - Control panel and connections; terminal of the battery.
IMPULSE 4.320 AMPLIFIER U s e r m a n u a l 24 4 - Control panel and connections fig. 11 INPUTS: These connectors are dedicated to the low-level and high-level signal inputs. GAIN (FRONT AND REAR): The GAIN knob allows you to adjust the incoming signal to the amplifier. The voltage gain varies betwe...
Page 26 - – Technical specifications
IMPULSE 4.320 AMPLIFIER U s e r m a n u a l 26 6 – Technical specifications IMPULSE 4.320 4/3/2-channel class D amplifier High-level input / RCA low-level input √ CEA power (4 Ohms) 4 x 55Wrms Power max (2 Ohms) 4 x 80Wrms Power max (4 Ohms bridged) 2 x 160Wrms Bandwidth 10Hz – 20KHz (+/- 1dB) Total...
Page 27 - kann zu schweren Verletzungen oder Sachschäden führen.; Verpackungsinhalt; - 1 Gebrauchsanleitung; G e b r a u c h s a n l e i t u n g; WARNUNG; Unfall zu verursachen.; Produkt vor; Deutsch
Vielen Dank, dass Sie sich für von Focal entschieden haben und dass Sie mit uns unsere Leidenschaft für Klang und Musik teilen, die sich mit Präzision und Reinheit offenbart: „Listen Beyond“. Diese Hightech- Lautsprecher vereinen das fortschrittliche Lautsprecherdesign von Focal für kraftvollen, hoc...
Page 28 - ACHTUNG
28 IMPULSE 4.320 AMPLIFIER G e b r a u c h s a n l e i t u n g ACHTUNG • Verwenden Sie Ihren Verstärker IMPULSE 4.320 ausschließlich an mobilen Geräten mit 12 Volt. Jede andere Verwendung als die beabsichtigte Anwendung bringt ein Brand-, Stromschlags- oder Verletzungsrisiko mit sich. • Verwenden Si...
Page 29 - Installation Ihres Verstärkers IMPULSE 4.320
29 IMPULSE 4.320 AMPLIFIER G e b r a u c h s a n l e i t u n g Installation Ihres Verstärkers IMPULSE 4.320 Die Installation dieses Produkts erfordert technische Fähigkeiten und Erfahrung. Falls Sie über Ihre Eignung zur Installation des Verstärkers im Zweifel sind, vertrauen Sie diese Aufgabe einem...
Page 30 - I - Anbringung Ihres Verstärkers IMPULSE 4.320
30 IMPULSE 4.320 AMPLIFIER G e b r a u c h s a n l e i t u n g Bevor Sie mit der Installation beginnen, befolgen Sie bitte gewissenhaft folgende Regeln: 1 - Nachdem Sie die Gebrauchsanleitung vollständig durchgelesen haben, vergewissern Sie sich, dass Sie alle Anweisungen verstanden haben, bevor Sie...
Page 32 - ten Kabelausgang zu Ihrem Verstärker IMPULSE 4.320
32 IMPULSE 4.320 AMPLIFIER G e b r a u c h s a n l e i t u n g 3.3.2 – Nehmen Sie das negative (-) Stromkabel. Dieses Kabel muss so kurz wie möglich sein und sollte idealerweise 1 Meter nicht überschreiten, um eine perfekte Verbindung zwischen dem Verstärker und dem Fahrzeuggestell sicherzustellen. ...
Page 33 - lausgang
33 IMPULSE 4.320 AMPLIFIER G e b r a u c h s a n l e i t u n g 3.4.2 – Ihr Autoradio ist nur mit verstärkten Ausgängen (Lautsprecherausgängen) ausgestattet Schließen Sie die Lautsprecherausgänge des Autoradios direkt an das mitgelieferte Adapterkabel an (Abb. 5) und beachten Sie die Polaritäten (INP...
Page 34 - chgängig eine Impedanz über 2 Ohm aufweisen.; IMPULSE 4.320 durchgängig eine Impedanz über 4 Ohm aufweisen.
34 IMPULSE 4.320 AMPLIFIER G e b r a u c h s a n l e i t u n g Schließen Sie am Ende die Lautsprecherkabel an den Verstärker an und beachten Sie die Polaritäten (+ an +; - an -) am Ausgang des mitgelieferten Kabels (Abb. 8) . ACHTUNG Die verkabelten Lautsprecher oder Lautsprechersätze an Ihrem Verst...
Page 36 - – Steuerpulte und Anschlüsse; und die minimalen Verstärkungen hinten anzuwenden.
36 IMPULSE 4.320 AMPLIFIER G e b r a u c h s a n l e i t u n g 4 – Steuerpulte und Anschlüsse Abb. 11 INPUTS: Diese Steckverbindung ist für den Eingang des hohen und niedrigen Signals gedacht. GAIN (FRONT AND REAR): das Drehpotentiometer GAIN ermöglicht, die Stärke des Eingangssignals in den Verstär...
Page 37 - – Störungsbehebung; der ab das Signal unterbrochen wird.
37 IMPULSE 4.320 AMPLIFIER G e b r a u c h s a n l e i t u n g 5 – Störungsbehebung Der Status der verschiedenen Kontrollleuchten bezeichnet bestimmte Ausfallsarten oder Störungsursachen. Überprüfen Sie alle nachstehenden möglichen Fälle. Wenn trotz dieser Überprüfungen der normale Betrieb nicht wie...
Page 39 - 放大器; 安 装 手 册
IMPULSE 4.320 放大器 安 装 手 册 39 感谢您为自己的汽车选择Focal音响系统,并分享我们的理念:“声音之灵”。该产品采用Focal在D级紧凑型放大 器领域的最先进技术。为获得最佳效果,建议您委托Focal经销商安装FDS放大器。为让您更好地使用最佳功能、尽 情享受其各项性能,建议您阅读本手册中的指引,并小心保存以备日后参考。任何因未遵守使用规则而产生的问题 都可能导致质保失效。 警告 此符号表示重要指示。不遵守这些说明可能导致严重伤害或财产损失。 包装清单: - IMPULSE 4.320放大器 x 1 - 使用手册 x 1 - 配件 x 1套 可用附件(需另行购买): ...
Page 45 - 按照正确的极性(左侧输入 = 黑或白,右侧输入 = 红),直接将车载收音机的扬声器输出端口连接到随附的适配线
IMPULSE 4.320 放大器 安 装 手 册 45 3.4.2 - 您的车载收音机只配备有放大输出(扬声器输出) 按照正确的极性(左侧输入 = 黑或白,右侧输入 = 红),直接将车载收音机的扬声器输出端口连接到随附的适配线 缆(图5)。将另一端连接到放大器的INPUTS(输入)连接面板。 (图5) 将输入选择器(INPUTS LEVEL)设置为HIGH (高电平)。(图6) (图6) 3.5 - 将扬声器和遥控器(REMOTE)连接到IMPULSE 4.320放大器 将REMOTE电缆焊接到随附的线缆引线上,并(使用热缩管保护)进行绝缘处理(图7)。将REMOTE电缆另一端连 接到车载收...
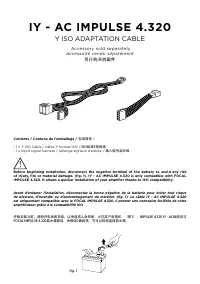
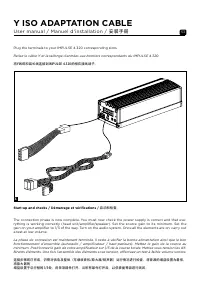
Page 51 - Y ISO ADAPTATION CABLE; Accessory sold separately
Contents / Contenu de l’emballage / 包装清单 : - 1 x Y ISO Cable / câble Y format ISO / ISO标准Y型线缆 - 1 x Input signal harness / rallonge signaux d’entrée / 输入信号延长线 Before beginning installation, disconnect the negative terminal of the battery to avoid any risk of injury, fire or material damage. (fig. 1)...
Page 52 - 安装手册; 进入车载收音机的连接面板。根据车辆不同,可能需要额外的适配器才能与ISO兼容,请咨询您的FOCAL经销商。
52 Y ISO ADAPTATION CABLE User manual / Manuel d'installation / 安装手册 Remove the head unit to get access to the connection panel. Depending of your car model, a complemen- tary adaptive cable could be necessary to upgrade to ISO standard. Ask your FOCAL dealer some advice. Accédez au panneau de conne...