Page 3 - CONTENTS; Registration
3 CONTENTS Safety and warnings 5 Before you begin 9 Using your Warming Drawer 11 Functions 12Delayed Start 14 Sabbath mode 15 Loading your appliance 16 Using the wire shelf 17 Cooking charts 18 Care and troubleshooting 20 Manufacturer’s Warranty and Service guide 21 Registration To register your pro...
Page 5 - SAFETY AND WARNINGS; Cut Hazard; Failure to use caution could result in injury.; Electric Shock Hazard; Failure to follow this advice may result in; Hot Surface Hazard; Failure to follow this advice could result in
5 SAFETY AND WARNINGS WARNING! Cut Hazard Failure to use caution could result in injury. • Take care: some edges may be sharp.• Do not put fingers in the drawer when closing. WARNING! Electric Shock Hazard Failure to follow this advice may result in electric shock or death. • If the product is damag...
Page 6 - Tipping Hazard; This product may tip. Keep children away; • The drawer must be secured in place by; Fire Hazard; • Flammable materials should not be stored in the
6 SAFETY AND WARNINGS WARNING! Tipping Hazard This product may tip. Keep children away and take care. Failure to follow this advice may result in injury. • The drawer must be secured in place by supplied screws. • Ensure there is a fixed shelf directly above the drawer if it is not installed under a...
Page 7 - READ AND SAVE THIS GUIDE; in these instructions.
7 SAFETY AND WARNINGS READ AND SAVE THIS GUIDE WARNING! To reduce the risk of fire, electrical shock, injury to persons or damage when using the appliance, follow the important safety instructions listed below. Read all the instructions before using the appliance. Use the appliance only for its inte...
Page 8 - Safety; Do not touch hot surfaces. Use handles or knobs.; Packaging disposal; Remove packaging and recycle materials that can be reused.
8 SAFETY AND WARNINGS Safety z Do not touch hot surfaces. Use handles or knobs. z Do not sit or lean on the appliance. Damage to the surface of the glass may cause it to shatter. z Do not store hazardous objects that can explode like containers with gas or air chambers (e.g spray cans). z Do not imm...
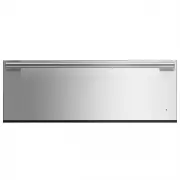
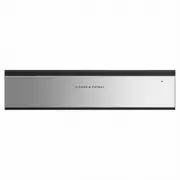
Page 9 - BEFORE YOU BEGIN; Drawer features & accessories
9 BEFORE YOU BEGIN z Ensure the installer has completed the final checklist in the installation instructions. z Read this guide, taking special note of the Safety and warnings section. Drawer features & accessories 1 Control panel 2 Indicator light 3 Handle 4 Serial plate* 5 Heated glass base 6 ...
Page 10 - Control panel features
10 All layers printed and illuminated (locking layer) printed only 1. ALL ARTWORK MUST BE APPROVED PRIOR TO MANUFACTURE2. ALL ARTWORK HIGHLIGHTED YELLOW REPRESENTS LEDS: 750329 WHITE QTBRIGHTEK 3.5x3.2x1.9 GFX_UI_WB60 576754 1 LEP 15/03/19 Release to order sample glass 3 1:1 1/1 PANTONE COOL GRAY 2 ...
Page 11 - USING YOUR WARMING DRAWER; At the end of a cycle:; Standby mode
11 USING YOUR WARMING DRAWER Open the drawer and touch to switch the drawer ON. Select the desired heating function. If no function is selected, the drawer will start at default setting. Close the drawer. The indicator light will flash if the drawer is not closed. At the end of a cycle: A tone will ...
Page 12 - FUNCTIONS; CUPS; PLATES; Heat circulates from the heated glass base; WARM; Heat circulates from the heated glass base
12 FUNCTIONS CUPS Heat circulates from the heated glass base z Heat is circulated for 30 minutes. z Heating duration depends on material and thickness of the cups including quantity, height and arrangement. z Do not place any cups and/or glasses in front of the ventilation slots. This will block the...
Page 13 - RAPID PROOF; Heat is produced for 30 minutes.; DEHYDRATE; Heat is circulated for four hours.; SLOW COOK; Heat is circulated for six hours
13 FUNCTIONS RAPID PROOF Gentle heat is generated from heated glass base z Heat is produced for 30 minutes. z Provides a warm and draft-free enviroment for proofing dough for bread making or pizza. DEHYDRATE Heat circulates from the heated glass base and rear fan z Heat is circulated for four hours....
Page 14 - During delayed start:
14 DELAYED START Open the drawer and touch then select the desired function. Touch and hold the button for five seconds to activate DELAYED START. Use and to increase or decrease the desired DELAYED START time. Push the drawer closed to start the countdown When using Delayed Start, the Warming Drawe...
Page 15 - , operation of up to 72 hours can be set and
15 SABBATH MODE Touch the button for 10 seconds to activate SABBATH MODE. Touch the button for 10 seconds to deactivate SABBATH MODE. The temperature and duration indicators will illuminate briefly three times to indicate SABBATH MODE has been enabled. The temperature and duration indicators will il...
Page 16 - LOADING YOUR APPLIANCE; Maximum load; Unloading the dishes
16 LOADING YOUR APPLIANCE Maximum load Do not load more than 25kg to prevent damage to the appliance. 24 Cappuccino cups Diameter guide20x 92 mm 54 Espresso cups Diameter guide48x 58mm Mixed load Plate settings Diameter guide16x 250mm Dinner16x 230mm Soup16x 180mm Bread & Butter16x 165mm Saucer ...
Page 17 - Use the wire shelf to increase the loading surface.; USING THE WIRE SHELF
17 Use the wire shelf to increase the loading surface. USING THE WIRE SHELF Insert the wire shelf in the left or right hand side of the Warming Drawer. wire shelf
Page 18 - COOKING CHARTS; FOOD TYPE
18 COOKING CHARTS The information in these charts is for guidance only. Refer to your recipe or the packaging and be prepared to adjust the cooking times and settings accordingly. FOOD TYPE FUNCTION g/kg SEAR TIME (mins/side) INTERNAL TEMP (°C) TIME MEAT, BEEF STEAK Rare Slow Cook 100- 300g 1-2 50 3...
Page 19 - WELLNESS
19 FOOD TYPE FUNCTION g/kg SEAR TIME (mins/side) INTERNAL TEMP (°C) TIME MEAT, BEEF STEAK Rare Slow Cook 100- 300g 1-2 50 30-60 mins Medium rare Slow Cook 100- 300g 2-3 55 30-60 mins Medium Slow Cook 100- 300g 3 60 30-60 mins Medium well Slow Cook 100- 300g 3-4 65 30-60 mins Well done Slow Cook 100-...
Page 20 - CARE AND TROUBLESHOOTING; Cleaning the drawer exterior and interior; Ensure that the appliance is turned off or set in; before cleaning. Do not; PROBLEM; Troubleshooting
20 CARE AND TROUBLESHOOTING Cleaning the drawer exterior and interior z Ensure that the appliance is turned off or set in STANDBY MODE before cleaning. Do not use high pressure or steam cleaners. z Remove any soiling or excess cleaning solution immediately. z Clean the surfaces with a soft cloth dam...
Page 21 - MANUFACTURER’S WARRANTY AND SERVICE GUIDE; To access your Warranty and Service Guide; NZ; Complete and keep for safe reference:
21 MANUFACTURER’S WARRANTY AND SERVICE GUIDE To access your Warranty and Service Guide Scan the QR code with your smartphone to access your warranty and book a service, or view online at https://www.fisherpaykel.com/nz/help-and-support/warranty-information This product has been designed for use in a...