Page 3 - CONTENTS; SAVE THESE INSTRUCTIONS
1 CONTENTS IMPORTANT! SAVE THESE INSTRUCTIONS The models shown in this user guide may not be available in all markets and are subject to change at any time. For current details about model and specification availability in your country, please go to our website www.fisherpaykel.com or contact your l...
Page 4 - SAFETY AND WARNINGS; Operation and maintenance
2 SAFETY AND WARNINGS Operation and maintenance WARNING! Electrical Shock HazardDo not cook on a broken or cracked cooktop. If the cooktop surface should break or crack, switch the appliance off immediately at the mains powersupply (wall switch) and contact a qualified technician.Switch the cooktop ...
Page 6 - IMPORTANT SAFETY INSTRUCTIONS; Never leave any objects or utensils on the appliance.
4 SAFETY AND WARNINGS IMPORTANT SAFETY INSTRUCTIONS ● Never leave the appliance unattended when in use. Boilover causes smoking and greasy spillovers that may ignite. ● Never use your appliance as a work or storage surface. ● Never leave any objects or utensils on the appliance. ● Do not place or le...
Page 7 - Do not use a steam cleaner to clean your cooktop.
5 SAFETY AND WARNINGS IMPORTANT SAFETY INSTRUCTIONS ● Children of less than 8 years old must be kept away from the appliance unless continuously supervised. This appliance can be used by children aged from 8 years and above, and persons with reduced physical, sensory or mental capabilities or lack o...
Page 9 - INTRODUCTION; Introducing your cooktop; As heat is transferred without loss, you save energy.; Before using your new cooktop; Remove any protective film that may still be on your cooktop.; Using the touch controls; Use the ball of your finger, not its tip.
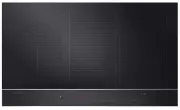
7 INTRODUCTION Introducing your cooktop Congratulations on your new purchase. Your Fisher & Paykel induction cooktop is the ultimate in induction cooking, giving you the speed, precision, and simplicity of electronic control, and the easy-care elegance of a ceramic glass surface. For more inform...
Page 10 - CHOOSING THE RIGHT COOKWARE; To check if cookware is suitable; Carry out a magnet test:; Quality of cookware
8 CHOOSING THE RIGHT COOKWARE To check if cookware is suitable ● Carry out a magnet test: ● Move a magnet across the base of the pan. If the magnet is attracted then the pan is induction suitable. ● Note: Make sure attraction is consistent across the base of the pan. If there are gaps, such as an in...
Page 11 - Cookware guidelines; Cookware made from the following materials is suitable:
9 CHOOSING THE RIGHT COOKWARE Cookware guidelines ● Cookware made from the following materials is suitable: ● stainless steel with a magnetic base or core ● aluminium and copper with a magnetic base or core ● cast iron ● steel or enamelled steel. ● Cookware made from the following materials is not s...
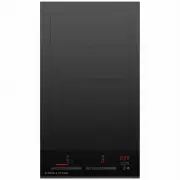
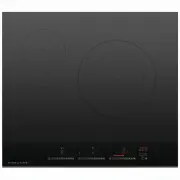
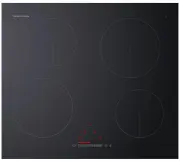
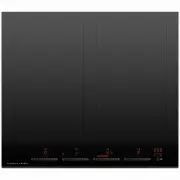
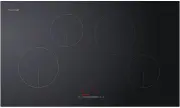
Page 12 - USING YOUR INDUCTION COOKTOP; POWER; SmartZone
10 USING YOUR INDUCTION COOKTOP * Maximum output when set on PowerBoost. ** PowerBoost is not available when cooking zones are bridged. See ‘Using your cooktop’s special features.’ CI302DTB model CI604DTB model CI754DTB model CI905DTB2 model CI905DTB3 model COOKING ZONE ZONEDIAMETER POWER POWERBOOST...
Page 13 - Timer Control; Control panel
11 USING YOUR INDUCTION COOKTOP GentleHeatindicators if one is lit: gentle heat is activated GentleHeatcontrol Heat SettingDisplay CookingZoneidentifier BridgingZoneindicator Zone timer indicator if brightly lit: timer is selected and ready to be set if dimly lit: timer is counting down Timer Displa...
Page 14 - To start cooking; A white indicator light will glow.
12 USING YOUR INDUCTION COOKTOP To start cooking 1 Touch and hold the ON/OFF control for 2 seconds. A white indicator light will glow. 3 Place a suitable pan on the cooking zone you wish to use. ● Make sure the bottom of the pan and the surface of the cooking zone are clean and dry. IMPORTANT! Alway...
Page 15 - If a display flashes; you have not placed a pan on the correct cooking zone or
13 USING YOUR INDUCTION COOKTOP If a display flashes alternately with the heat setting This means that: ● you have not placed a pan on the correct cooking zone or ● the pan you’re using is not suitable for induction cooking or ● the pan is too small or not properly centred on the cooking zone. No he...
Page 16 - When you have finished cooking; Turn the cooking zone off
14 USING YOUR INDUCTION COOKTOP When you have finished cooking 1 Turn the cooking zone off by touching or sliding down to . Make sure the display shows . 1 Turn the whole cooktop off by touching the ON/OFF control. 2 Beware of hot surfaces will flash in the window of any cooking zone that is t...
Page 17 - Locking the controls; To lock the controls
15 USING YOUR INDUCTION COOKTOP Locking the controls ● You can lock the controls to prevent unintended use (for example children accidentally turning cooking zones on). ● When the controls are locked, all controls except the ON/OFF control are disabled. To lock the controls 1 Make sure that the cook...
Page 18 - USING YOUR COOKTOP ’S SPECIAL FEATURES; Using the PowerBoost feature; will then
16 USING YOUR COOKTOP ’S SPECIAL FEATURES Using the PowerBoost feature This feature allows you to sear meat or bring liquid to the boil very quickly. When a cooking zone is set for PowerBoost, it uses more than 100% of the power of that particular cooking zone, resulting in a boost of intense heat. ...
Page 19 - as long as one is not behind the other
17 USING YOUR COOKTOP ’S SPECIAL FEATURES Note: ● You can set two (CI603DTB, CI604DTB and CI754DTB) or three (CI905DTB2) cooking zones for PowerBoost, as long as one is not behind the other . For example: ● If one cooking zone is set for PowerBoost and you accidentally select a second cooking zone i...
Page 20 - Using the GentleHeat feature; To quit the GentleHeat setting
18 USING YOUR COOKTOP ’S SPECIAL FEATURES Using the GentleHeat feature There are two Gentle heat settings. ● The Low setting is ideal for the most delicate cooking tasks (such as melting chocolate), as the cooking zone will provide a very low continuous gentle heat. ● The Medium setting is ideal for...
Page 21 - Using the Auto Rapid Heat feature; To set a cooking zone for Auto Rapid Heat
19 USING YOUR COOKTOP ’S SPECIAL FEATURES Using the Auto Rapid Heat feature This feature lets you rapidly heat up food or liquid then automatically reduce the temperature to a pre-selected heat setting. To set a cooking zone for Auto Rapid Heat 1 With the cooktop turned on, touch or slide the settin...
Page 22 - When Auto Rapid Heat is set; To quit the Auto Rapid Heat setting while; SELECTED HEAT SETTING
20 USING YOUR COOKTOP ’S SPECIAL FEATURES When Auto Rapid Heat is set ● The amount of time the cooking zone will rapidly heat for depends on the heat setting you have selected. See below chart for rapid heat times. ● If you would like a lower or higher heat setting than you originally selected, simp...
Page 23 - Using the timer; If you are not using any cooking zones
21 USING YOUR COOKTOP ’S SPECIAL FEATURES Using the timer You may use the timer in two different ways: ● You can use it as a minute minder, even when not using the cooktop. When used as a minute minder, the timer will not turn any cooking zone off when the set time is up. ● You can set it to turn on...
Page 24 - Using the cooking zone after you have a set the minute minder
22 USING YOUR COOKTOP ’S SPECIAL FEATURES Using the cooking zone after you have a set the minute minder If you start using a cooking zone after you have set the minute minder, the minute minder will continue to count down. You may also set cooking timer to turn a zone off (see opposite). Setting the...
Page 25 - Setting the timer to turn one or more cooking zones off; You may now continue to set the timer for additional cooking zones:
23 USING YOUR COOKTOP ’S SPECIAL FEATURES Setting the timer to turn one or more cooking zones off You may now continue to set the timer for additional cooking zones: 4 Cycle through the zones, by tapping the – and + controls of the timer together until the timer indicator of the required cooking zon...
Page 26 - Setting the minute minder when other timers are set; When the timer is set; To check the remaining time for another cooking zone:; When the set time is up
24 5 Set the time. You can set different times for each of the cooking zones. Setting the minute minder when other timers are set 1 Repeatedly tap the – and + controls of the timer together as you cycle through the individual timers for the cooking zones until the egg timer glows. . will steadi...
Page 28 - To select the bridging function
26 USING YOUR COOKTOP ’S SPECIAL FEATURES Using Bridging Zones (CI905DTB3, CI604DTB & CI302DTB models only) ● The bridging zone function allows you to use two SmartZones together giving you a larger cooking area. Your pan(s) will need to cover both cooking zones. ● There may be a cooler area in ...
Page 29 - If no pan is detected; . The right hand selector will show
27 USING YOUR COOKTOP ’S SPECIAL FEATURES 3 Use the left hand setting selector to set the heat setting for the combined zone. The heat setting will be displayed in the left hand cooking zone control window only, but the setting indicator lights will glow on both cooking zones. The right hand selecto...
Page 30 - Using Auto Rapid Heat in bridged mode
28 USING YOUR COOKTOP ’S SPECIAL FEATURES If no pan is detected on one half of the bridged cooking zone:Initially the left hand display will still show the selected temperature and the right hand display will still show . If after 10 minutes there is still no pan detected: ● the bridging function wi...
Page 31 - COOKING GUIDELINES; Cooking tips; Simmering, cooking rice
29 COOKING GUIDELINES IMPORTANT! Take care when frying: oil and fat heat up very quickly, particularly if you’re using PowerBoost. At extremely high termperatures oil and fat will ignite spontaneously and this presents a serious fire risk. Cooking tips ● When food comes to the boil, reduce the tempe...
Page 32 - Heat settings; Per
30 COOKING GUIDELINES Heat settings The settings below are guidelines only. The exact setting will depend on several factors, including your cookware and the amount you are cooking. Experiment with the cooktop to find the settings that best suit you. Per c entage of po w er % 100 80 60 40 20 0 u 1 2...
Page 33 - HEAT SETTING
31 COOKING GUIDELINES HEAT SETTING SUITABILITY ● melting chocolate, butter, and foods that burn quickly ● delicate warming for small amounts of food ● gentle simmering ● slow warming ● reheating ● rapid simmering ● cooking rice ● pancakes ● sautéing ● cooking pasta ...
Page 34 - CARE AND CLEANING; angle and scrape
32 CARE AND CLEANING WHAT? HOW? IMPORTANT! Everyday soilingon glass(fingerprints, marks, stains left by food or non-sugary spillovers on the glass) 1 Switch the power to the cooktop off at the wall. 2 Apply cooktop cleaner while the glass is still warm (but not hot!) 3 Rinse and wipe dry with a clea...
Page 35 - TROUBLESHOOTING; PROBLEM; The controls are locked.
33 TROUBLESHOOTING PROBLEM POSSIBLE CAUSES WHAT TO DO The cooktop cannot beturned on. No power. Make sure the cooktop is connected to the power supply and that it is switched on at the wall. Check whether there is a power outage in your home or area. If you’ve checked everything and the problem pers...
Page 36 - appears in the
34 TROUBLESHOOTING PROBLEM POSSIBLE CAUSES WHAT TO DO Some pans make crackling or clicking noises. This may be caused by theconstruction of your cookware (layers of different metals vibrating differently). This is normal for induction cookware and does not indicate a fault. The cooktop makes a low h...
Page 38 - WARRANTY AND SERVICE; Your product is correctly installed.
36 WARRANTY AND SERVICE Before you call for service or assistance ... Check the things you can do yourself. Refer to the installation instructions and your user guide and check that: 1 Your product is correctly installed. 2 You are familiar with its normal operation. If after checking these points y...
Page 39 - In New Zealand and Australia:
37 WARRANTY AND SERVICE This cooktop has been designed and constructed in accordance with the following codes and specifications: In New Zealand and Australia: ● AS/NZS 60335-1:2011 General Requirements for Domestic electrical appliances ● AS/NZS 60335-2-6:2014 Particular Requirements for Domestic e...
Page 40 - Bridging Zones
38 ENERGY GUIDELINES (GB IE ONLY) Reducing the environmental impact of cooking Reducing energy consumption will reduce the impact of cooking on the environment. You can reduce energy consumption by: ● Thawing frozen foods in the refrigerator first ● Using a moderate setting to conserve energy ● Usin...
Page 42 - NZ AU GB IE SG
590487 E 03.17 www.fi sherpaykel.com Copyright © Fisher & Paykel Appliances 2017. All rights reserved. The product specifications in this booklet apply to the specific products and models described at the date of issue. Under our policy of continuous product improvement, these specifications may ...


 Fisher & Paykel CG604CNGX2
User Manual
Fisher & Paykel CG604CNGX2
User Manual
 Fisher & Paykel CG604DLPGB4
User Manual
Fisher & Paykel CG604DLPGB4
User Manual
 Fisher & Paykel CG604DWFCX1
User Manual
Fisher & Paykel CG604DWFCX1
User Manual
 Fisher & Paykel CG903DLPGB1
User Manual
Fisher & Paykel CG903DLPGB1
User Manual
 Fisher & Paykel CG905DNGGB4
User Manual
Fisher & Paykel CG905DNGGB4
User Manual
 Fisher & Paykel CG905DWNGFCX3
User Manual
Fisher & Paykel CG905DWNGFCX3
User Manual
 Fisher & Paykel CG905DX1
User Manual
Fisher & Paykel CG905DX1
User Manual
 Fisher & Paykel CI122DTB4
User Manual
Fisher & Paykel CI122DTB4
User Manual
 Fisher & Paykel CI302DTB4
User Manual
Fisher & Paykel CI302DTB4
User Manual
 Fisher & Paykel CI603DTB4
User Manual
Fisher & Paykel CI603DTB4
User Manual
 Fisher & Paykel CI604CTB1
User Manual
Fisher & Paykel CI604CTB1
User Manual
 Fisher & Paykel CI604DTB4
User Manual
Fisher & Paykel CI604DTB4
User Manual
 Fisher & Paykel CI904CTB1
User Manual
Fisher & Paykel CI904CTB1
User Manual
 Fisher & Paykel CI905DTB4
User Manual
Fisher & Paykel CI905DTB4
User Manual