Page 2 - Safety Instructions; I M P O R T A N T S A F E T Y I N S T R U C T I O N S; IMPORTANT: SAVE THESE INSTRUCTIONS; SAFETY WARNING; agent or similarly qualified person in order to
2 Safety Instructions I M P O R T A N T S A F E T Y I N S T R U C T I O N S . IMPORTANT: SAVE THESE INSTRUCTIONS SAFETY WARNING • This appliance should not be used by children and persons with reduced physical, sensory or mental capabilities. Close attention is necessary when used by or near childre...
Page 3 - Important Notices
3 Safety Instructions I M P O R T A N T S A F E T Y I N S T R U C T I O N S . • This appliance is not to be used if it has been dropped, if there are visible signs of damage or if it is leaking. • Disconnect the appliance from the power supply prior to any maintenance or cleaning operations. Always ...
Page 4 - ATTENTION! This appliance is equipped with a 3-prong; and unplug appliance when filling with water.
4 Safety Instructions ATTENTION! This appliance is equipped with a 3-prong grounded power cord. Insert only into a 3-prong grounded electrical outlet. Do not try to remove the contacts of the grounded connection. • Always drain condensed water from hose before use or if unit has been left idle for a...
Page 5 - • Do not use the floor brush without a microfiber pad; CAUTIONS; ADVICE ON DISPOSAL; stream via specific collection facilities designated by the; INDICATIONS OF USE; This manual can not take into account every possible use.; Keep this manual in a safe place for future reference.; Keep the packaging for possible future transport (eg
5 Safety Instructions • Do not use the floor brush without a microfiber pad attached to the system. CAUTIONS I M P O R T A N T S A F E T Y I N S T R U C T I O N S . ADVICE ON DISPOSAL 1. When this crossed-out bin symbol appears on a product it means that the product is covered by European Directive ...
Page 6 - Product Description
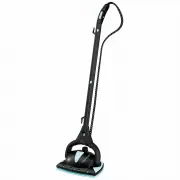
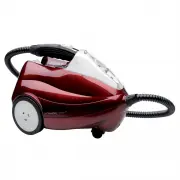
Product Description 6 Product Description 16 6 5 7 8 3 1 2 18 10 15 17 19 14 13 20 9 21 12 11 4 22 1 - Steam Gun 2 - (2) Extension Tubes 3 - Steam Control Trigger 4 - Floor Brush 5 - Boiler Cap 6 - Power Indicator Light (orange) 7 - Steam Ready Light (green) 8 - Power Switch 9 - Flexible Steam Hose ...
Page 7 - Product Description - Features; floors and much more.; The Compact Steam Cleaner Features; Read and pay attention to all Safety Labels and Product Markings; Features
Product Description 7 Product Description - Features 1 The Compact Steam Cleaner Features 1. No need for detergents or chemicals. Just add water.2. Lightweight and compact.3. Ergonomic, lightweight Steam Gun.4. Steam Gun locks in as carry handle.5. Versatile, quick-change accessories.6. On/Off steam...
Page 8 - Cleaner Accessories; Accessories - Attachment & Descriptions; Attach the Extension Tube to Brush Adapter by; WARNING: Always ensure steam control; corners of floors and on stairs.; The Brush Adapter is used to connect the Floor
Cleaner Accessories 8 Cleaner Accessories 2 Accessories - Attachment & Descriptions A. Attach Brush Adapter to Floor Brush 1. Insert the Brush Adapter in the Floor Brush The Floor Brush attaches to your Steam Cleaner using the Brush adapter. Insert the Brush Adapter in the Floor Brush and turn i...
Page 9 - CAUTION: When cleaning windows, always avoid any sudden; WARNING: Always ensure steam control trigger is off and; the Extension Tube and button locks in place.
Cleaner Accessories 9 Cleaner Accessories CAUTION: When cleaning windows, always avoid any sudden changes in temperature to prevent glass breakage or cracks. T o attach Extension Tubes together: Press down the locking button while sliding Tubes together. Be sure button and hole line up and button lo...
Page 11 - SMALL BRUSH; A fitted Microfibre Pad should be placed over; H. ATTACH MICROFIBRE PAD TO BRUSHES; A Microfibre Pad can be fitted on the Floor Brush; Always ensure steam control trigger is off and not; I. ATTACH SHOULDER STRAP; Using the detachable Shoulder Strap allows for
11 Cleaner Accessories Cleaner Accessories SMALL BRUSH – A fitted Microfibre Pad should be placed over the bristles of the Small Brush to clean smooth surfaces such as kitchen cupboards, splash backs, countertops, etc. Fit the Small Microfibre Pad over the bristles and top of Small Brush as shown. W...
Page 12 - Before Use; when attaching an accessory to the unit.; Use ordinary tap water. Use distilled or demineralized water; Follow these instructions to avoid overfilling the Boiler.; fo; Us; fo; Filling Steam Cleaner with Water; • Carefully read all instructions before removing Boiler Cap.; WARNINGS
Before Use 12 Before Use WARNING: Always ensure steam control trigger is off and not steaming when attaching an accessory to the unit. Use ordinary tap water. Use distilled or demineralized water if tap water is too hard. DO NOT add detergents, perfumes, oils or other chemical substances. This will ...
Page 13 - Using The Steam Cleaner; Turning Steam Cleaner ON; • The Steam Cleaner will heat up in approximately 6-7 minutes.; Steam Release; NOTE: Do not turn on Steam Cleaner if Water Tank is empty.; IMPORTANT: When the Steam Cleaner has run out of; Refilling the Boiler During Use; filling the Boiler – at least 5 minutes.
Using The Steam Cleaner 13 Using The Steam Cleaner • Always drain condensed water from Hose before use or if appliance has been left idle for a period of time. To drain, direct steam gun opening into a sink and slide Steam Control trigger on Steam Gun forward. Once Hose is empty, resume normal use. ...
Page 14 - Do not open the Boiler Cap until there is no steam being release
Using The Steam Cleaner 14 Using The Steam Cleaner WARNING: Do not open the Boiler Cap until there is no steam being release from the Steam Gun. If the Boiler Cap is opened while there is hot steam and pressure in the Boiler severe burns and injury can occur. If the Boiler Cap is turned and steam/pr...
Page 15 - Using The Steam Cleaner - Maintenance & Cleaning; Turning Steam Cleaner Off After Use; • Use ordinary tap water.; REMINDERS; the Boiler is flushed of any calcium or mineral deposits. Wipe the; Maintenance & Cleaning
Using The Steam Cleaner 15 Using The Steam Cleaner - Maintenance & Cleaning 7 Turning Steam Cleaner Off After Use • To turn Steam Cleaner off, press the Power Switch and unplug the electrical cord from the power outlet. • Any remaining water can be left in the unit. • Use ordinary tap water. • W...
Page 16 - Maintenance; Steam Cleaner Tips & Reminders; Line for tips and suggestions of where and how to use the Steam; TIP: to get the best cleaning results use a microfiber pad to wipe; the area of the steam output that should be used to clean to achieve; Replacement of Brushes, Microfiber Pads; are to get you started using your Steam Cleaner. As these brushes
Maintenance 16 Maintenance - Tips & Reminders Steam Cleaner Tips & Reminders This steam cleaning appliance has many practical uses that have not been mentioned in this manual. Please contact the Customer Support Line for tips and suggestions of where and how to use the Steam Cleaner. Alterna...
Page 17 - Water; Use ordinary tap water for all cleaning. In hard water areas, we; Superheated Temperature; range of about 130°C. The superheated temperature dries out most of; and deodorise the fibres. Steam is not used to clean carpets,
Tips & Reminders 17 Tips & Reminders Water Use ordinary tap water for all cleaning. In hard water areas, we recommend distilled or demineralised water to reduce the formation of calcium and other mineral deposits in the Steam Cleaner. Use distilled or demineralised water when steaming light ...
Page 18 - Microfiber Pad Care & Cleaning; Your Microfiber Pads are designed for hundreds of uses. Wash Pads; Never; We recommend letting Pads air; Microfiber washing instructions; MICROFIBER FLOOR PAD; MICROFIBER BRUSHES PADS; Hand wash only
Maintenance & Cleaning 18 Maintenance & Cleaning Microfiber Pad Care & Cleaning Your Microfiber Pads are designed for hundreds of uses. Wash Pads regularly, either by hand washing (using mild soap and warm water) or in your washing machine on a delicate cycle, cool water. Never use fabri...
Page 19 - Troubleshooting; ISSUES; Troubleshooting
19 Troubleshooting Troubleshooting ISSUES POSSIBLE CAUSES SOLUTIONS Steam is not coming out of the Steam Nozzles Improper Handle Assembly Call Customer Service to receive instructions to correct the problem Why does the Green Steam Ready Light turn off when I’m using the Steam Cleaner? Euroflex Stea...
Page 20 - Customer Support; Customer Support Line; 9 Furniss Road; Euroflex New Zealand Ltd; ITALY
M6S 03-2021 Customer Support Customers needing assistance with their Steam Cleaner can call the Customer Support Line on the phone numbers listed below. Customers should also call the Customer Support Line if they require product warranty repair or post-warranty product servicing. Our friendly Custo...