Page 2 - When using an electrical appliance, basic safety precau-; I M P O R TA N T S A F E T Y I N S T R U C T I O N S; Safety Instructions
S A V E THE S E I N S T R U C T IO N S When using an electrical appliance, basic safety precau- tions should always be observed, including the following: Read all instructions before using this appliance. WARNING: To reduce the risk of fire, electrical shock, or injury: 1. This appliance is authoriz...
Page 3 - E THE; CAUTIONS; Please contact the Customer Support Line
S A V E THE S E IN S T R U C T ION S I M P O R TA N T S A F E T Y I N S T R U C T I O N S 17. Do not operate around flammable or combustible liquids such as gasoline, or in areas where fumes may be present. Do not operate outdoors if wet. 18. To reduce the likelihood of circuit overload, do not oper...
Page 4 - What’s Inside & Product Description; Steam Cleaner
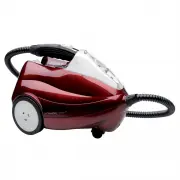
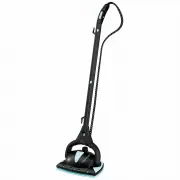
1 4 3 2 6 5 18 10 15 13 12 11 17 16 9 19 20 1 - Steam Gun 2 - (2) Extension Tubes 3 - Floor Brush Adapter 4 - Floor Brush 5 - Boiler Cap 6 - Power Indicator Light (orange) 7 - Steam Ready Light (green) 8 - Power Switch 9 - Flexible Steam Hose 10 - Shoulder Strap 11 - Filler Funnel 12 - Small Brush A...
Page 5 - Features & Cleaner Accessories; The Compact Steam Cleaner Features; A. Connecting Floor Brush Adapter to Floor Brush
Fe a tu re s C leane r Ac c e ss o rie s 5 Features & Cleaner Accessories The Compact Steam Cleaner Features 1. No need for detergents or chemicals. Just add water. 2. Lightweight and compact. 3. Ergonomic, lightweight Steam Gun. 4. Steam Gun locks in as carry handle. 5. Versatile, quick-change ...
Page 6 - Cleaner Accessories; lea; Accessories; C. Attach Extension Tube to Detail Nozzle
6 Cleaner Accessories C lea ne r A c c e ss o rie s Accessories (continued) C. Attach Extension Tube to Detail Nozzle D. Attach Nylon or Brass Detail Brush to Detail Nozzle E. Attach Scraper to Detail Nozzle F. Connecting Brush Adapter to Small Brush 2 * CLICK B. Attach Extension Tube to Window Sque...
Page 7 - Before Use & Using Your Steam Cleaner; fo; Filling Steam Cleaner with Water; WARNINGS; Follow these instructions to avoid overfilling the Boiler.; Us
7 Before Use & Using Your Steam Cleaner Be fo re Us e 3 4 Filling Steam Cleaner with Water WARNINGS • Carefully read all instructions before removing Boiler Cap. • Always switch off the appliance and be sure it has cooled before filling the Boiler. Connecting Extension Tube(s) • Attach one Exten...
Page 8 - Using Your Steam Cleaner; Attaching Floor Brush to Extension Tube; A. Attach Brush Adapter to Floor Brush; Attaching Microfibre Pads to Brushes; A. Attaching Microfibre Pad to Floor Brush –
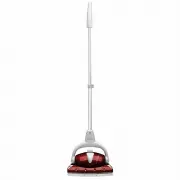
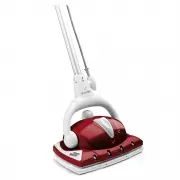
Us in g Y o u r S tea m C lea ne r 8 Using Your Steam Cleaner Attaching Floor Brush to Extension Tube A. Attach Brush Adapter to Floor Brush Attaching Microfibre Pads to Brushes A. Attaching Microfibre Pad to Floor Brush – A Microfibre Pad can be fitted on the Floor Brush to absorb dirt and protect ...
Page 9 - Attaching Shoulder Strap; Attaching Bristle Tray to Floor Brush
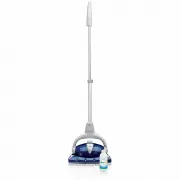
9 Using Your Steam Cleaner Us in g Yo u r S team C leane r 7 8 IMPORTANT: When the Steam Cleaner has run out of water, steam, output will cease. Follow refill instructions (page 10) to use your Steam Cleaner again. Attaching Shoulder Strap Using the detachable Shoulder Strap allows for greater freed...
Page 10 - Refilling the Boiler During Use
10 Using Your Steam Cleaner Us in g Y o u r S tea m C lea ne r Refilling the Boiler During Use When water in the boiler runs out, steam will stop emitting from the Steam Cleaner. To refill the Boiler with water, follow the steps below:• Switch off the Steam Cleaner by depressing the Power Switch and...
Page 11 - Maintenance & Cleaning; na; Cleaning Steam Cleaner; Replacement of Brushes, Microfibre Pads
11 Maintenance & Cleaning M ainte na nc e & C le aning Cleaning Steam Cleaner We recommend you periodically clean the Steam Cleaner to prevent the accumulation of calcium, mineral deposits and other sediment caused by the use of tap water. After every 10-15 refills, fill the Boiler three-quart...
Page 12 - Steam Cleaner Tips & Reminders; Making Contact with Surfaces; Water; Temperature
Ti p s & R e m in d e rs 12 Tips & Reminders Steam Cleaner Tips & Reminders This steam cleaning appliance has many practical uses that have not been mentioned in this manual. Please refer to the Cleaning Reference Guild included with this manual for tips and suggestions of where and how ...
Page 13 - Tool Caddy & Wall Bracket; To; Tool Caddy and Wall Bracket; A. Tool Caddy – Installation; Tool Caddy Installation:
13 Tips & Reminders Tool Caddy & Wall Bracket To o l Ca d d y & W a ll B ra c ke t Tool Caddy and Wall Bracket 15 A. Tool Caddy – Installation The Tool Caddy allows you to store a variety of accessories/ attachments right on the Steam Cleaner, keeping them handy and ready for use. Select...
Page 14 - Wall Bracket Installation:; B. Wall Bracket – Installation
14 Tool Caddy & Wall Bracket To o l C a d d y & W a ll B ra c ke t The Wall Bracket can be permanently mounted to a wall or inside a cupboard or closet. Slots on the underside of the Tool Caddy slide easily on to hooks on the Wall Bracket, giving you convenient off-the-floor storage. Before ...
Page 15 - C. Wall Bracket – Placing Unit on Bracket; D. Wall Bracket – Removing Unit from Bracket
15 Tool Caddy & Wall Bracket Tool Caddy & Wall Bracket To o l Ca d d y & W a ll B ra c ke t C. Wall Bracket – Placing Unit on Bracket • Lift the Steam Cleaner above the Wall Bracket and line up the slots on the Tool Caddy with the hooks on the Bracket. • Lower the Steam Cleaner until the...
Page 16 - Customer Support; Customer Support Line; AUSTRALIA; Euroflex Australia Pty Ltd; 9 Furniss Road; Euroflex New Zealand Ltd; NEW ZEALAND; Plastecs SRL; ITALY
SC60 (Australia/NZ) 05/09/18 EFLX-047AA Customer Support Customers needing assistance with their steam cleaner can call the Customer Support Line on the phone numbers listed below. Customers should also call the Customer Support Line if they require product warranty repair or post-warranty product s...