Page 2 - SAFETY WARNING; I M P O R TA N T S A F E T Y I N S T R U C T I O N S; Safety Instructions
S A V E THE S E I N S T R U C T IO N S SAFETY WARNING • The manufacturer reserves the right to make changes to the design and features of the appliance without notice. • This appliance is solely for household use.• Do not turn the appliance on if the steam mop shows signs of damage, the power cable ...
Page 3 - E THE; CAUTIONS; Save your back
S A V E THE S E IN S T R U C T ION S I M P O R TA N T S A F E T Y I N S T R U C T I O N S Please contact your closest technical support centre should you require further infor- mation or instructions not contained in this document. Customer Support Centre: Australia: 1800 663 866 New Zealand: 0800 6...
Page 4 - Product Features; Technical Data
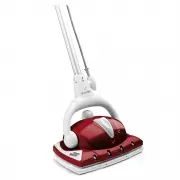
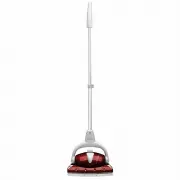
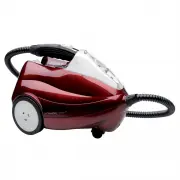
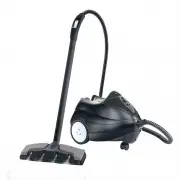
One (1) Floor Steamer 1 4 6 3 7 10 2 1 - Cord Winder2 - Handle 3 - Metal Extension Tube 4 - Measuring Cup (pre-marked)5 - Filling Funnel6 - Boiler Cap 7 - Steam Ready Indicator Light (green) 8 - Power Indicator Light (orange) 9 - Power Cord 10 - Steam Nozzles11 - Hard Surface Floor Pad 12 - Carpet P...
Page 5 - Before Use; Assembly of Parts & Preparation of Steamer; Frontal steam can only be generated when Extension Tube is in the; BE SURE EXTENSION TUBE IS FULLY; • Extend Tube to the; LOCK; CLICK
Be fo re Us e 5 Before Use Assembly of Parts & Preparation of Steamer Make sure all parts are in the box (see pg 4). IMPORTANT: FOLLOW THESE INSTRUCTIONS CAREFULLY! 1 *IMPORTANT* Frontal steam can only be generated when Extension Tube is in the “Maximum Extension” position. BE SURE EXTENSION TUB...
Page 6 - fo; B. Attach Handle to Steamer
6 Before Use Be fo re Us e B. Attach Handle to Steamer • Before starting, remove the self-tapping screw from the bottom of Extension Tube. • Insert the Handle Assembly into the Floor Steamer Base. Align Arrow on Handle with Arrow on Base (as shown in Fig. A). • Once inserted, twist Handle Assembly 9...
Page 7 - C. Attach Hard Surface Floor or Carpet Pad to Steamer; WARNING: To prevent floor damage, ALWAYS attach either the; IMPORTANT NOTE ABOUT LINOLEUM FLOORING
7 Before Use C. Attach Hard Surface Floor or Carpet Pad to Steamer Affix either the Hard Surface Floor Pad or Carpet Glide with Carpet Pad to your Floor Steamer. WARNING: To prevent floor damage, ALWAYS attach either the HARD SURFACE FLOOR PAD or the CARPET GLIDE ACCESSORY with CARPET PAD when using...
Page 8 - D. Filling Boiler with Water; cooled for; Do not tighten Boiler Cap too much – finger
Be fo re Us e 8 Before Use *IMPORTANT* • Do not overfill the Boiler as excess water will be flushed out of the Boiler before dry steam will emit. • If re-filling the Boiler while Steamer has been in use, be sure to allow Steamer to cool for at least 5 minutes and loosen Boiler Cap slowly to allow an...
Page 9 - Us; Using Your Floor Steamer; B. Starting the Appliance; Keeping the handle in the upright “Off”; A. Using the Parking Pad; CAUTION; You will find that your Floor
9 Using Your Floor Steamer Us in g Yo u r F lo o r S team e r Using Your Floor Steamer 2 B. Starting the Appliance • Be sure Boiler is filled with water and Boiler Cap is securely in place. • Insert the plug into a-3 prong grounded electrical outlet (orange Power Indicator Light will illuminate). • ...
Page 10 - The Floor Steamer will stop producing steam when the Boiler is; D. Refilling Boiler During Use
10 Using Your Floor Steamer Us in g Y o u r F lo o r S tea m e r • To emit steam from the Steam Nozzles, pull the trigger on the Handle upward. *IMPORTANT* The Steam Nozzles are meant to be used in steam “bursts” and should never be used on a sustained basis. The Steam Nozzles will loosen especially...
Page 11 - the Steamer from continuing to heat up.; REMINDERS
11 Using Your Floor Steamer Using Your Floor Steamer Us in g Yo u r F lo o r S team e r • Unplug the appliance from the electrical power outlet. This will stop the Steamer from continuing to heat up. • Once unplugged from the power outlet, place Handle in the “On” position to release any residual st...
Page 12 - Maintenance & Cleaning; in; Cleaning the Floor Steamer
12 Maintenance & Cleaning M a in te na nc e & C lea n in g If distilled or demineralized water is regularly used in the Steamer, cleaning of the Boiler can be done less frequently. In some areas tap water is very hard, it is recommended that the Boiler is cleaned more frequently if hard wate...
Page 13 - Tro; Microfiber Pad Care & Cleaning; Microfiber washing instructions – ULTRA MICROFIBRE; HARD SURFACE FLOOR PAD; Issues
13 Maintenance & Cleaning Maintenance & Cleaning & Troubleshooting Tro ublesh o o tin g Microfiber Pad Care & Cleaning Your Microfiber Pads are designed for hundreds of uses. Clean Pads regularly, either by hand (using mild soap and warm water) or in your clothes washer on a delicate...
Page 14 - Notes
Page 16 - Customer Support; Monster Customer Support Line; EUROFLEX Australia Pty Ltd; Success Way; EUROFLEX New Zealand Ltd; Triton Plaza; EUROFLEX SRL; ITALY
EZ1 (Australia/NZ) 09/27/13 EFLX- 039AD Customer Support Customers needing assistance with their Monster Floor Steamer can call the Customer Support Line on the phone numbers listed below. Customers should also call the Customer Support Line if they require product warranty repair or post-warranty p...