Page 2 - Table of Contents; Clean the Dirty Water Tank and Sponge Filter
EN 01 Thank you for purchasing this appliance. Carefully read all instructions before using this product, and keep this manual for future reference. Table of Contents 02 Important Safety Instructions 07 What's in the Box 08 Overview09 Assembly 09 Charging10 Selecting a Voice Prompt Language 11 Addin...
Page 4 - SAVE THESE INSTRUCTIONS; Notice; FCC Statement
04 EN EN 05 • Use only as described in this manual. Use only manufacturer recommended attachments. • Store this appliance on a flat surface.• Only use the floor cleaner designated by eufy and in a proper ratio. We are not responsible for any damage and injury caused by unauthorized floor cleaners. •...
Page 6 - Charging
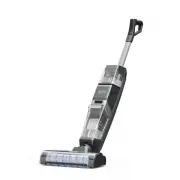
08 EN EN 09 Overview Water spray button Wheels Bottom base Charging base Drying plate Filter cover Rolling brush Filter Dirty water tank Speed control button (High / Low) Power button LED display panel Charging contact pins Power adapter Auxiliary wheels Rolling brush cover Clean water tank Self-cle...
Page 7 - Adjust Volume; seconds; Adding Water and Floor
10 EN EN 11 Selecting a Voice Prompt Language 1. Gently step on the foot pedal and push the handle bar backward until you hear a click. 2. Press and hold the water spray button with one hand, then hold the self-cleaning button with the other hand to enter the language selection mode. 3. Press the wa...
Page 8 - LED Screen Guide; Carrying with the Handle; Using the Vacuum
12 EN EN 13 6. Place the vacuum onto the charging base to charge, and then start self- cleaning and self-drying (see the Maintenance section). • To prevent unpleasant smells, clean the dirty water tank after each use (see the the Maintenance section). LED Screen Guide The LED screen will show you th...
Page 10 - Clean the Rolling Brush
16 EN EN 17 4 5 6 7. Clean the filter component with water or mild detergent.8. Clean the floater and top container as illustrated.9. If there is any debris around the area as illustrated, clean with a cloth or towel. 7 8 9 10. Make sure to completely air dry all the components.11. Reassemble these ...
Page 12 - Troubleshooting; Specifications
20 EN EN 21 Troubleshooting Vacuum is not working normally: 1. Make sure the battery is fully charged. 2. Make sure the handle bar has been pushed backward and you have heard a click before use. 3. Check if the rolling brush is stuck. 4. If the self-cleaning is not working due to low battery, charge...
Page 13 - Índice; Instrucciones de seguridad
22 ES ES 23 Gracias por adquirir este dispositivo. Lea bien las instrucciones antes de usar el producto y conserve este manual para consultarlo más adelante. Índice 23 Instrucciones de seguridad importantes 27 QUÉ HAY EN LA CAJA 28 Descripción general 29 Montaje 29 Cargando30 Selección del idioma pa...
Page 15 - GUARDE ESTE MANUAL DE INSTRUCCIONES; Aviso; Declaración de conformidad de la UE; QUÉ HAY EN LA CAJA
26 ES ES 27 • No modifique ni intente reparar el aparato o la batería, a excepción de lo que se indique en las instrucciones de uso y mantenimiento. GUARDE ESTE MANUAL DE INSTRUCCIONES Aviso Este símbolo en el dispositivo o en su embalaje indica lo siguiente: No deseche los aparatos eléctricos como ...
Page 16 - Cargando
28 ES ES 29 Descripción general Botón de pulverización de agua Ruedas Base inferior Base de carga Bandeja de secado Tapa del filtro Cepillo giratorio Filtro Depósito de agua sucia Botón de control de velocidad (Alto/Bajo) Botón de encendido Panel de pantalla LED Contactos de carga Adaptador de corri...
Page 17 - Ajustar volumen; Cómo añadir agua y el
30 ES ES 31 Selección del idioma para los mensajes de voz 1. Pise suavemente el pedal y tire del mango hacia atrás hasta que oiga un clic. 2. Mantenga pulsado el botón de pulverización de agua con una mano y el botón de autolimpieza con la otra mano para acceder al modo de selección de idioma. 3. Pu...
Page 18 - Modo de uso de la aspiradora; Guía de pantalla LED
32 ES ES 33 Modo de uso de la aspiradora 1. Pise suavemente el pedal y tire del mango hacia atrás hasta que oiga un clic. 2. Pulse el botón de encendido. El cepillo giratorio comenzará a girar. 1 2 3. Pulse el botón de control de velocidad para seleccionar una velocidad de rotación: Alto/Bajo . 4. P...
Page 19 - Cómo transportarla con el asa; Mantenimiento; Limpieza del depósito de agua sucia y la
34 ES ES 35 El flotador es lo que evita que el depósito de agua sucia se desborde. Cuando el depósito de agua sucia está lleno, el flotador apagará el motor de succión y emitirá un fuerte sonido como aviso de que el depósito debe limpiarse. Flotador 1. Pulse el botón de extracción y sostenga el tira...
Page 21 - Limpieza del cepillo giratorio
38 ES ES 39 Limpieza del cepillo giratorio Antes de quitar la tapa del cepillo giratorio, compruebe que la aspiradora esté apagada. 1. Tire hacia usted para abrir la tapa del cepillo giratorio. 2. Levante el cepillo giratorio para quitarlo. 1 2 3. Limpie el cepillo giratorio con la herramienta de li...
Page 22 - Solución de problemas; Especificaciones
40 ES ES 41 1 2 3 4 Autolimpieza Autosecado Solución de problemas Si la aspiradora no funciona correctamente: 1. Asegúrese de que la batería esté totalmente cargada. 2. Recuerde que debe tirar del mango y compruebe que escucha el clic correspondiente antes de usarla. 3. Revise el cepillo giratorio p...
Page 23 - Servicio de atención al cliente
42 ES Servicio de atención al cliente Para ver tutoriales de vídeo, preguntas frecuentes, manuales y demás información, visite: https://support.eufylife.com/ Garantía: Garantía limitada de 12 meses [email protected] www.eufylife.com (US) +1 (800) 988 7973 Mon-Sat 6:15 AM - 6:45 PM (PT); Sun 6:15 AM ...