Page 3 - either; QR Code
1. Open Smart Phone 2. Open Photo3. Scan QR Code4. Click the Link either QR Code 1. Scan the QR Code 2. Online at: ApplianceDesk.com/Warranty 2
Page 5 - Introduction
This self-contained compact appliance operates as an air conditioner, air purifier/fan or dehumidifier. It is easily portable with castors and does not require permanent installation. 4 Control Panel Air outlet with adjustable louver Front Panel Inside Air inlet with air filter Recessed Handle Castor L...
Page 6 - Accessories; Model; Air Circulation / Flow; Noise Level; Specifications Table; Net Weight
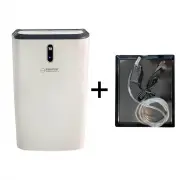
5 1. Inlet / Exhaust hoses2. Hose connectors3. Window kit adapters 4. Window kit5. Drain Hose6. Remote control Accessories 1 2 3 6 4 5 PAC 122 W14126 Ft³/h Model 65 lbs 30" x 18.5" x 14" 54 dB 296 Sq Ft115V / 12V 2A Adapter Input / Output Application Area Air Circulation / Flow Noise Lev...
Page 7 - Placement; Never install the unit where it could be affected by:
Placement Place the unit on a firm, level surface in an area with at least 20 inches (50 cm) of free space around it to allow for proper air circulation. If tipped more than 45°, allow the unit to stand upright for at least 24 hours before starting it. It allows compressor to stabilize. Ensure the un...
Page 8 - Installation; Follow these steps to install both hoses:
7 This is an advanced portable AC where there are 2 hoses:The Right Hose brings fresh air into the unit. The Left Hose blows hotexhaust air to the outdoors. Do not replace or extend the hoses which will result in decreased efficiency, or even worse shut down the unit due to low back pressure. Attachin...
Page 9 - Note: Repeat these steps to install the second hose.
Step 4 : Step 5 : Attach the hose connector to the window kit adapter. Step 6 : Adjust the length of the flexible hose and avoid bends in the hose. Then place the appliance near an electrical outlet, and plug it in. Close your window to secure the kit in place. To hold the window kit firmly in place, ...
Page 10 - Operation; CONTROL PANEL AND DISPLAY
Operation CONTROL PANEL AND DISPLAY Cool Dry Air Power Timer 9 7 6 5 4 2 1 10 11 3 8 1 Power Press to switch the unit on or off. 2 Mode Press to switch the operation mode between Cool , Dry and Air (Air Purifier/Fan). 3 ModeIndicator Displays the Mode: Cool , Dry and Air . 4 Sleep Press to turn Sleep ...
Page 12 - Dehumidifier Drainage
Dehumidifier Drainage When using the Dehumidifier, water collects in the unit and needs to be drained either continuously or when it gets full. Water can be drained either from the Upper Drain Outlet or from the Lower Drain Outlet. For continuous draining, while the unit is operating as a Dehumidifier:...
Page 14 - Maintenance
If not continuously drained, the unit will need to be drained manually. Note: When the water collection tank in the unit gets full, it will stop working and an error code of “Ft” will be displayed on the Control Panel. Turn off the appliance and unplug it. If the unit needs to be moved, do it careful...
Page 15 - Troubleshooting; Problem; Clear the obstacle
14 Troubleshooting Problem Possible Cause Solution The unit is not operating Check the power connection Check if water tank in unit is full Check the room temperature The unit works with reduced capacity Insert the power cord securely into the wall outlet Empty the water tank by removing the drain p...
Page 16 - Water tank is full; Empty the water tank; Ft; Drain any water from the unit and dry it completely.
Storage If you will not be using the unit for an extended period of time (more than a few weeks) it is best to clean the unit and dry it out completely. Prepare the unit for storage as follows: Unplug the unit, remove hoses and window kit, and store with the unit. ATTENTION: The evaporator inside th...