Page 3 - Contents; Read the instructions bef ore installing or using this ap pliance.
Contents ◆ Cooktop Description ◆ Important Information ◆ Operation ◆ Maintenance and Cleaning ◆ Troubleshooting ◆ Instructions for the Installer ◆ Important safety requirements ◆ Installation This appliance shall be installed in accordance with the regulations in f orce and only used in a well - ven...
Page 4 - Operating Instructions:
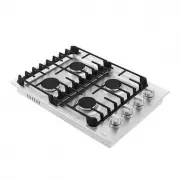
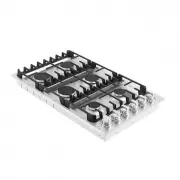
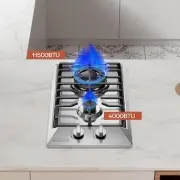
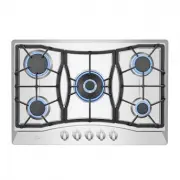
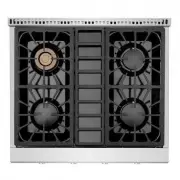
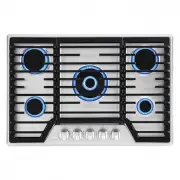
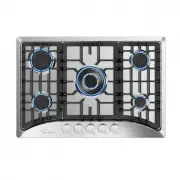
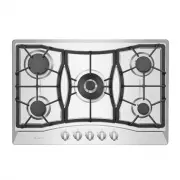
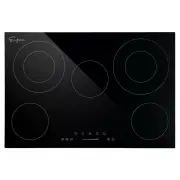
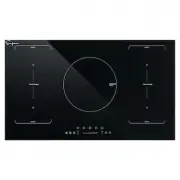
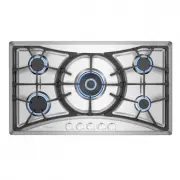
Cooktop Description Figure 1 Figure 2 Figure 3 Figure 4 A D C B E 1 2 3 4 5 A B D C E 1 2 3 4 5 A B D C Operating Instructions: Knob 1 is for wok burner A Knob 2 is for semi-rapid burner C Knob 3 is for auxiliary burner D Knob 4 is for rapid burner B Operating Instructions: Knob 1 is for wok burner ...
Page 6 - Read the instructions bef ore installing or using this appliance.; Installation; and the adjustm ent of the appliance are com patible.; For your Safety
Figure 9 Important Information Read the instructions bef ore installing or using this appliance. These instructions are only valid if the country sym bol appears on the appliance. If the sym bol does not appear on the appliance, it is necessary to ref er to the technical instructions which will prov...
Page 7 - When Use; cooker; Service
➢ This gas cooktop is designed to be operated by adults. Do not allow children to play near or with the gas cooktop. ➢ The gas cooktop gets hot when it is in use. ➢ Children should be kept away until it has cooled. ➢ Children can also injure them selves by pulling pans or pots of f the gas cooktop. ...
Page 8 - Lighting; center placed the burner cap on the burner.; to be activated autom atically.
Lighting ◆ Sim ply press the knob in, turn anticlockwise to ignition position (star icon). ◆ Press the ignition device and hold the knob till the burner is ignited ◆ Bef ore releasing knob, ensure a f lam e is established . ◆ If the burner f ails to ignite, put into of f position and try again. If i...
Page 9 - Maintenance and Cleaning; Control Panel
sim m ering. If the control knobs becom e dif f icult to turn, please contact your local service cent er. WARNING: Users could not use the cooking vessels on the hotplate that overlap its edges. WARNING: All burner caps can ’t be dislocated installation, otherwise it will lead to flash back on the u...
Page 11 - Important safety requirements
For Model Width Depth 24GC4B67A 23.23in 20.08in 24GC4L67A 25.39in 20.67in 30GC5B70C, 30GC5L70A 29.92in 20.08in 34GC5B90A, 34GC5B90C, 34GC5L90A 33.86in 19.69in 36GC5B90S, 36GC5L90I 35.43in 20.08in Cut out dimensions For Model Width Depth 24GC4B67A, 24GC4L67A 22.00 in 18.90in 30GC5B70C, 30GC5L70A 28.6...
Page 12 - WARNING
to the f ront edge of the countertop should be 3.0 ”.The distance between the closet should be 23.62” (not less than the depth of the cooktop itself ) (see Figure 1 2 & Figure 13) Notice that a horizontal se paration below the base of the hotplate is needed. The m inim um distance between this s...
Page 13 - Warning; Gas Conversion Operating Instructions
WARNING: The base of the appliance should be protected f rom contact by a horizontal partition or plate. A m anual valve be installed in an accessible location in the gas line external to the appliance f or the purpose of turning on or shutting of f gas to the appliance. Warning : Turn the knob coun...
Page 14 - rem oved f rom the appliance f or f uture use.
W ok burner 1.06 12000 1.62 12000 R apid burner 0.97 10200 1.50 10200 Sem i rapid burner 0.75 6000 1.14 6000 Aux iliary burner 0.56 3400 0.83 3400 1) Air supply valve and cooktop valve need to be closed, unplug the power plug f or AC m odel. 2) When the gas pressure regulator is in NG state and need...
Page 15 - m anufacturer’s; WHEN THE GAS COOKTOP IS FIRST INSTALLED; for ventilating the interior of the cabinet adequately.; Pressure Regulator Installation
WARNING This conversion kit shall be installed by a qualif ied service agency in accordance with the m anufacturer’s instructions and all applicable codes and requirements of the authority having jurisdiction. If the inf ormation in these instructions is not f ollowed exactly, a f ire, explosion or ...
Page 17 - Electrical connections; Electrical supply type: AC; The GAS COOKTOP MUST BE EARTHED; If the cooktops to be connected to a 120V, 60 Hz AC electrical supply.; Electrical Grounding Instructions; Circuit Diagram
30.07" 18.9" 1.18" Figure 21 Electrical connections Any electrical work required to install this gas cooktop should be carried out by a qualified electrician or competent person. Electrical supply type: AC The GAS COOKTOP MUST BE EARTHED If the cooktops to be connected to a 120V, 60 Hz A...
Page 18 - Use with D.C battery
Figure 24(for the appliance with five burners) Use with D.C battery When your cooktop is the one fitted with D.C supply device only, you are suggested to use one 1.5V battery. Be sure that the battery is well fixed then you can follow the “Lighting” procedure. Take off the battery if you won ’t use ...