Page 2 - TABLE OF CONTENTS
TABLE OF CONTENTS IMPORTANT SAFEGUARDS 2-3 SHORT CORD PURPOSE/POLARIZED PLUG 4 INSTALLATION GUIDE 4 PARTS IDENTIFICATION 5 TEMPERATURE CONTROL PROBE 6 HOW TO USE YOUR SKILLET 6-7 OPERATING INSTRUCTIONS 7 HINTS & TIPS 7 COOKING TIMES & TEMPERATURES 8 CLEANING & MAINTENANCE 9 TROUBLE SHOOT...
Page 3 - IMPORTANT SAFEGUARDS; READ ALL INSTRUCTIONS BEFORE USE AND SAVE FOR FUTURE REFERENCE; Wash all removable accessories before using for the first time.
IMPORTANT SAFEGUARDS The Elite Brand takes consumer safety very seriously. Products are designed and manufactured with our valued consumers' safety in mind. Additionally, we ask that you exercise a level of caution when using any electrical appliance by following all instructions and important safeg...
Page 5 - polarized plug; INSTALLATION GUIDE; Carefully unpack your electric skillet.; SAVE THESE INSTRUCTIONS
SHORT CORD PURPOSE Do not attempt to modify the power cord or plug in any way. NOTE: A short power cord is provided to reduce the risk of personal injury resulting from becoming entangled in or tripping over a longer cord. Longer power-supply cords or extension cords are available and may be used if...
Page 6 - PARTS IDENTIFICATION
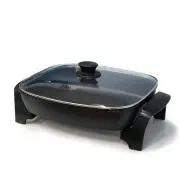
PARTS IDENTIFICATION 1. Temperature Control Knob – adjust cooking temperature for a variety of foods. 2. Cool-Touch Handles – safely handle and transport the skillet. 3. Tempered Glass Lid – allows viewing and monitoring of foods without having to remove the lid. 4. Cool-Touch Knob – safely remove l...
Page 7 - TEMPERATURE CONTROL PROBE; Trigger release for easy removal.; HOW TO USE YOUR ELECTRIC SKILLET; Insert the control probe into the inlet on the side of the skillet.
TEMPERATURE CONTROL PROBE 1. Trigger release for easy removal. 2. Temperature selector 3. Built-in thermostat NOTE: The light on the control probe will illuminate and will remain on until the set temperature is reached. It will then cycle on and off throughout cooking, as the temperature is maintain...
Page 8 - HINTS AND TIPS
HOW TO USE YOUR ELECTRIC SKILLET (cont.) 6. The STEAM VENT on the tempered glass lid allows steam to escape while cooking with the LID in place. CAUTION: Escaping steam is HOT! Be careful when removing or lifting LID. Oven mitts are required when handling the LID or SKILLETPAN. Note: Remember, the s...
Page 9 - COOKING TIMES AND TEMPERATURES; ITEM
COOKING TIMES AND TEMPERATURES The following cooking guide temperatures and times are approximate and are for reference only. ITEM TEMP (°F) TIME (MIN) Bacon 300° – 320° 10 – 12 Baking, Cake 250° – 300° 25 – 40 Braising 200° – 230° 45 – 60 Browning 320° – 390° 5 – 10 Casserole 200° – 230° 60 – 90 Ch...
Page 10 - CLEANING AND MAINTENANCE
CLEANING AND MAINTENANCE • Medium and low heat settings will yield the best results for most types of cooking. Heating the skillet gradually will ensure even heat distribution. Do not use your skillet on maximum temp settings as this will shorten the life of the non -stick coating. • Do not allow yo...
Page 11 - TROUBLE SHOOTING; TROUBLE
TROUBLE SHOOTING BEFORE CALLING FOR SERVICE If the skillet fails to operate: 1. Make sure the skillet is plugged in correctly and securely. If it is not, remove the plug from the outlet, wait 10 seconds and plug it back in securely. 2. Check for a blown or tripped circuit breaker in your home. If th...
Page 12 - RECIPES FOR ELECTRIC SKILLET; Set the temperature control knob to medium, 325 degrees.; Serves 4; Set the temperature control knob to medium-high, 375 degrees.
RECIPES FOR ELECTRIC SKILLET All recipes courtesy of www.mrfood.com Hamburger Stroganoff Serves 4 1 pound lean ground beef 1 onion, chopped 1 teaspoon garlic powder 1/4 teaspoon black pepper 1/2 pound fresh mushrooms, sliced 1 (10- to 12-ounce) can condensed cream of mushroom soup 1 1/2 cups sour cr...