Page 2 - TABLE OF CONTENTS
1 IMPORTANT SAFETY INSTRUCTIONS ……………………………………………….…2 PREPARING YOUR ICE MAKER FOR USE IMPORTANT SAFETY TIPS ……………………………………………………………………..3 GETTING TO KNOW YOUR UNIT ……………………………………………………… ………………………………………………………. .. .. 4 4 OPERATING PROCEDURES & MAINTENANCE UNPACKING UNPACKING YOUR YOUR ICE ICE MAK...
Page 3 - Your safety and the safety of others are important to us.; IMPORTANT SAFETY INSTRUCTIONS
2 DANGER WARNING Your safety and the safety of others are important to us. We have provided many important safety messages manual and your appliance.Always read and obey all safety massages. This is the safety alert symbol: ! All safety messages will follow the safety alert symbol and the word “DANG...
Page 5 - General instrucion; GETTING TO KNOW YOUR UNIT
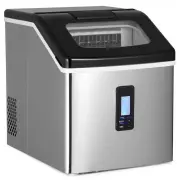
4 General instrucion 1. Water tube connector 2. Cover 3. Water Pipe 4. Evaporator 5. Ice Basket 6. Control Panel 7. Ice Scoop 8. Viewing Window 9. Air Outlet: Please make sure there’s no object at least 20cm around the air outlet. 10. Water Outlet: For draining water from the water tank. GETTING TO ...
Page 6 - Postion of control panel & function; OPERATING PROCEDURES & MAINTENANCE; Control panel
5 Postion of control panel & function A. LCD Display Area 1) Ambient Temperature 2) Time Indicator 3) Failure Indicator: Flash : Intake air temperature sensor malfunction Stay ON : Ice making malfunction 4) Ice making display area: Flash : the machine is dumping ice Zoom : the machine is making ...
Page 7 - DANGER; power cord is damaged, please call our customer service.; Clean it thoroughly before you use it for the first time.; CONNECTING YOUR ICE MAKER
6 DANGER 1. Remove the exterior and interior packaging. Check that ice basket and ice scoop is included. If any parts are missing, please contact our customer service. 2. Clean the interior with lukewarm water and a soft cloth. Take out the ice basket and clean it3. Place your ice maker on a level s...
Page 8 - completely
7 To maintain maximum efficiency and to prevent bacterial growth, we suggest you clean your unit regularly, especially the water pipe and water filters. 1. If there is no water flowing down but you can still hear the compressor and water pump are working, the water pipe is probablyblocked. To clean ...
Page 9 - USING YOUR ICE MAKER; OPERATION
8 2. Turn “ON” : Operation Panel and Display Area A. Plug the Ice Maker into the outlet, the Power Indicator and will turn on and flash. The water tank starts filling the inner tank under the ice basket until it reaches required water level, and symbol turns off. Press Power Button (ON/OFF) on the o...
Page 10 - Shutdown; CLOSE
9 time you press "—", the duration decreases 1 minute, and the ice will be thinner. Themaximum time can be reduced is 6 minutes. After the machine is powered on again, itreturns to the default setting "0". Please note the time you set takes effect from the nextice making cycle. E. If...
Page 11 - WARNINGS
10 silicone plug and drain nut after draining out the water. Good hygiene is important for staying healthy. Please change water every 24 hours and cleanthe water tank and inner tank every 3 days. WARNINGS A. Make sure the water tank, water filter and the water separator pipe are cleaned regularly. B...
Page 12 - TROUBLESHOOTING
11 PROBLEM POSSIBLE CAUSE SOLUTION Ambient temperature display“E” on standby mode The ambient temperature sensordamaged Turn on the machine, "E"disappears and the ambienttemperature will no longerdisplay. Ice Full Indicator Light is on Too much ice cube in the basket Remove ice from the bask...
Page 13 - TECHNICAL PARAMETERS & CIRCUIT DIAGRAM; control
12 Model Model HZB- HZB- 18F/SL 18F/SL Protection Protection Type Type I I Power Power 115 115 V/ V/ 6 6 0Hz 0Hz Ice Ice Making Making Current Current 1. 1. 6 6 A A Ice Ice Harvest Harvest Current Current 2. 2. 6 6 A A Refrigerant Refrigerant R R 600 600 a a 1.13 1.13 Oz Oz / / 32 32 g g Design Desi...