Page 2 - Parts; description; Tools you will need for assembly:; left
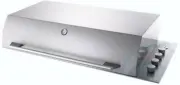
ii product description electrolux integrated barbecue electrolux integrated barbecue parts iii Parts Integrated barbecue with slimline lid Integrated barbecue with roasting hood 1 Pivotting leg 2 Slimline lid 3 Battery cover 4 Gas connection point 5 Burner controls 6 Grill assemblies x 2 sets 7 Hotp...
Page 3 - environmental tip; Information on disposal for users; user manual; integrated barbecue; Congratulations
electrolux integrated barbecue contents i Electrolux Home ProductsAustralia telephone: 1300 363 640fax: 1800 350 067 email: [email protected] web: www.electrolux.com.au New Zealand telephone: 09 573 2230fax: 0800 36 36 00 email: [email protected] web: www.electrolux.co.nz P/No. 0616001937 - Rev A © ...
Page 5 - • philips head screw driver
ii product description electrolux integrated barbecue electrolux integrated barbecue parts iii Parts Integrated barbecue with slimline lid Integrated barbecue with roasting hood 1 Pivotting leg 2 Slimline lid 3 Battery cover 4 Gas connection point 5 Burner controls 6 Grill assemblies x 2 sets 7 Hotp...
Page 6 - tips and information; Important safety instructions; Do not lean over barbecue when lighting.
electrolux integrated barbecue important safety instructions 1 Please read the user manual carefully and store in a handy place for later reference. Meanings of the symbols used in this manual are shown below: warning This symbol indicates information concerning your personal safety caution This sym...
Page 7 - electrolux integrated barbecue; Assembling the barbecue; NOTE ensure that grill assemblies are orientated
2 assembling electrolux integrated barbecue 1. Remove all components from box. 2. Attach heat shield to rear of unit by inserting the three top tabs into the rear holes and sliding the shield down. 3. Position flame tamers into desired locations (under where grill sections will be fitted) and fix ba...
Page 8 - Preparing the unit for Natural Gas installation; • Fit the pipe ensuring the blue sealing washer is in; Preparing the unit for Natural Gas connection to; gas type; Gas connection detail; Natural Gas installation
Preparing the unit for Natural Gas installation This barbecue is supplied set up for Natural Gas and is labelled accordingly. A Universal LPG conversion kit is included if required. Conversion of this unit to Universal LPG must be carried out by a qualified licensed person. A Certificate of Complian...
Page 9 - NOTE; Universal LPG installation
2. Adjust the turndown setting on the valve • If fitted, remove the knobs from the valves. • Remove rubber grommets from control panel holes. • Adjust the turndown screw fully clockwise on each of the 4 valves using a small flat blade screwdriver. The valve is now set correctly for LPG operation (se...
Page 10 - Gas bottle safety information
electrolux integrated barbecue electronic display controls – electronic models 5 • This appliance once converted to use Universal LPG is designed to use a 9kg (20 lbs) gas cylinder. • The gas cylinder must be made and marked in accordance with specifications for LPG cylinders • The isolation valve m...
Page 11 - Installation warnings; Choosing a location; Installation instructions
6 installation warnings/installation instructions electrolux integrated barbecue warning • This appliance shall only be used in an above ground, open air situation with natural ventilation without stagnant areas, where gas leakage and product of combustion are rapidly dispersed by wind or natural co...
Page 12 - • The minimum width of the mounting surface is 600mm; warning; • This appliance requires venting. An open area as; Dimensions
electrolux integrated barbecue installation instructions/dimensions 7 • The minimum width of the mounting surface is 600mm • The cut-out size required is 1025mm x 502mm (see diagram). • For roasting hood models there is a specific clearance required at the back of the barbecue between the splashback...
Page 13 - Gas requirements; important; Fitting the slimline lid or roasting hood
8 gas requirements/setting up the barbecue/fitting the lid or hood electrolux integrated barbecue Natural Gas requirements • The enclosure must be constructed so that access can be gained to the Natural Gas regulator at all times. • For Natural Gas the gas supply is required to be connected to 1.2m ...
Page 14 - Options for configuration of hotplates; NOTE The slimline lid is designed as a cover for weather; Operating instructions
electrolux integrated barbecue configuration of hotplates and grills/operating instructions 9 important Ensure flame tamers are positioned under the grill panels Left hand hotplate, right hand grill – preferred orientation for grilling Left hand half grill, central hotplate, right hand half grill – ...
Page 15 - Cleaning and care
10 lid safety leg/cleaning and care electrolux integrated barbecue The Electrolux Integrated barbecue has been constructed from select grade stainless steel which, if not cared for, may discolour over time. To keep your barbecue looking its best we recommend that the cooking surfaces are cleaned aft...
Page 16 - problem
electrolux integrated barbecue cleaning and care/maintenance/troubleshooting 11 Maintenance Troubleshooting problem possible cause remedy Barbecue won’t light No gas Check isolation valve is ONGas bottle empty – refill or change gas bottle Ignition system not working Check battery – should hear a cl...
Page 17 - Warranty; Important Notice
This document sets out the terms and conditions of product warranties for Electrolux branded appliances. It is an important document. Please keep it with your proof of purchase documents in a safe place for future reference should you require service for your Electrolux appliance. General Terms and ...