Page 2 - Before you throw away your old Wine cooler:; PLEASE
2 WARNING IMPORTANT SAFETY INSTRUCTIONS WARNING To reduce the risk of fire, electrical shock, or injury when using your appliance, follow these basic precautions: Read all instructions before using the Wine cooler. DANGER or WARNING: Risk of child entrapment. Child entrapment and suffocation...
Page 3 - INSTALLATION INSTRUCTIONS; Before Using Your Wine cooler
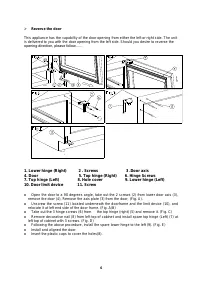
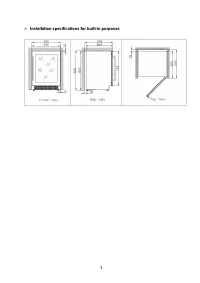
3 INSTALLATION INSTRUCTIONS Before Using Your Wine cooler Remove the exterior and interior packing. Before connecting the Wine cooler to the power source, let it stand upright for approximately 2 hours. This will reduce the possibility of a malfunction in the cooling system from handling durin...
Page 5 - Shelves
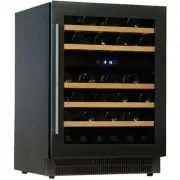
5 Shelves To prevent damaging the door gasket, make sure to have the door all the way opened when pulling shelves out of the rail compartment. For easy access to the storage content, you must pull the shelves approximately 1/3 out of the rail compartment, however this unit was designed with a ...
Page 6 - Reverse the door; Install and aligned the door.
6 Reverse the door This appliance has the capability of the door opening from either the left or right side. The unit is delivered to you with the door opening from the left side. Should you desire to reverse the opening direction, please follow…... 1. Lower hinge (Right) 2 . Screws 3 .Door axis 4...
Page 7 - Installation specifications for built-in purposes
7 Installation specifications for built-in purposes
Page 8 - Clean your Wine cooler; Wash the inside surfaces with a warm water and mild solution.; Power failure; Vacation Time
8 CARE & MAINTENANCE Clean your Wine cooler Turn off the power, unplug the appliance, and remove all items including shelves and rack. Wash the inside surfaces with a warm water and mild solution. Wash the shelves with a mild detergent solution. Wring excess water out of the sponge or ...
Page 10 - Before disposal of the appliance.
10 Before disposal of the appliance. 1. Disconnect the main plug from the main socket. 2. Cut off the main cable and discard it.