Dimplex SILVERTON - Manuals

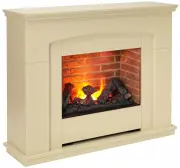
User Manual Dimplex SILVERTON


Summary
Table of Contents Welcome and Congratulations ..................................................... 2 Important Instructions ................................................................... 3 Site Selection and Preparation ..................................................... 4 Log Grate Assembly...
Welcome and Congratulations Thank you and congratulations for choosing to purchase a Silverton from Dimplex. Please carefully read and save these instructions. Caution: Read all instructions and warnings carefully before starting installation. Failure to follow these instructions may result in a pos...
Important Instructions Please read this information guide carefully to be able to safely install, use and maintain your product When using electrical appliances, basic precautions should always be followed to reduce the risk of fire, electrical shock and injury to persons, including the following: 1...
Dimplex Heaters Manuals
-
 Dimplex ALAMEDA
User Manual
Dimplex ALAMEDA
User Manual
-
 Dimplex COURCHEVEL
User Manual
Dimplex COURCHEVEL
User Manual
-
 Dimplex CUBIC
User Manual
Dimplex CUBIC
User Manual
-
 Dimplex ECR15
User Manual
Dimplex ECR15
User Manual
-
 Dimplex ECR15FA
User Manual
Dimplex ECR15FA
User Manual
-
 Dimplex ECR24FA
User Manual
Dimplex ECR24FA
User Manual
-
 Dimplex ECR24TIF
User Manual
Dimplex ECR24TIF
User Manual
-
 Dimplex KTN20-AU
User Manual
Dimplex KTN20-AU
User Manual
-
 Dimplex LVT20-AU
User Manual
Dimplex LVT20-AU
User Manual
-
 Dimplex MCFSTV12-AU
User Manual
Dimplex MCFSTV12-AU
User Manual
-
 Dimplex ML2TSFA
User Manual
Dimplex ML2TSFA
User Manual
-
 Dimplex MOCCA
User Manual
Dimplex MOCCA
User Manual
-
 Dimplex MWDS15-AU
User Manual
Dimplex MWDS15-AU
User Manual
-
 Dimplex OAKHURST
User Manual
Dimplex OAKHURST
User Manual
-
 Dimplex OCR15FA
User Manual
Dimplex OCR15FA
User Manual
-
 Dimplex OCR15TIF
User Manual
Dimplex OCR15TIF
User Manual
-
 Dimplex OFC2400TI
User Manual
Dimplex OFC2400TI
User Manual
-
 Dimplex OFC2400TIF
User Manual
Dimplex OFC2400TIF
User Manual
-
 Dimplex OFRC15TFNW
User Manual
Dimplex OFRC15TFNW
User Manual
-
 Dimplex OFRC24TIR
User Manual
Dimplex OFRC24TIR
User Manual