Denon DHTS517 - Manuals
Denon DHTS517 – User Manual, Manual in PDF format online.
Manuals:
User Manual Denon DHTS517


Summary
About manuals 4 About descriptions of this manual 4 Accessories 5 Before using the remote control unit 6 Operating range of the remote control unit 7 Part names and functions 8 Sound bar 8 Subwoofer 12 Remote control unit 13 Connections Positioning 15 Positioning the sound bar in front of a TV 15 Ha...
Tips Troubleshooting 35 Power does not turn on / Power is turned off 36 Operations cannot be performed through the remote control unit 37 Trouble teaching this unit remote control commands 37 No sound comes out 38 Bluetooth playback does not work 39 The HDMI control function does not work 40 Audio c...
Thank you for purchasing this Denon product. To ensure proper operation, please read this owner’s manual carefully before using the product. After reading this manual, be sure to keep it for future reference. About manuals The following manuals are included on this unit. 0 Safety Instructions (suppl...
Manual Denon DHTS517


Summary
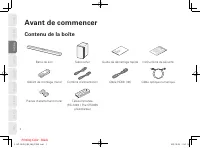
1 ENGLISH DEUTSCH FRANÇAIS ITALIANO ESPAÑOL NEDERLANDS SVENSKA РУ ССКИЙ POLSKI Avant de commencer Contenu de la boîte Barre de son Subwoofer Guide de démarrage rapide Instructions de sécurité Gabarit de montage mural Cordons d’alimentation Câble HDMI (4K) Câble optique numérique Pièces d’écartement ...
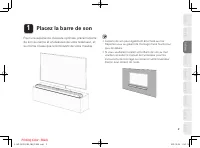
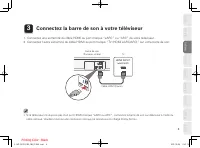
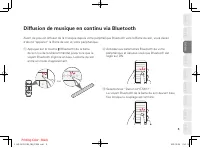
2 ENGLISH DEUTSCH FRANÇAIS ITALIANO ESP AÑOL NEDERLANDS SVENSKA РУ ССКИЙ POLSKI 1 Placez la barre de son Pour une expérience d'écoute optimale, placez la barre de son au centre et en-dessous de votre téléviseur, et au même niveau que le bord avant de votre meuble. • La barre de son peut également êt...
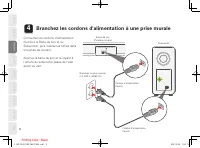
3 ENGLISH DEUTSCH FRANÇAIS ITALIANO ESPAÑOL NEDERLANDS SVENSKA РУ ССКИЙ POLSKI 2 Placez le caisson de basse Placez le Subwoofer sur le sol près de la Barre de son. 3. DHT-S517E2_QSG_FRA_211008.indd 3 3. DHT-S517E2_QSG_FRA_211008.indd 3 2021/10/08 9:43:15 2021/10/08 9:43:15 Printing Color : Black
Denon Manuals
-
 Denon AVR-882
User Manual
Denon AVR-882
User Manual
-
Denon AVR-882
Manual
-
 Denon AVR-682
User Manual
Denon AVR-682
User Manual
-
Denon AVR-682
Manual
-
Denon AVR-1602
User Manual
-
Denon AVR-1602
Manual
-
 Denon DRR-M30
User Manual
Denon DRR-M30
User Manual
-
 Denon DVD-756
User Manual
Denon DVD-756
User Manual
-
Denon DVD-756
Manual
-
 Denon DHT-1000DV
User Manual
Denon DHT-1000DV
User Manual
-
Denon DHT-1000DV
Manual
-
 Denon DVD-556
User Manual
Denon DVD-556
User Manual
-
Denon DVD-556
Manual
-
 Denon AVR-786
User Manual
Denon AVR-786
User Manual
-
Denon AVR-786
Manual
-
 Denon AVR-683
User Manual
Denon AVR-683
User Manual
-
Denon AVR-683
Manual
-
 Denon AVR-3802
User Manual
Denon AVR-3802
User Manual
-
Denon AVR-3802
Manual
-
 Denon AVR-2805
User Manual
Denon AVR-2805
User Manual