Denon DENONHOMEAMP - Manuals
Denon DENONHOMEAMP – Manual, User Manual in PDF format online.
Manuals:
Manual Denon DENONHOMEAMP


Summary
DENON HOME AMP Wireless Streaming Amplifier Quick Start Guide 1.DENON HOME AMP E3_ENG_QSG_240320.indd 1 1.DENON HOME AMP E3_ENG_QSG_240320.indd 1 2024/03/27 15:20:26 2024/03/27 15:20:26
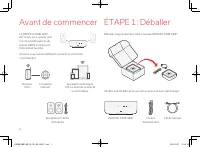
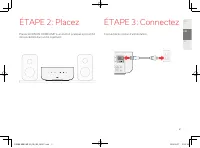
1 Avant de commencer ÉTAPE 1: Déballer Le DENON HOME AMP est conçu pour ajouter une fonctionnalité audio multi-pièces HEOS à votre paire d’enceintes favorite. Assurez-vous que les éléments suivants fonctionnent correctement: Appareil mobile Apple iOS ou Android connecté à votre réseau Enceintes et c...
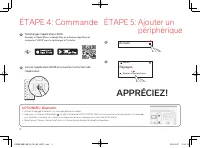
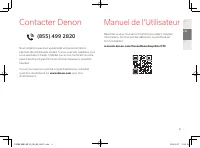
4 E N F R E S Manuel de l’Utilisateur Reportez-vous au manuel sur Internet pour obtenir d’autres informations, fonctions et des détails sur la procédure de fonctionnement. manuals.denon.com/DenonHomeAmp/ALL/FR/ Nous espérons que vous apprécierez votre produit Denon pendant de nombreuses années. Si v...
User Manual Denon DENONHOMEAMP


Summary
Accessories 4 Part names and functions 5 Front panel 5 Rear panel 6 Connecting 7 Connecting 7 Connecting speakers 7 Connecting a subwoofer 8 Connecting a digital device 8 Connecting an analog device 9 Connecting a USB flash drive 9 Connecting an external control device 10 Connecting the power cord 1...
Thank you for purchasing this Denon product. To ensure proper operation, please read this owner’s manual carefully before using the product. After reading this manual, be sure to keep it for future reference. Accessories Check that the following parts are included with the product. Quick Start Guide...
Part names and functions Front panel w e r q A Quick select buttons (1 - 3)Register input source, volume and other settings to these buttons or recall those settings. ( v p. 29) B Status LEDPlease refer to the “Status LED table” for LED color and state meaning. ( v p. 36) C Play/Pause key ( 1 / 3 ) ...
Denon Manuals
-
 Denon AVR-882
User Manual
Denon AVR-882
User Manual
-
Denon AVR-882
Manual
-
 Denon AVR-682
User Manual
Denon AVR-682
User Manual
-
Denon AVR-682
Manual
-
Denon AVR-1602
User Manual
-
Denon AVR-1602
Manual
-
 Denon DRR-M30
User Manual
Denon DRR-M30
User Manual
-
 Denon DVD-756
User Manual
Denon DVD-756
User Manual
-
Denon DVD-756
Manual
-
 Denon DHT-1000DV
User Manual
Denon DHT-1000DV
User Manual
-
Denon DHT-1000DV
Manual
-
 Denon DVD-556
User Manual
Denon DVD-556
User Manual
-
Denon DVD-556
Manual
-
 Denon AVR-786
User Manual
Denon AVR-786
User Manual
-
Denon AVR-786
Manual
-
 Denon AVR-683
User Manual
Denon AVR-683
User Manual
-
Denon AVR-683
Manual
-
 Denon AVR-3802
User Manual
Denon AVR-3802
User Manual
-
Denon AVR-3802
Manual
-
 Denon AVR-2805
User Manual
Denon AVR-2805
User Manual