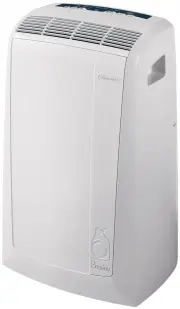
Page 2 - AIR-CONDITIONING WITHOUT INSTALLATION; PREPARING FOR USE
16 The instructions below will enable you to prepare your air conditioner for operation as efficientlyas possible. Before use, make sure the air intake and outlet grilles are unobstructed. AIR-CONDITIONING WITHOUT INSTALLATION Just a few simple steps and your comfort isensured with your air conditio...
Page 3 - AIR-CONDITIONING WITH INSTALLATION
17 AIR-CONDITIONING WITH INSTALLATION If required, your appliance can also be instal-led semi-permanently (Fig. D ). • Fit the wall flange accessory provi- ded in the hole. • Fit the air exhaust hose in the rele- vant hose located on the rear side of the appliance (see fig. A ). • Screw the wall mou...
Page 4 - THE CONTROL PANEL; DESCRIPTION OF THE CONTROL PANEL; Dehumidifying mode light
18 THE CONTROL PANEL H C D I L M Q G B A E F T S O P N R Never turn the air conditioner off by unplugging from the mains. Always press the button, then wait for a few minutes before unplugging. This allows the appliance toper form a cycle of checks to verify operation. . DESCRIPTION OF THE CONTROL P...
Page 5 - OPERATION; TURNING THE APPLIANCE ON; MODE; ) until the indicator light corresponding; AIR-CONDITIONING MODE; You can adjust temperature in air conditioning mode only.; FAN; for silent operation
19 OPERATION TURNING THE APPLIANCE ON Plug the appliance into the mains.Press the ON/OFF button ( A ) (when turned on, the air conditioner starts operating in the same mode as when it was turned off).The display shows the room temperature. Press the MODE button ( B ) until the indicator light corres...
Page 6 - FAN MODE; DEHUMIDIFYING MODE; MIN; PROGRAMMING THE TIMER; How to programme delayed start up
20 FAN MODE Adjust fan speed by pressing the FAN button ( C ) as described for the air-conditioning mode. Remember that the higher the speed, the more air is filtered. If you select " MIN " speed, less air is filtered but the appliance is also less noisy. DEHUMIDIFYING MODE Ideal for reducin...
Page 7 - USING THE REMOTE CONTROL UNIT (SOME MODELS ONLY); MODELS WITH REMOTE CONTROL; extreme care and respect; DESCRIPTION OF THE REMOTE CONTROL; button; increase temperature button; Pulsante “; TIMER; °F/°C switching button; ) (when turned on, the air conditioner starts operating in the same; ) to select the required mode; MAX 5 metres
21 USING THE REMOTE CONTROL UNIT (SOME MODELS ONLY) MODELS WITH REMOTE CONTROL • Point the remote control at the receiver onthe air-conditioner. The remote controlmust be no more than 5 metres away fromthe appliance (without obstaclesbetween the remote control and thereceiver). • The remote control ...
Page 8 - TIPS; level
22 To get the best from your air conditioner, fol- low these recommendations: • close the windows and doors in the room to be air conditioned. The only exception is when the appliance is installed through a hole in the wall. In this case, you are recommended to leave a slight draught through a door ...
Page 9 - CLEANING
23 Before cleaning or maintenance, turn theappliance off by pressing the ON/OFF button(A) or in models with remote control unit, bypressing the ON/OFF button , then always unplug the appliance from the mains socket. CLEANING THE CABINET You should clean the appliance with a slightlydamp cloth then d...
Page 10 - TROUBLESHOOTING; PROBLEM; room temperature is too low; “Low Temperature”
24 TROUBLESHOOTING PROBLEM CAUSE REMEDY The air conditionerdoes not come on • no electricity • it is not plugged into the mains • the safety device has tripped • wait • plug into the mains • contact your service centre The air conditionerworks for a shorttime only • the air exhaust hose has a constr...
Page 11 - GUARANTEE/TECHNICAL SPECIFICATION; GUARANTEE AND TECHNICAL ASSISTANCE
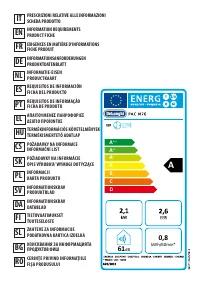
25 GUARANTEE/TECHNICAL SPECIFICATION GUARANTEE AND TECHNICAL ASSISTANCE The conditions of the guarantee and techni- cal assistance are given on the certificate supplied with your appliance. LIMIT CONDITIONS Room temperature for air conditioning 21 ÷ 35°C TECHNICAL SPECIFICATION Power supply voltage ...