Page 2 - A MESSAGE TO OUR CUSTOMERS; WARNING; PLEASE RETAIN THIS MANUAL
1 A MESSAGE TO OUR CUSTOMERS 2 Thank you for selecting this DCS Outdoor Warming Drawer. Because of its unique features, we have developed this Use and Care and Installation Guide. It contains valuable information on how to properly operate, install and maintain your new Warming Drawer for years of s...
Page 3 - TABLE OF CONTENTS
1 TABLE OF CONTENTS 2 S A F E T Y P R A C T I C E S & P R E C A U T I O N S 3-5 W A R M I N G D R A W E R F E A T U R E S 6 I N S T A L L A T I O N Specifications 7 Cutout Dimensions 7 Mounting Installation 10-11 U S E A N D C A R E I N F O R M A T I O N Operational Guide 12 Cleaning the Warming...
Page 4 - SAFETY PRACTICES & PRECAUTIONS; R E A D A N D U N D E R S T A N D T H E S E P R E C A U T I O N S; Be certain to use only dry pot holders:
4 SAFETY PRACTICES & PRECAUTIONS 3 R E A D A N D U N D E R S T A N D T H E S E P R E C A U T I O N S n Read this Use and Care and Installation Manual thoroughly before using your new appliance. This will help to reduce the risk of fire, electric shock, or injury to persons. n Remove all packagin...
Page 5 - SAFETY PRACTICES & PRECAUTIONS
4 SAFETY PRACTICES & PRECAUTIONS n For safety reasons and to avoid damage to the appliance, never sit, stand, or lean on the warming drawer door. n For personal safety, wear proper apparel. Loose fitting garments or hanging sleeves should never be worn while using this appliance. Some synthetic ...
Page 6 - S A V E T H E S E I N S T R U C T I O N S; IMPORTANT SAFEGUARDS
6 5 S A V E T H E S E I N S T R U C T I O N S n Read all instructions n Do not touch hot surfaces. Use handles or knobs. n To protect against electrical shock, do not immerse cord, plugs, or element in water or other liquid. n Close supervision is necessary when any appliance is used by or near chil...
Page 7 - WARMING DRAWER FEATURES
6 WARMING DRAWER FEATURES Power Indicator Lens Thermostat Control Knob Stainless Steel Tray Power Indicator Light Stainless Steel Drawer Model and serial tag Fig. 01 5
Page 8 - INSTALLATION INSTRUCTIONS; P R O U D I N S T A L L A T I O N; C U T O U T D I M E N S I O N S
8 7 INSTALLATION INSTRUCTIONS P R O U D I N S T A L L A T I O N S P E C I F I C A T I O N S The cabinet depth from the outer edge of the face frame to the inside back of the cabinet or wall should be at least 24 3/16” inches (see figure 02A). The Warming Drawer should be installed into a base cabine...
Page 9 - F L U S H I N S T A L L A T I O N
8 7 INSTALLATION INSTRUCTIONS F L U S H I N S T A L L A T I O N S P E C I F I C A T I O N S The cabinet depth from the outer edge of the face frame to the inside back of the cabinet or wall should be at least 26 3/16” inches (see figure 02B). The Warming Drawer should be installed into a base cabine...
Page 11 - M O U N T I N G I N S T A L L A T I O N; S T E P 1; S T E P 4
10 INSTALLATION INSTRUCTIONS M O U N T I N G I N S T A L L A T I O N The lower rear corners of the cabinet need to provide proper support to the back of the Warming Drawer and the anti-tip mounting clips. A 120 volt AC 15 amp (GFI) outlet should be located no further than 36 inches from the back cen...
Page 13 - USE & CARE INFORMATION; O P E R A T I O N A L G U I D E; CAUTION; P R E H E A T T I M E A N D T E M P E R A T U R E S E L E C T O R:
12 USE & CARE INFORMATION O P E R A T I O N A L G U I D E The Warming Drawer is designed to keep previously cooked foods at a safe, warm temperature, for extended periods of time, when operated correctly. It is not designed to cook or reheat food. The Warming Drawer should be pre-heated on HIGH ...
Page 14 - C L E A N I N G T H E W A R M I N G D R A W E R
14 13 USE & CARE INFORMATION C L E A N I N G T H E W A R M I N G D R A W E R n Be careful cleaning any part of this appliance, particularly the drawer box and back of the drawer face. All parts of the drawer can be cleaned with a hot soapy damp cloth, rinsed, dried and buffed with a heavy pile c...
Page 15 - R E M O V I N G T H E D R A W E R
14 USE & CARE INFORMATION R E M O V I N G T H E D R A W E R Be sure the drawer is cool and no food items or trays are in the drawer. Never attempt to remove the drawer while the unit is on or warm. 1. To remove the drawer, first remove plates, trays, etc., from the drawer.2. Pull the drawer open...
Page 16 - R E P L A C I N G T H E D R A W E R
16 15 USE & CARE INFORMATION R E P L A C I N G T H E D R A W E R WARNING With the drawer removed, the heating element is exposed (see Figure 13). Never turn the unit on while the drawer is removed. Never let children play near or touch the warming drawer while it is not safely installed. Push th...
Page 17 - TEMPERATURE SETTINGS; S U G G E S T E D T E M P E R A T U R E S T O K E E P F O O D S H O T
16 TEMPERATURE SETTINGS FOOD TEMPERATURE Beef** Rare Low Medium Med Well Done Med Bacon High Casseroles Med Chips High Cooked Cereal Med Eggs Med Fish, Seafood Med Fried Foods (all) High Fruit Med Garlic Bread, Rolls Low Gravy, Cream Sauces Med Ham Med Lamb Med Meat Loaf Med Pancakes, Waffles High P...
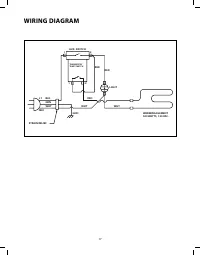
Page 18 - WIRING DIAGRAM
18 17 WIRING DIAGRAM AUX. SWITCH LIGHT WARMING ELEMENT 500 WATTS, 120 VAC. GND L1 NEU STRAIN RELIEF 1 THERMOSTAT TEMP. SWITCH 2 1 2 WHT GRN BLK WHT RED WHT RED RED
Page 19 - SERVICE; H O W T O O B T A I N S E R V I C E:
18 SERVICE H O W T O O B T A I N S E R V I C E: Before you call for service: 1. Is the circuit breaker or GFI tripped or the fuse blown?2. Is there a power outage in the area? For warranty service, please contact your local service provider or DCS Customer Care Representative at (888) 936-7872. Befo...
Page 21 - A L’INTENTION DE NOS CLIENTS; AVERTISSEMENT; VEUILLEZ CONSERVER CE MANUEL À TITRE DE RÉFÉRENCE.
20 A L’INTENTION DE NOS CLIENTS Nous vous remercions d’avoir choisi ce chauffe-plats DCS. Nous avons conçu ce Manuel d’utilisation et d’entretien pour expliquer les fonctions uniques de cet appareil. Il contient des informs extrêmement utiles sur la façon cor- recte de faire fonctionner votre nouvea...
Page 22 - TABLE DES MATIÉRES
22 21 TABLE DES MATIÉRES M E S U R E S D E S É C U R I T É E T D E P R É C A U T I O N 22 C A R A C T E R I S T I Q U E S D U C H A U F F E - P L A T S 25 I N S T R U C T I O N S D E M O N T A G E Specifications 26 Montage et installation 29-30 E N T R E T I E N E T U T I L I S A T I O N Reglages de...
Page 23 - MESURES DE SÉCURITÉ ET DE PRÉCAUTION; V E U I L L E Z L I R E E T B I E N A S S I M I L E R C E S C O N S I G N E S
22 MESURES DE SÉCURITÉ ET DE PRÉCAUTION V E U I L L E Z L I R E E T B I E N A S S I M I L E R C E S C O N S I G N E S n Veuillez lire attentivement ce manuel d’utilisation et d’entretien avant d’utiliser votre nouvel appareil. Ceci vous permettra de réduire les risques d’incendie, de chocs électriqu...
Page 25 - P R I È R E D E C O N S E R V E R C E S I N S T R U C T I O N S; PRÉCAUTIONS IMPORTANTE
24 23 P R I È R E D E C O N S E R V E R C E S I N S T R U C T I O N S n Lire toutes les instructions n Ne pas toucher les surfaces très chaudes. Utilisez les manches ou les boutons. n Pour éviter tout risque électrique, ne pas immerger le cordon, les fiches ou l’élément dans l’eau ou d’autre liq- ui...
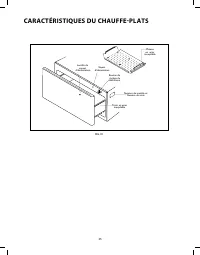
Page 26 - CARACTÉRISTIQUES DU CHAUFFE-PLATS
26 25 CARACTÉRISTIQUES DU CHAUFFE-PLATS Lentille du voyant d'alimentation Bouton de réglage du thermostat Plateau en acier inoxydable Voyant d'alimentation Tiroir en acier inoxydable Numéro de modèle et Numéro de série FIG. 01
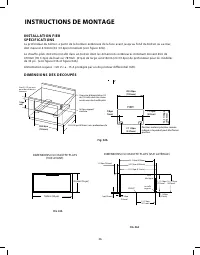
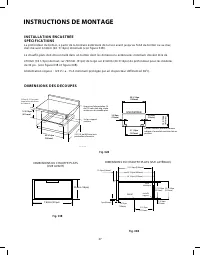
Page 27 - INSTRUCTIONS DE MONTAGE; I N S T A L L A T I O N F I E R; D I M E N S I O N S D E S D E C O U P E S
Prise électrique installé support 16” 23 1/4po (590mm) 26 1/8po (663mm) 24 1/8po (613mm) 1 1/8po (28mm) 11-11/16po (297mm) 12-1/4po (311mm) 13/16po (20mm) 1po(25mm) 30” 14 -7/16po (367mm) 1 -5/8po (41mm) ÉGOUT 26 INSTRUCTIONS DE MONTAGE I N S T A L L A T I O N F I E R S P É C I F I C A T I O N S La ...
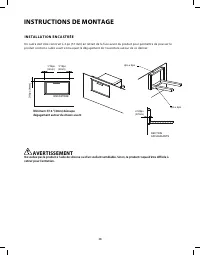
Page 28 - I N S T A L L A T I O N E N C A S T R E E
Prise électrique installé support 16” 23 1/4po (590mm) 26 1/8po (663mm) 24 1/8po (613mm) 1 1/8po (28mm) 11-11/16po (297mm) 12-1/4po (311mm) 13/16po (20mm) 1po(25mm) 30” 14 -7/16po (367mm) 1 -5/8po (41mm) ÉGOUT DIMENSIONS DU CHAUFFE-PLATS (VUE LATÉRALE) 28 27 I N S T A L L A T I O N E N C A S T R E E...
Page 29 - I N S T A L L A T I O N E N C A S T R É E
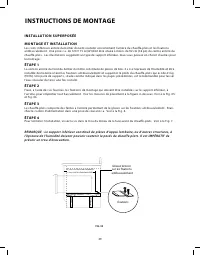
28 27 INSTRUCTIONS DE MONTAGE 1/16po (2mm) 1/16po (2mm) 2po x 4po 2po x 4po 3/16po (4mm) 2 5/8po (67mm) ENCASTREE SECTION AFFLEURANTS I N S T A L L A T I O N E N C A S T R É E Un cadre doit être construit à 2 po (51 mm) en retrait de la face avant du produit pour permettre de pousser le produit cont...
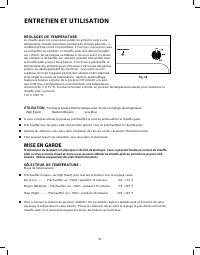
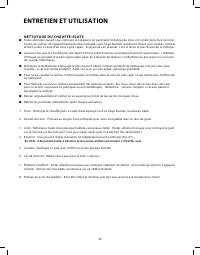
Page 32 - ENTRETIEN ET UTILISATION; R É G L A G E S D E T E M P É R A T U R E; MISE EN GARDE; S É L E C T E U R D E T E M P É R A T U R E :
32 31 ENTRETIEN ET UTILISATION R É G L A G E S D E T E M P É R A T U R E Le chauffe-plats est conçu pour garder les aliments cuits à une température chaude sécuritaire, pendant de longues périodes, à condition d’être utilisé correctement. Il n’est pas conçu pour cuire ou réchauffer les aliments. Le ...
Page 33 - N E T T O Y A G E D U C H A U F F E - P L A T S
ENTRETIEN ET UTILISATION 32 N E T T O Y A G E D U C H A U F F E - P L A T S n Faites attention quand vous nettoyez cet appareil, en particulier le boîtier du tiroir et l’arrière de la face du tiroir. Toutes les parties de l’appareil peuvent être nettoyées avec linge humide savonneux chaud, puis rinc...
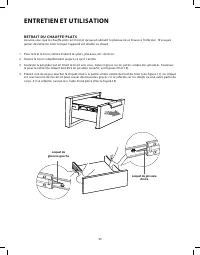
Page 34 - R E T R A I T D U C H A U F F E - P L A T S
34 33 ENTRETIEN ET UTILISATION R E T R A I T D U C H A U F F E - P L A T S Assurez-vous que le chauffe-plats est froid et qu’aucun aliment ni plateau ne se trouve à l’intérieur. N’essayez jamais de retirer le tiroir lorsque l’appareil est allumé ou chaud. 1. Pour retirer le tiroir, retirez d’abord l...
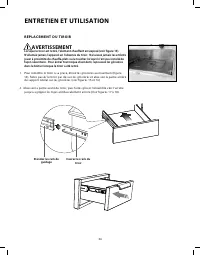
Page 35 - R E P L A C E M E N T D U T I R O I R
34 ENTRETIEN ET UTILISATION R E P L A C E M E N T D U T I R O I R AVERTISSEMENT Lorsque le tiroir est retiré, l’élément chauffant est exposé (voir figure 13). N’allumez jamais l’appareil en l’absence du tiroir. Ne laissez jamais les enfants jouer à proximité du chauffe-plats ou le toucher lorsqu’il ...
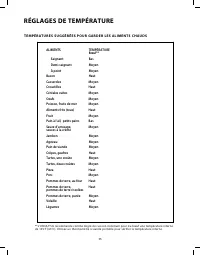
Page 36 - RÉGLAGES DE TEMPÉRATURE; T E M P É R A T U R E S S U G G É R É E S P O U R G A R D E R L E S A L I M E N T S C H A U D S
36 35 RÉGLAGES DE TEMPÉRATURE ALIMENTS TEMPÉRATURE Bœuf** Saignant Bas Demi-saignant Moyen À point Moyen Bacon Haut Casseroles Moyen Croustilles Haut Céréales cuites Moyen Oeufs Moyen Poisson, fruits de mer Moyen Aliments frits (tous) Haut Fruit Moyen Pain à l’ail, petits pains Bas Sauce d’arrosage,...
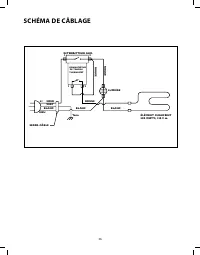
Page 37 - SCHÉMA DE CÂBLAGE
36 SCHÉMA DE CÂBLAGE INTERRUPTEUR AUX. LUMIÈRE ÉLÉMENT CHAUFFANT500 WATTS, 120 V c.a. Terre L1 NEU SERRE-CÂBLE 1 COMMUTATEUR DE TEMP. DU THERMOSTAT 2 1 2 NOIR VERT BLANC BLANC BLANC ROUGE ROUGE ROUGE 35
Page 38 - P O U R L’O B T E N T I O N D E S E R V I C E :
37 SERVICE P O U R L’O B T E N T I O N D E S E R V I C E : Avant d’appeler le service technique : 1. Est-ce que le disjoncteur s’est déclenché ou que le fusible est grillé?2. Y a-t-il une coupure de courant dans le secteur? Pour le service sous garantie, veuillez contacter votre distributeur ou cont...