Page 3 - NOTE; WARNING; this or any other appliance.; DANGER; What To Do If You Smell Gas:; or your fire department.; A MESSAGE TO OUR CUSTOMERS
1 Thank you for selecting this DCS by Fisher & Paykel Professional “BGB” Series Grill. Because of these appliances’ unique features we have developed this manual. It contains valuable information on how to properly install, oper-ate and maintain your new appliance for years of safe and enjoyable...
Page 4 - TABLE OF CONTENTS
2 S A F E T Y P R A C T I C E S & P R E C A U T I O N S 3 G R I L L M O D E L S 7 I N S T A L L A T I O N Locating Grill / Built-in Clearances 8 Built-in Construction Details 12 Gas Hook-up 13 Leak Testing 18 Burner Adjustment 19 Radiant Assembly 20 Griddle Plate 21 Installer Checklist 22 U S I ...
Page 5 - IMPORTANT SAFETY NOTICE!; SAFETY PRACTICES & PRECAUTIONS
3 IMPORTANT SAFETY NOTICE! Certain Liquid Propane dealers may fill liquid propane cylinders for use in the grill beyond cylinder filling capacity. This “Overfilling” may create a dangerous condition. “Overfilled” cylinders can build up excess pressure. As a safety device, the cylinder pressure relie...
Page 7 - G R I L L P L A C E M E N T
SAFETY PRACTICES & PRECAUTIONS For personal safety, wear proper apparel. Loose fitting garments or sleeves should never be worn while using this appliance. Some synthetic fabrics are highly flammable and should not be worn while cooking. Only certain types of glass, heat-proof glass ceramic, ear...
Page 8 - This unit is for outdoor use only!
■ When using the side burners always use flat bottomed pans which are large enough to cover the side burner. Adjust the flame so that it heats only the bottom of the pan to avoid ignition of clothing. Position handles inward away from open edges of the unit to avoid burns associated with unintention...
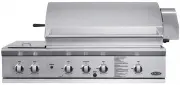
Page 9 - GRILL MODELS
7 GRILL MODELS B G B 4 8 - B Q A R B G B 4 8 - B Q R B G B 3 6 - B Q A R
Page 10 - INSTALLATION
Tools required: Phillips screwdriver. Important! Before installation, remove shipping brackets from the grill. To do so, loosen the 4 screws on the bottom sides of the grill which hold the brackets to the grill. Slide the shipping brackets off and retighten the screws. Remove all internal packaging ...
Page 12 - C l e a r a n c e s t o N o n - C o m b u s t i b l e C o n s t r u c t i o n *; C l e a r a n c e s t o N o n - C o m b u s t i b l e C o n s t r u c t i o n * :; * DEFINITION OF NONCOMBUSTIBLE MATERIAL; - Material which is not capable of being ignited and burned, such as; C l e a r a n c e s t o C o m b u s t i b l e C o n s t r u c t i o n * * :
10 BGB 48 BQAR = 1378 mm BGB 48 BQR = 1382 mm BGB 36 BQAR = 1082 mm ( with rotisserie motor mounted) BGB 48 Models = 1216 mm BGB 36 Models = 911 mm ( without rotisserie motor mounted) rotisserie motor 616 mm 267 mm 673 mm grill exhaust 76 mm (to non-combustible construction / minimum hood clearance ...
Page 13 - C l e a r a n c e s t o C o m b u s t i b l e C o n s t r u c t i o n * *; It is required that a minimum of 3 x 65 cm
11 G E N E R A L The grill is designed for easy placement into built-in masonry enclosures. For non-combustible applications the grill drops into the opening shown in Fig. 10 and hangs from its side flanges. A deck is not required to support it from the bottom. When using the insulated jacket in a c...
Page 14 - BUILT–IN CONSTRUCTION DETAILS
12 grill exhaust 76 mm (to non-combustible construction / minimum hood clearance) min. 310 mm (to combustible construction) 254 mm 559 mm 648 mm 38 mm 51 mm 349 mm Standard layout for non-combustible enclosure: NOTE: If using a backguard apron or rear wall, locate electrical service on the right han...
Page 15 - G A S R E Q U I R E M E N T S; N A T U R A L G A S H O O K U P :; G A S F I T T E R O N L Y .; For built-in installation with connection to Natural Gas:
13 INSTALLATION GAS HOOK-UP G A S R E Q U I R E M E N T S Verify the type of gas supply to be used, either natural or LPG, by checking the gas type label on rear panel of the unit and the serial label behind the drip pan handle on the right-hand side. For gas consumption data, see the rating label o...
Page 16 - N A T U R A L G A S H O O K U P C O N T :; C H E C K I N G T H E G A S P R E S S U R E
14 INSTALLATION GAS HOOK-UP N A T U R A L G A S H O O K U P C O N T : Important! Where the appliance is intended to be permanently connected to a reticulated supply of gas, the appliance inlet connection shall have a thread in accordance with AS ISO 7.1 For grills mounted on a mobile cart and being ...
Page 17 - L P G G A S H O O K U P; Do not overtighten the coupler.; L P G C Y L I N D E R R E Q U I R E M E N T S :; If the appliance is stored indoors, the cylinder must be discon-
15 L P G G A S H O O K U P Grills set for use with LPG gas come equipped with a high capacity hose/regulator assem bly for connection to a standard 9 kg LPG POL cylinder. The LPG cylinder is not included. Connection: 1/2” NPT male with a 3/8” Flare adapter (included). LPG Hose with a POL fitting and...
Page 18 - L P G C Y L I N D E R R E S T R A I N T F O R B U I L T - I N I N S T A L L A T I O N
16 INSTALLATION GAS HOOK-UP L P G C Y L I N D E R R E S T R A I N T F O R B U I L T - I N I N S T A L L A T I O N If the grill is to be installed in a Built-in application, then the grill must be installed in accordance with the Built–in installation guidelines. If you intend to operate your Built-i...
Page 20 - B e f o r e T e s t i n g :; LEAK TESTING -- PROCEDURE FOR A QUALIFIED GAS FITTER
18 Important! There are two levels of testing for leaks. (1) Gas supply connection points that are accessible with the grill installed can be leak tested by the user. (2) Connections that are internal to the grill and therefore require dis-assembly should only be leak-tested by a licenced gas fitter...
Page 21 - L O W F L A M E S E T T I N G A D J U S T M E N T :; BURNER ADJUSTMENT
Burner adjustment should only be performed by a licenced gas fitter. G R I L L B U R N E R A I R A D J U S T M E N T : Each grill burner is tested and adjusted at the factory prior to shipment; however, variations in the local gas supply or a conversion from one gas to another may make it necessary ...
Page 22 - R A D I A N T A S S E M B L Y I N S T A L L A T I O N :; I N S T A L L I N G T H E G R E A S E S H I E L D S; RADIANT ASSEMBLY
20 R A D I A N T A S S E M B L Y I N S T A L L A T I O N : 1 . Unpack ceramic rods and remove radiant (Fig. 25) from the unit. 2 . Unlock radiant end cap by pushing it up with two fingers (Fig. 26). 3. Place 18 ceramic rods on the radiant (Fig. 27). 4. Lock radiant end cap (Fig. 28). 5. Place the as...
Page 23 - GRIDDLE PLATE; Griddle plate to be fitted to centre burner positions only; Remove griddle plate only when completely cooled
21 INSTALLATION GRIDDLE PLATE Note: the griddle plate is not supplied with the grill but may be purchased separately as an optional accessory . To purchase a griddle plate, contact Customer Care. See section ‘Service’ for contact details. Griddle plate to be fitted to centre burner positions only 1 ...
Page 24 - INSTALLER CHECKLIST
22 ❏ Specified clearances main- tained to combustibles. ❏ Verified proper enclosure ventilation. ❏ All internal packaging and any adhesive residue removed. To remove stub-born residue, use rubbing alcohol or a commercially available adhesive remov-er. ❏ Removed shipping brack- ets. ❏ Knobs turn free...
Page 25 - done correctly, correct before using the unit.
N O T E : If any of the listed items are missing, contact Customer Care. See section ‘Service’ for contact details.. Please be prepared with your Model #, Serial # and description of item(s) that are missing. Read all installation instructions in this manual to see if the unit has been properly inst...
Page 26 - USING THE GRILL; LIGHTING INSTRUCTIONS
24 B E F O R E U S I N G Y O U R G R I L L , C H E C K T H A T A L L P A C K A G I N G H A S B E E N R E M O V E D . T O L I G H T T H E G R I L L B U R N E R : Open the grill hood and/or remove the top grate cover from side burner (for 48BQR) before lighting. Turn all knobs to “OFF”. Turn the main ...
Page 27 - D I R E C T / I N D I R E C T C O O K I N G N O T E S :; IMPORTANT; U s i n g t h e G r i l l :; GRILLING
25 G R I L L : Each grill section consists of a large stainless steel burner, a series of ceramic rods en-cased in a stainless steel radiant, grease shield and a stainless steel heat retaining grate. Below the burners there is a stainless steel heat shield which reflects usable heat upward into the ...
Page 28 - Check to be certain the drip pan and grease tray are in place.; Never cook food with all grill burners on; “SEAR” with the grill hood open for more than 30 minutes.; G R I L L I N G H I N T S :
26 USING THE GRILL GRILLING (Continued) 1. Check to be certain the drip pan and grease tray are in place. 2. Light the grill burners using the instructions in section ‘Lighting instructions’. 3. Once you have verified the burners are lit, preheat the grill for 5 to 10 minutes. 4. Place the food on t...
Page 29 - RADIUS GRATE
27 “W”-SHAPED GRATE RADIUS GRATE • chicken (bone-in and boneless cuts)• steaks• chops• burgers• ribs• kabobs• steak cuts of fish like tuna and swordfish• whole fish• game• oysters• large slices of whole vegetables and mushrooms• fruit• bread• sausages• hot dogs • delicate fish fillets• lobster meat•...
Page 30 - Do not immerse the rotisserie unit in water.; USING THE ROTISSERIE
28 The grill rotisserie system is designed to cook items from the back using infrared heat. The location of the burner allows the placement of the rotisserie basting pan (included) beneath the food to collect juices and drippings for basting and gravy. To flavour the contents of the basting pan, you...
Page 31 - P R E P A R A T I O N; R e c o m m e n d e d :
29 WARNING! Never have the grill burners (bottom burners) on during Rotisserie cooking. It will burn your meat and make it very dry. Use only one section at a time, grill or rotisserie. Do not cover or obstruct the upper or lower vents on the rotisserie motor unit. The motor is air-cooled and blocki...
Page 32 - T O L I G H T T H E R O T I S S E R I E B U R N E R B E F O R E C O O K I N G :; M A N U A L L I G H T I N G :
30 T O L I G H T T H E R O T I S S E R I E B U R N E R B E F O R E C O O K I N G : The location of the rotisserie burner makes it more susceptible to strong wind conditions, more so than the protected grill burners. For this reason you should avoid operating the rotisserie during windy conditions. A...
Page 33 - C O O K I N G O N R O T I S S E R I E
31 C O O K I N G O N R O T I S S E R I E 1. Place prepared rod into motor, lay across to other side in groove (Fig.42). 2. Verify placement as shown in Fig. 43. 3. Ignite burner, start rotisserie motor, and keep on rotisserie valve on “high” for cooking all meats on the rotisserie. 4. To check tempe...
Page 34 - G E N E R A L A D V I C E; R E C O M M E N D E D M A I N T E N A N C E S C H E D U L E; CARE AND MAINTENANCE
32 G E N E R A L A D V I C E ■ Before carrying out any cleaning or maintenance, make sure that all burners are off, and gas to the appliance has been shut off at the cylinder valve or shut-off valve. ■ Beware of hot surfaces. If you clean surfaces while they are still warm, make sure to wear barbecu...
Page 35 - LEAK TESTING – PROCEDURE FOR THE USER; W h e n t o c h e c k f o r l e a k s; T o t e s t
33 CARE AND MAINTENANCE LEAK TESTING – PROCEDURE FOR THE USER IMPORTANT! There are two levels of testing for leaks. (1) Gas supply connection points that are accessible with the grill installed can be leak tested by the user. (2) Connections that are internal to the grill and therefore require disas...
Page 36 - B A T T E R Y R E P L A C E M E N T :; R E G U L A T O R A N D H O S E R E P L A C E M E N T; G R I L L G R A T E S :
34 B A T T E R Y R E P L A C E M E N T : 1. Carefully remove the drip pan, following the instructions under section ‘Drip pan’ further below. 2. Open cart door (on cart model only). 3. Pull battery downwards (This may require use of pliers). 4. Re-install upward and push to snap - Fig. 48. (Polarity...
Page 37 - C E R A M I C R O D S :; Heat
35 CARE AND MAINTENANCE C E R A M I C R O D S : It is not necessary to remove the ceramic rods for cleaning. They burn themselves clean during the next cooking operation. Periodically the trays holding the ceramic rods need to be turned over, and shaken free of debris for a thorough cleaning. How of...
Page 38 - G R E A S E T R A Y; D R I P P A N; T o r e m o v e a n d r e p l a c e t h e d r i p p a n a n d g r e a s e t r a y f o r c l e a n i n g
36 G R E A S E T R A Y ■ Most of the grease from grilling, as well as boilovers and spills from the side burners (48BQR models only) are channelled into the small grease tray insert. ■ Clean the grease tray after every use, but only after its contents have had time to cool. If not cleaned, accumulat...
Page 39 - B E F O R E U S I N G T H E G R I D D L E F O R T H E F I R S T T I M E O R T O R E - S E A S O N
37 CARE AND MAINTENANCE D R O P - O N G R I D D L E P L A T E ( N O T S U P P L I E D W I T H U N I T , P U R C H A S E D S E P A R A T E L Y ) B E F O R E U S I N G T H E G R I D D L E F O R T H E F I R S T T I M E O R T O R E - S E A S O N 1. Clean the griddle thoroughly with hot soapy water to re...
Page 43 - B E F O R E C A L L I N G F O R S E R V I C E :; See section ‘Service’ for contact details.; G R I L L W O N ’ T L I G H T W H E N T H E I G N I T I O N B U T T O N I S P U S H E D :; TROUBLESHOOTING
41 B E F O R E C A L L I N G F O R S E R V I C E : If the grill does not function properly, use the following checklist before contacting Customer Care to arrange for service. You may save the cost of a service call. Troubleshooting is for general purposes only. If the problem persists and you feel ...
Page 44 - C O N T A C T U S T H R O U G H O U R L O C A L W E B S I T E; SERVICE
42 For warranty service and to purchase replacement parts, please contact Customer Care. To arrange for service under warranty, please have the following information ready: • Model number* • Serial number* • Part number* • Date of installation • A brief description of the problem *these can be found...
Page 45 - WARRANTY; T H I S W A R R A N T Y D O E S N O T C O V E R
43 WARRANTY 2 You receive a 2 year Manufacturer’s Warranty with this product. Fisher & Paykel Appliances will repair (or at its option replace) any part which is found to be defective within TWO YEARS from date of purchase, without cost to you for either parts or labour. +13 You also receive an ...
Page 48 - NZ AU
www.fi sherpaykel.com Copyright © Fisher & Paykel 2013. All rights reserved. The product specifications in this booklet apply to the specific products and models described at the date of issue. Under our policy of continuous product improvement, these specifications may change at any time. You s...