Page 3 - GARANTÍA LIMITADA; CONDICIONES DE LA GARANTÍA; EXCLUSIONES; Servicio de Garantía
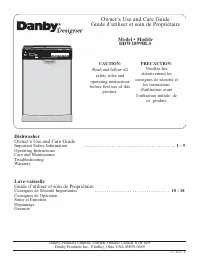
Important Safety Information Safety Precautions 3 Grounding Instructions 4 Leveling Instructions 4 Installation Instructions - Integrated Application Tools You Will Need 5 Preparing the Enclosure 5 Operating Instructions Features of Your Wine Cooler 6 The Controls of Your Wine Cooler 7 Setting the T...
Page 4 - WELCOME; Read this manual; Start Here!...Before using your Wine Cooler; Problema; No Enciende; Alta humedad en el ambiente; gabinete y/o la puerta
2 WELCOME NEED HELP? Welcome to theDanby family. We’reproud of our qualityproducts and webelieve in dependableservice. You’ll see it in thiseasy-to-use manualand you’ll hear it in thefriendly voices of ourconsumer servicedepartment.Tel:1-800-26- Best of all, you’ll experience these values each time ...
Page 5 - D A N G E R , R I S K O F C H I L D E N T R A P M E N T !; Consejos Útiles; Cubierta Exterior; ¡ I M P O R T A N T E !
READ ALL SAFETY INFORMATION BEFORE USING 3 IMPORTANT SAFETY INFORMATION WARNING SAFETYPRECAUTIONS • This appliance must be grounded. Connect only to aproperly grounded outlet. See “Grounding Instructions” section on page 4. • Do not operate this appliance if it has a damaged power cordor plug, if it...
Page 6 - use an adapter plug; Do not; use an extension cord; IMPORTANT SAFETY INFORMATION; Extreme Weight Hazard; Raises; ¡ I M P O R TA N T E !; Instrucciones de Operación; . Incline el frente de la repisa; Va c a c i o n e s
4 This appliance must begrounded. In the event of anelectrical short circuit, ground-ing reduces the risk of electricshock by providing an escapewire for the electric current. This appliance is equipped witha power cord having a ground-ing wire with a grounding plug.The plug must be plugged intoan o...
Page 7 - depth; Installation Instructions - Integrated Application; Electrical Requirements; Door Swing; • La capacidad m; • Guarde el vino en botellas; * Cuando se guarden de
• It is recommended that you do not install the wine coolerinto a corner (i.e. directlybeside a wall). This is to allowthe door to have a greater than90° opening swing. A limiteddoor swing will prevent theshelves from sliding out asintended, and may lead todamaging the door gasket. • The rough cabin...
Page 8 - Operating Instructions; stainless steel trim.; Pantalla electrónica del compartimiento; Ajuste de; POWER; RUN; Activation; Lower chamber
6 Operating Instructions Features of YourWine Cooler 1. Tempered Glass Door: Tinted for UV protection while still allowing for easy interior viewing. 2. Interior Lights: Illuminate both compartments of the wine cooler. 3. Cherry wood slide-out shelves with stainless steel trim. 4. Dual Electronic Co...
Page 9 - or; Upper chamber; Especificaciones; Ancho; Repisas de madera de cerezo con; Para
7 Operating Instructions The Controls ofYour Wine Cooler I M P O R T A N T ! In the event of a power fail-ure, wait 3 to 5 minutesbefore restarting. 1. Power on/off switch. 2. Interior lights on/off switch (while the doorstays closed ) . 3. Run: Indicator light illuminates to signify that the coolin...
Page 10 - • The maximum* capacity of; Instrucciones de Instalación – Funcionamiento; AT E N C I Ó N; Abertura de la puerta
Operating Instructions 8 Wine Storage In order to achieve the maxi-mum capacity of 166 bottles, itwill be necessary to positionthe bottles alternately on theupper thirteen (13) shelves, asshown in Fig. C . This will allow for the storage of eleven (11)750 ml bottles per shelf oneach of the top thirt...
Page 11 - To remove a roller-shelf; Shelf Instructions; cover shelves with; INFORMACIÓN IMPORTANTES DE SEGURIDAD; Equipo muy pesado; subir; Va c a t i o n s; Remove or securely; Va c a t i o n Ti m e; Disconnect from
Operating Instructions To remove a roller-shelf (Fig.G) :1. Gently slide the shelf outwarduntil it meets resistance. 2. Tilt the shelf slightly upwards (approximately 15°) and carefully remove the shelf by sliding it outward from the cabinet. To reinstall a roller-shelf:1. Set the shelf ’s wheels up...
Page 12 - Outer Case; LEA TODAS LAS INSTRUCCIONES DE SEGURIDAD; ¡ P E L I G R O , L O S N I Ñ O S P O D R Í A N Q U E D A R AT R A PA D O S !
Helpful Hints Allow the wine cooler door toremain open for a few minutesafter cleaning to air out anddry the inside of the wine cool-er cabinet. How to Cleanthe Inside Walls, Floor, InsideWindow, and Shelves Water deposits and dust canbe removed with a damp cloth. IMPORTANT: To avoid breakage, do no...
Page 13 - No Power; BIENVENIDO; Lea este manual; ¡Comience Aquí! Antes de usar su Heladera para Vinos
Before You Call For Service If none of the above rectify the situation please contact our customer care departmentat 1-800-26- (1-800-263-2629) 11 Trouble Shooting R Problem Possible Cause What to do No Power A fuse in your home may Replace fuse or reset circuit breaker. be blown or the circuit brea...
Page 14 - LIMITED PRODUCT WARRANTY; TERMS OF WARRANTY; EXCLUSIONS; Warranty Service; Información Importante de Seguridad; Instrucciones de Instalación – Funcionamiento Empotrado
LIMITED PRODUCT WARRANTY This quality product is warranted to be free from manufacturer’s defects in material and workmanship, provided that the unit is used under the normal operatingconditions intended by the manufacturer. This warranty is available only to the person to whom the unit was original...
Page 15 - Outils néccesaires; Instructions de fonctionnement; GARANTIE LIMITÉE; CONDITIONS; Service sous-garantie
Informations de sécurité importantes Précautions 15 Instructions de mise à la terre 16 Instructions de mise à niveau 16 Instructions d’installation - Application Intégré Outils néccesaires 17 Préparation de l’enceinte 17 Instructions de fonctionnement Caractéristiques de votre refroidisseur de vin 1...
Page 16 - Lisez ce guide; Avant de placer un appel de service; Problème; joint étanche
14 BIENVENUE EN CAS DE BESOIN D’ASSISTANCE Bienvenue dans la familleDanby. Nous sommesfiers de nos produits dequalité et croyons au bienfondé de fournir uneassistance fiable à nosclients. Vous le découvrirez parce guide facile d’utilisationet vous pourrez l’entendreen provenance des voixamicales de ...
Page 17 - • N'épissez pas le cordon électrique; DANGER, RISQUE DES ENFANTS DEVIENNENT COINCER DANS L’APPAREIL; M I S E E N G A R D E; t i v e s a t t e n t i v e m e n t .; SAUVEGARDEZ CES INSTRUCTIONS; Extérieur de l’armoire; I M P O R TA N T; Ne pas utiliser; de nettoyants; M I S E E N G A R D E !; q u e l l e p a r t i e d e c e t a p p a r e i l .
LISEZ TOUTES LES INFORMATIONS DE SÉCURITÉ AVANT DE FAIRE FONCTIONNER L’APPAREIL 15 INFORMATIONS DE SÉCURITÉ IMPORTANTES AVERTISSEMENT PRÉCAUTIONS • Cet appareil doit être mis à laterre. Branchez le seulement dansune prise correctement mise à laterre. Référez-vous au chapitre intit-ulé “Instructions ...
Page 18 - Sous aucun; prétexte il est; d’adaptateur de; N’utilisez pas; de cordon de; INFORMATIONS DE SÉCURITÉ IMPORTANTES; AV E R T I S S E M E N T !; Danger de poids excessif; Ne recouvrez PAS; les; Périodes de vacances
Cet appareil doit être mis à laterre. Dans l’éventualité d’uncourt-circuit, la mise à la terreprocure un chemin direct decontournement du courantpour prévenir l’électrocutiondes manipulateurs de l’ap-pareil. Cet appareil est muni d’un cor-don comprenant une fiche etfil de mise à la terre. La fiche d...
Page 19 - Instructions d’installation - Application Intégré; mesurer; Ouverture de porte; • Le DWC166BLSRH peut; La tablette la plus haute
17 Instructions d’installation - Application Intégré Préparation de l’enceinte Outilsnéccesaires Equerre decharpentier Ruban à mesurer Niveau Perceuse et jeu descie cylindrique Gants Lunette desécurité Lampe depoche • Nous recommandons que vous n'installez pas le refroidisseur devin dans un coin (di...
Page 20 - Portes en Verre Trempé :; Pour; Verrou à l’épreuve des enfants; Le joint; S p é c i f i c a t i o n s; Largeur; Commutateur de courant en marche / arrêt
18 Instructions de fonctionnement Caractéristiques de votrerefroidisseur de vin 1. Portes en Verre Trempé : Teinté pour protéger contre les rayons UV tout en permettant de voir facilement le contenu du cabinet . 2. Lumière Intérieures : S’aIllume lorsqu’on ouvre la porte du cabinet. 3. Tablettes en ...