Page 2 - The Dacor Customer Assurance Team
Copyright © 2017 by Dacor Inc. All rights reserved. To Our Valued Customer:Congratulations on your purchase of the very latest in Dacor® products! Our unique combination of features, style, and performance make us a great addition to your home.To familiarize yourself with the controls, functions and...
Page 3 - PRECAUTIONS TO AVOID; GROUNDING INSTRUCTIONS; IMPORTANT SAFETY INSTRUCTIONS
E1 Installer: Leave these instructions with the owner.Customer: Read and keep this manual for reference. Keep this guide and the sales receipt/cancelled check in a safe place for reference. Proof of original purchase date is needed for warranty service.If you have any questions, call:Dacor® Customer...
Page 4 - READ AND SAVE THESE INSTRUCTIONS
E2 READ AND SAVE THESE INSTRUCTIONS IMPORTANT SAFETY INSTRUCTIONS WARNING 1. Read all instructions before using the appliance.2. Read and follow the specific “PRECAUTIONS TO AVOID POSSIBLE EXPOSURE TO EXCESSIVE MICROWAVE ENERGY” on page 1. 3. This appliance must be properly grounded. See page 1 and ...
Page 5 - About Unpacking And Examining; About Your Microwave; Information You Need To Know; About Microwave Cooking
E3 About Unpacking And Examining Your Microwave In-A-Drawer ™ 1. Remove all packing materials from inside the Microwave In- A-Drawer ™ . DO NOT REMOVE THE WAVE- GUIDE COVER, which is located inside, on the ceiling of the Micro- wave In-A-Drawer ™ . 2. Remove the feature sticker, if there is one. Che...
Page 6 - About Utensils And Coverings; Open Or Close Drawer
E4 About Utensils And Coverings It is not necessary to buy all new cookware. Many pieces already in your kitchen can be used successfully in your new microwave. Make sure the utensil does not touch the interior walls during cooking.Use these utensils for safe microwave cooking and reheating:• Glass ...
Page 7 - About Safety; About Foods
E5 About Safety Check foods to see that they are cooked to the United States Department of Agriculture’s recommended temperatures. 160˚F - For fresh pork, ground meat, boneless white poultry, fish, seafood, egg dishes and frozen prepared food.165˚F - For leftovers, ready-to-reheat refrigerated; deli...
Page 8 - Part Names
E6 Microwave In-A-Drawer ™ KEYPAD Numbers next to the keypad illustration indicate page numbers where feature descriptions and usage information is located. 13 7 13 15 14 12 9 10 9 11 12 14 14 7 7 8 7 Part Names 1. Control Panel2. Waveguide Cover DO NOT REMOVE 3. Menu Label 4. Drawer Sealing Surface...
Page 9 - To Set The Clock; Before Operating; Timer
E7 Before operating your new Microwave In-A-Drawer ™ make sure you read and understand this manual completely. • Before the Microwave In-A-Drawer ™ can be used, follow these steps: 1. Plug in the Microwave In-A-Drawer ™ . ENJOY YOUR MICRO- WAVE TOUCH CLEAR AND TOUCH CLOCK will appear. 2. Touch the S...
Page 10 - Cooking
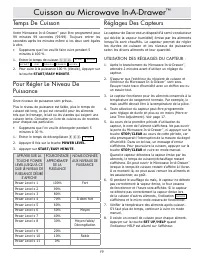
E8 Time Cooking Your Microwave In-A-Drawer ™ can be programmed for 99 minutes 99 seconds (99.99). Always enter the seconds after the minutes, even if they are both zeros.• For example: Cook for 5 minutes at 100%.1. Enter cooking time 5 0 0 . 5.00 TOUCH START OR TOUCH POWER LEVEL 2. To cook at 100% p...
Page 11 - Sensor Popcorn / Sensor Reheat
E9 COVERING FOODS: Some foods cook best when covered. Use the cover recommended in the charts for these foods. You may refer to the hints by touching the SET UP/HELP key.1. Casserole lid.2. Plastic wrap: Use plastic wrap recommended for microwave cooking. Cover dish loosely; allow approximately 1/2 ...
Page 12 - Sensor Cooking
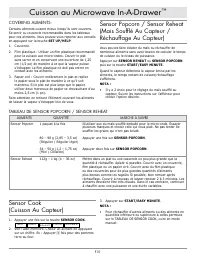
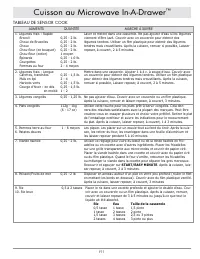
E10 Sensor Cooking 1. Touch the SENSOR COOK key once. SEE LABEL SELECT FOOD NUMBER 2. See the Menu Label. Select desired food by touching the number key. Ex: Touch 5 for baked potatoes. 3. Touch the START/EASY MINUTE key. NOTE: • To heat or cook other foods or foods above or below the quantity allow...
Page 13 - Defrost; Manual Defrost
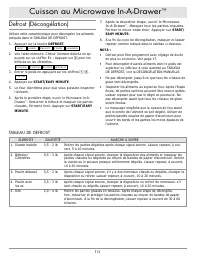
E11 Defrost Use this feature to defrost the foods shown in the DEFROST CHART below.1. Touch the DEFROST key. SEE LABEL SELECT FOOD NUMBER 2. See the Menu Label. Select desired food by touching the number key. For example: Touch 2 for steaks/ chops. STEAKS CHOPS ENTER WEIGHT 3. Enter the weight by to...
Page 14 - Reheat; Beverage Center
E12 Reheat Reheat automatically computes the correct warming time and microwave power level for foods shown in the chart below.1. Touch the REHEAT key once. SEE LABEL SELECT FOOD NUMBER 2. See Menu Label. Select desired food by touching the number key. For example: Touch 2 for frozen rolls or muffin...
Page 16 - Heading; Keep Warm; Help; Other Features; Multiple Sequence Cooking; Easy Minute
E14 Heading Keep Warm Keep Warm allows you to keep food warm up to 30 minutes. DIRECT USE 1. Touch the Keep Warm key. ENTER TIME UP TO 30 MINUTES 2. Enter the desired time by touching the number keys. To enter 30 minutes, touch 3000 . 30.00 TOUCH START 3. Touch the START/EASY MINUTE key.The Microwav...
Page 17 - AUDIBLE SIGNAL ELIMINATION; Control Lock
E15 Heading Other Features AUDIBLE SIGNAL ELIMINATION At the end of timed cook, a series of beeps will sound. If you wish to operate the appliance with no audible signals, you can turn them off. TO TURN SOUND OFF 1. Touch the SETUP/HELP key. TOUCH AGAIN 2. Touch the SETUP/HELP key again. SOUND OFF ?...
Page 18 - Cleaning and Care
E16 Heading Exterior The outside surface is precoated metal and plastic. Clean the outside with mild soap and water; rinse and dry with a soft cloth. Do not use any type of household or abrasive cleaner. Stainless Steel Surface (Select Models)The exterior should be wiped often with a soft damp cloth...
Page 22 - What Is Covered; What Is Not Covered; Product Warranty
E20 Heading What Is Covered CERTIFICATE OF WARRANTIESDACOR Microwave In-A-Drawer ™ WITHIN THE FIFTY STATES OF THE U.S.A., THE DISTRICT OF COLUMBIA AND CANADA*: FULL 2-YEAR WARRANTYIf, due to material or manufacturing defect, your DACOR Modernist product malfunctions within 2 years of the original pu...
Page 23 - T a b l e D e s M a t i è r e s; Modernist Micro-Onde Tiroir; Mode D’emploi
Importantes Consiges De Sécurité .............. 2-3 MESURES POUR ÉVITER UNE EXPOSITION POSSIBLE À UNE ÉNERGIE MICRO-ONDE EXCESSIVE ................................................. 2 Ce Que Vous Devez Savoir ......................... 4-6 Nom Des Pièces .......................................... 7 Av...
Page 24 - INSTRUCTIONS POUR LA MISE; MESURES POUR ÉVITER; IMPORTANTES CONSIGES DE SÉCURITÉ
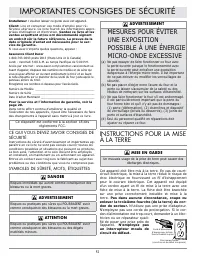
F2 Installateur : Veuillez laisser ce guide avec cet appareil.Client: Lire et conserver ces mode d’emploi pour ré- férence ultérieure. Ce livre fournit les informations appro- priées d’utilisation et d’entretien. Gardez ce livre et les ventes acquittent et/ou ont décommandé signent un endroit sûr la...
Page 25 - LIRE ET CONSERVER CES DIRECTIVES
F3 LIRE ET CONSERVER CES DIRECTIVES IMPORTANTES CONSIGES DE SÉCURITÉ ADVERTISSEMENT 1. Lire toutes les directives avant d’utiliser l’appareil. 2. Lire et suivre expressément les « MESURES POUR ÉVITER UNE EXPOSITION POSSIBLE À UNE ÉNER- GIE MICRO-ONDE EXCESSIVE » à la page 2. 3. Cet appareil doit êtr...
Page 26 - Ce Que Vous Devez Savoir; À Propos Du Déballage Et De; À Propos De Votre
F4 Ce Que Vous Devez Savoir À Propos Du Déballage Et De L’inspection De Votre Microwave In-A-Drawer ™ 1. Retirer tous les matériaux d’emballage de l’intérieur du Micro- wave In-A-Drawer ™ . NE PAS RETIRER LE GUIDE D’ONDES qui est situé au plafond du Microwave In-A- Drawer ™ . 2. Retirer l’étiquette ...
Page 27 - À Propos Des Ustensiles Et Des; Ouverture Ou Fermeture Du Tiroir; À Propos Des Enfants Et Du
F5 Ce Que Vous Devez Savoir À Propos Des Ustensiles Et Des Moyens De Couvrir Les Aliments Il n’est pas nécessaire d’acheter une nouvelle batterie de cuisine. La plupart des ustensiles de votre cuisine peuvent être utilisés dans votre nouveau micro-onde. S’assurer que les ustensiles ne touchent pas l...
Page 28 - À Propos Des Aliments; À Propos De La Sécurité
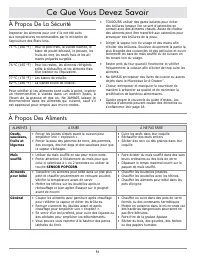
F6 Ce Que Vous Devez Savoir À Propos Des Aliments ALIMENTS À FAIRE À NE PAS FAIRE Oeufs, saucisses, fruits et légumes • Percer les jaunes d’œufs avant la cuisson pour empêcher une « explosion ». • Percer la peau des pommes de terre, des pommes, des courges, des hot dogs et des saucisses pour que la ...
Page 29 - Nom des Pièces
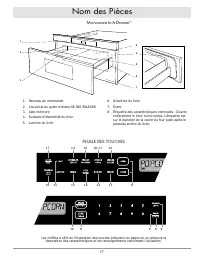
F7 1. Panneau de commande2. Couvercle du guide d’ondes NE PAS ENLEVER 3. Aide-mémoire 4. Surfaces d’étanchéité du tiroir 5. Lumière du tiroir 6. Glissières du tiroir 7. Évent8. Étiquette des caractéristiques nominales : Ouvrez entièrement le tiroir micro-ondes. L’étiquette est sur le plancher de la ...
Page 30 - Pour Régler L’horloge; Avant L’utilisation
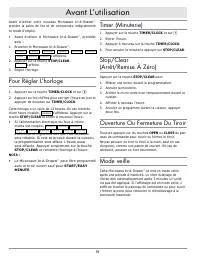
F8 Avant d’utiliser votre nouveau Microwave In-A-Drawer ™, prendre la peine de lire et de comprendre intégralement ce mode d’emploi. • Avant d’utiliser le Microwave In-A-Drawer ™ , procéder ainsi : 1. Brancher le Microwave In-A-Drawer ™ . ENJOY YOUR MICRO- WAVE TOUCH CLEAR AND TOUCH CLOCK s’afficher...
Page 32 - Sensor Cook
F10 COVERING ALIMENTS: Certains aliments cuisent mieux lorsqu’ils sont couverts. Se servir su couvercle recommandés dans les tableaux pour ces aliments. Vous pouvez vous reporter aux conseils en appuyant sur la touche SET UP/HELP.1. Couvercle.2. Film plastique : Utiliser un film plastique recommandé...
Page 35 - Décongélation Manuelle
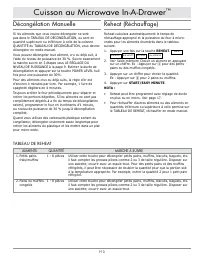
F13 Reheat (Réchauffage) Reheat calculera automatiquement le temps de réchauffage approprié et la puissance du four à micro- ondes pour les aliments énumérés dans le tableau suivant.1. Appuyer une fois sur la touche REHEAT. SEE LABEL SELECT FOOD NUMBER 2. Voir l’aide-mémoire Choisir un aliment en ap...
Page 38 - Cuisson À Séquences Multiples; Autres Caractéristiques
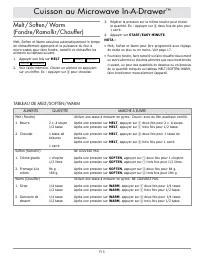
F16 Keep Warm (Micro Réchaud) Keep Warm vous permet de garder les aliments au chaud pendant 30 minutes. USAGE DIRECT 1. Appuyer sur la touche KEEP WARM. ENTER TIME UP TO 30 MINUTES 2. Entrer la durée désirée en appuyant sur les chiffres. Pour entrer 30 minutes appuyer sur 3000 . 30.00 TOUCH START 3....
Page 39 - Réglage De Durée En Plus Ou En; SUPPRESSION DU SIGNAL SONORE
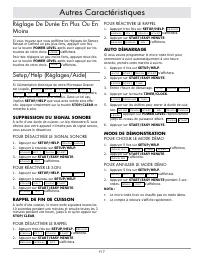
F17 Autres Caractéristiques Réglage De Durée En Plus Ou En Moins Si vous trouvez que vous préférez les réglages de Sensor, Reheat or Defrost un peu plus forts, appuyer une fois sur la touche POWER LEVEL après avoir appuyé sur les touches de votre choix. MORE s’affichera. Pour des réglages un peu moi...
Page 40 - Nettoyage et Entretien
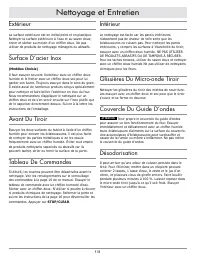
F18 Extérieur La surface extérieure est en métal peint et en plastique. Nettoyer la surface extérieure à l’eau et au savon doux; rincer et sécher au moyen d’un chiffon doux. Ne pas utiliser de produits de nettoyage ménagers ou abrasifs. Surface D’acier Inox (Modèles Choisis) Il faut essuyer souvent ...
Page 41 - Avant d’appeler pour une Réparation
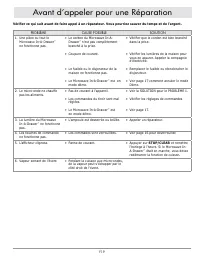
F19 Vérifier ce qui suit avant de faire appel à un réparateur. Vous pourriez sauver du temps et de l’argent. PROBLÈME CAUSE POSSIBLE SOLUTION 1. Une pièce ou tout le Microwave In-A-Drawer ™ ne fonctionne pas. • Le cordon du Microwave In-A- Drawer ™ n’est pas complètement branché à la prise. • Coupur...
Page 42 - Guide des Touches Automatiques
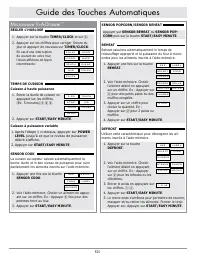
F20 Microwave In-A-Drawer ™ RÉGLER L’HORLOGE 1. Appuyer sur la touche TIMER/CLOCK et sur 2 . 2. Appuyer sur les chiffres pour corriger l’heure du jour et appuyer de nouveau sur TIMER/CLOCK. En cas d’une interruption du courant de votre four, l’écran affichera de façon intermittente: ENJOY YOUR MICRO...
Page 44 - Ce Qui Est Couvert; Ce Qui N’est Pas Couvert; Garantie du Produit
F22 Ce Qui Est Couvert CERTIFICAT DE GARANTIE Microwave In-A-Drawer ™ DACOR DANS LES CINQUANTE ÉTATS DES É.-U., LE DISTRICT DE COLUMBIA ET AU CANADA* : GARANTIE COMPLÈTE DE 2 ANSSi, en raison de défaut matériel ou vice de fabrication, votre produit Modernist DACOR occasionnelles dans les 2 ans de la...
Page 45 - BUSINESS REPLY MAIL
fold here DACOR ATTN WARRANTY PROCESSING DEPT PO BOX 90070 CITY OF INDUSTRY CA 91715-9907 NO POSTAGE NECESSARY IF MAILED IN THE UNITED STATES BUSINESS REPLY MAIL FIRST-CLASS MAIL CITY OF INDUSTRY CA PERMIT NO 1600 POSTAGE WILL BE PAID BY ADDRESSEE
Page 46 - WARRANTY INFORMATION
Web site: www.Dacor.com Corporate phone: (800) 793-0093 WARRANTY INFORMATION IMPORTANT: Your warranty will not be activated until you activate it online or return this form to Dacor. If you have purchased more than one Dacor product, please return all forms in one envelope or activate the warranty f...