Cuisinart CGG-240 - Manuals
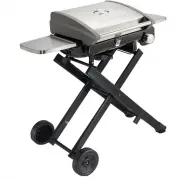
User Manual Cuisinart CGG-240


Summary
1. Warnings and Safety Instructions y Instructions If these instructions are ignored, there is a possibility of a hazardous fire or explosion which could result in physical injury or property damage! It is your responsibility to assemble, operate and maintain your gas grill properly. READ ALL WARNIN...
3. Exploded View 4 5 1 Lid 15 Rubber Pad 30 Left Up Tube Assembly 2 Flame Tamer 16 Left Leg Assembly 31 Drip Tray 3 Cooking Grate 17 M6X15 Screw 32 Hook 4 Thermometer 18 Leg Spring 33 Grill Body Connector Pin 5 Thermometer Bezel 19 Right Leg Tube 34 Connector Pin Cotter Pin 6 Burner Assembly 20 Bott...
4. Assembly Instructions Remove all contents from packaging and make sure all parts are present before attempting to assemble. Part numbers reference the tables on pages 4 and 5. Remove Grill Grate (Part C) and Flame Tamer (Part B) from inside the grill. 6 Step 1: Left Up Tube Assembly • Attach Left...
Cuisinart Grills Manuals
-
 Cuisinart CCG-190
User Manual
Cuisinart CCG-190
User Manual
-
 Cuisinart CCG-190RB
User Manual
Cuisinart CCG-190RB
User Manual
-
 Cuisinart CCG-216
User Manual
Cuisinart CCG-216
User Manual
-
 Cuisinart CCG-290
User Manual
Cuisinart CCG-290
User Manual
-
 Cuisinart CEG-115
User Manual
Cuisinart CEG-115
User Manual
-
 Cuisinart CGG-0028
User Manual
Cuisinart CGG-0028
User Manual
-
 Cuisinart CGG-0036
User Manual
Cuisinart CGG-0036
User Manual
-
 Cuisinart CGG-059
User Manual
Cuisinart CGG-059
User Manual
-
 Cuisinart CGG-180
User Manual
Cuisinart CGG-180
User Manual
-
 Cuisinart CGG-180T
User Manual
Cuisinart CGG-180T
User Manual
-
 Cuisinart CGG-180TB
User Manual
Cuisinart CGG-180TB
User Manual
-
 Cuisinart CGG-180TS
User Manual
Cuisinart CGG-180TS
User Manual
-
 Cuisinart CGG-306
User Manual
Cuisinart CGG-306
User Manual
-
 Cuisinart CGG-608
User Manual
Cuisinart CGG-608
User Manual
-
 Cuisinart CGG-750
User Manual
Cuisinart CGG-750
User Manual
-
 Cuisinart CGG-888
User Manual
Cuisinart CGG-888
User Manual
-
 Cuisinart CPG-256
User Manual
Cuisinart CPG-256
User Manual
-
 Cuisinart CPG-465
User Manual
Cuisinart CPG-465
User Manual
-
 Cuisinart CPG-700
User Manual
Cuisinart CPG-700
User Manual
-
 Cuisinart CPO-401
User Manual
Cuisinart CPO-401
User Manual