Page 2 - Before You Start; Vor dem Beginnen
Before You Start Please read all instructions carefully.Retain instructions for future reference.Separate and count all parts and hardware.Read through each step carefully and follow the proper order.We recommend that, where possible, all items are assembled near to the area in which they will be pl...
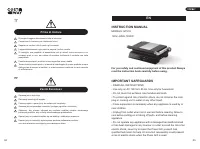
Page 3 - Prima di Iniziare; INSTRUCTION MANUAL; cool before putting on or taking off parts, and before cleaning; For you safety and continued enjoyment of this product Always
Si prega di leggere attentamente tutte le istruzioni.Conservare le istruzioni per riferimento futuro.Separare e contare tutte le parti e gli accessori.Leggere attentamente ogni passo e seguire l'ordine corretto.Si consiglia, ove possibile, di assemblare tutti gli articoli vicino alla zona in cui ver...
Page 4 - PARTS IDENTIFICATION; • Power Switch; OPERATIONAL GUIDANCE
10 11 7 5 3 9 8 6 4 2 1 7 5 3 9 8 6 4 2 1 • The use of accessory attachments not recommended by the manufacturer may result in fire, electrical shock, or risk of injury to persons.• Do not use outdoors or for commercial purposes.• Do not let power cord hang over the edge of the table or counter, or ...
Page 6 - CLEANING AND CARE; FAULT CODE
CLEANING AND CARE • Always unplug the Grill and allow it to cool before cleaning. The unit is easier to clean when slightly warm. There is no need to disassemble Grill for cleaning. Never immerse the Grill in water or place in dishwasher.• Wipe cooking plates with a soft to remove food residue. For ...
Page 7 - Lesen Sie für Ihre Sicherheit und anhaltende Freude an diesem
STORAGE • Always unplug the Grill before storage.• Always make sure the Grill is cool and dry before storing.• The power cord can be wrapped around the bottom of base for storing. BEDIENUNGSANLEITUNG MODELL: GT5 7 A 120V~,60Hz,1200W WICHTIGE SICHERHEITSMASSNAHMEN • LIES ALLE ANWEISUNGEN• Nur mit Wec...
Page 8 - IDENTIFIZIERUNG DER TEILE; • Temperaturregler für obere Platte; BEDIENUNGSANLEITUNG
10 11 7 5 3 9 8 6 4 2 1 7 5 3 9 8 6 4 2 1 IDENTIFIZIERUNG DER TEILE • Temperaturregler für obere Platte ② : * Strom einschalten, Temperaturregler blinken* Die Maschine ist funktionsfähig, die Temperaturregler sind normal eingeschaltet* Jede Berührung erhöht/verringert 5 ℃ * Lang drücken, um kontinui...
Page 9 - VOR DEM ERSTEN GEBRAUCH
* Ohne den automatischen Startmodus leuchtet das Licht weiß und ist normal eingeschaltet* Drücken Sie 3 Sekunden, um einen automatischen Modus einzuschalten, das Licht leuchtet grün* Wenn ein automatischer Modus aktiviert ist, können Sie die Zeit und/oder Temperatur nach eigenem Geschmack erhöhen/ve...
Page 10 - FEHLERCODE
REINIGUNG UND PFLEGE • Stecken Sie den Grill immer aus und lassen Sie ihn abkühlen, bevor Sie ihn reinigen. Das Gerät ist leichter zu reinigen, wenn es leicht warm ist. Der Grill muss zur Reinigung nicht zerlegt werden. Tauchen Sie den Grill niemals in Wasser oder legen Sie ihn in die Spülmaschine.•...
Page 12 - IDENTIFICATION DES PIÈCES; • Interrupteur d'alimentation
10 11 7 5 3 9 8 6 4 2 1 7 5 3 9 8 6 4 2 1 • L'utilisation d'accessoires non recommandés par le fabricant peut entraîner un incendie, un choc électrique ou un risque de blessure. • Ne pas utiliser à l'extérieur ou à des fins commerciales. • Ne laissez pas le cordon d'alimentation pendre sur le bord d...
Page 13 - AVANT LA PREMIÈRE UTILISATION
* Sans démarrer le mode automatique, la lumière est de couleur blanche, c'est normal.* Appuyez 3 secondes pour activer le mode automatique, la lumière devient verte.* Lorsqu'un mode automatique est activé, vous pouvez augmenter/diminuer le temps et/ou la température selon vos goûts.* Appuyez sur 3 s...
Page 14 - NETTOYAGE ET ENTRETIEN; CODE D’ERREUR
NETTOYAGE ET ENTRETIEN • Débranchez toujours le gril et laissez-le refroidir avant de le nettoyer. L'appareil est plus facile à nettoyer lorsqu'il est légèrement chaud. Il n'est pas nécessaire de démonter le Gril pour le nettoyer. Ne plongez jamais le gril dans l'eau et ne le mettez jamais dans un l...
Page 15 - ● Es necesario supervisar de cerca cualquier aparato que sea; Para su seguridad y para seguir disfrutando de este producto,
• N'utilisez rien d'abrasif qui puisse rayer ou endommager le revêtement antiadhésif.•N'utilisez pas d'ustensiles métalliques pour retirer vos aliments, ils peuvent endommager la surface antiadhésive.• Essuyez l'extérieur du grille-pain avec un chiffon humide uniquement. Ne nettoyez pas l'extérieur ...
Page 16 - IDENTIFICACIÓN DE PIEZAS; ● Interruptor de encendido; INSTRUCCIONES DE OPERACIÓN
10 11 7 5 3 9 8 6 4 2 1 7 5 3 9 8 6 4 2 1 ● El uso de accesorios no recomendados por el fabricante puede provocar un incendio, una descarga eléctrica o riesgo de lesiones a las personas. ● No lo utilice al aire libre ni con fines comerciales. ● No deje que el cable de alimentación cuelgue del borde ...
Page 17 - aumentar/disminuir el tiempo y/o la temperatura según su gusto.; ANTES DEL PRIMER USO
* Sin iniciar el modo automático, la luz está en color blanco, y se enciende normalmente.* Presione 3 segundos para encender un modo automático, la luz se vuelve de color verde.* Cuando un modo automático está activado, puede aumentar/disminuir el tiempo y/o la temperatura según su gusto. * Presione...
Page 18 - LIMPIEZA Y CUIDADO; ● Desenchufe siempre la parrilla y deje que se enfríe antes de; CÓMO USAR; precalentamiento. Más tarde puede ajustar más bajo según su; CÓDIGO DE ERROR
LIMPIEZA Y CUIDADO ● Desenchufe siempre la parrilla y deje que se enfríe antes de limpiarla. La unidad es más fácil de limpiar cuando está ligeramente caliente. No es necesario desmontar la parrilla para limpiarla. Nunca sumerja la parrilla en agua ni la coloque en el lavavajillas. ● Limpie las plac...
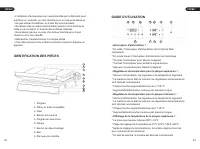
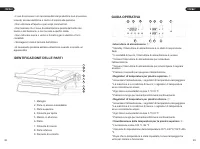
Page 20 - IDENTIFICAZIONE DELLE PARTI; • Interruttore di alimentazione; GUIDA OPERATIVA
10 11 7 5 3 9 8 6 4 2 1 7 5 3 9 8 6 4 2 1 • L'uso di accessori non raccomandati dal produttore può provocare incendi, scosse elettriche o rischio di lesioni alle persone.• Non utilizzare all'aperto o per scopi commerciali.• Non lasciare che il cavo di alimentazione penda dal bordo del tavolo o del b...
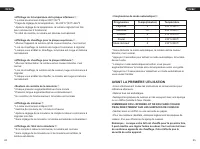
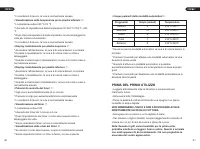
Page 21 - PRIMA DEL PRIMO UTILIZZO
* Senza avviare la modalità automatica, la luce è di colore bianco, è normale* Premere 3 secondi per attivare una modalità automatica, la luce diventa di colore verde* Quando è attiva una modalità automatica, è possibile aumentare/diminuire il tempo e/o la temperatura in base ai propri gusti* Premer...
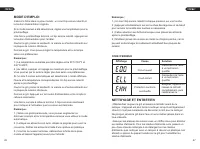
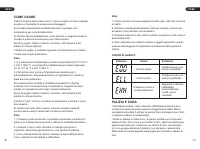
Page 22 - CODICE DI GUASTO
PULIZIA E CURA • Scollegare sempre il grill e lasciarlo raffreddare prima di pulirlo. L'unità è più facile da pulire quando è leggermente calda. Non è necessario smontare il grill per la pulizia. Non immergere mai il Grill in acqua o metterlo in lavastoviglie.• Pulire le piastre di cottura con un pa...
Page 23 - Przed użyciem zapoznaj się z instrukcją, aby zapewnić
• Non utilizzare oggetti abrasivi che possano graffiare o danneggiare il rivestimento antiaderente.• Non utilizzare utensili in metallo per rimuovere i cibi, possono danneggiare la superficie antiaderente.• Pulire l'esterno del tostapane grill solo con un panno umido. Non pulire l'esterno con spugne...
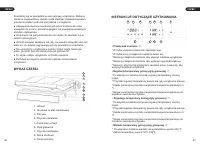
Page 24 - WYKAZ CZĘŚCI; • Przełącznik zasilania; • Regulacja temperatury dolnej płyty grzewczej; momentu zwolnienia przycisku.; • Wartość temperatury górnej płyty grzewczej; * Zakres temperatury wynosi; INSTRUKCJE DOTYCZĄCE UŻYTKOWANIA
10 11 7 5 3 9 8 6 4 2 1 7 5 3 9 8 6 4 2 1 Skontaktuj się ze specjalistą w celu naprawy urządzenia. Złożenie części w nieprawidłowy sposób może stwarzać niebezpieczeństwo porażenia prądem podczas korzystania z urządzenia.● Używanie akcesoriów niezalecanych przez producenta może prowadzić do pożaru, p...
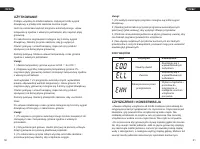
Page 25 - PRZED PIERWSZYM UŻYCIEM; • Przyciski timera
* Przed wybraniem programu automatycznego przyciski świecą na biało.* Naciśnij i przytrzymaj przycisk przez 3 sekundy, aby wybrać program automatyczny. Przycisk wybranego programu automatycznego zmieni kolor na zielony. * Po włączeniu programu automatycznego możesz zwiększyć/zmniejszyć czas oraz tem...
Page 26 - KODY BŁĘDÓW
CZYSZCZENIE I KONSERWACJA • Zawsze odłączaj urządzenie od źródła zasilania i pozostawiaj do ostygnięcia przed przystąpieniem do czyszczenia. Czyszczenie jest łatwiejsze, gdy powierzchnie urządzenia są lekko ciepłe. Nie rozkładaj urządzenia na części w celu czyszczenia. Nie zanurzaj urządzenia w wodz...
Page 27 - Return / Damage Claim Instructions; PRZECHOWYWANIE; w celu przechowywania.
In case a return is required, the item must be returned in original box. Without this your return will not be accepted. DO NOT discard the box / original packaging. Take a photo of the box markings. Take a photo of the damaged part (if applicable). Send us an email with the images requested. A photo...
Page 28 - Instructions De Retour / Réclamation De Dommages; Instrucciones de Devolución/Reclamación de Daños; Istruzioni Per La Restituzione / Reclamo Per Danni
Instructions De Retour / Réclamation De Dommages Dans le cas où un retour est requis, l'article doit être retourné dans sa boîte d'origine. Sans cela, votre retour ne sera pas accepté. NE PAS jeter la boîte/l'emballage d'origine. Prenez une photo des marquages de la boîte. Prenez une photo des domma...