Page 2 - DISCLAIMER; MODEL
K1C Series Installation Instructions 2 DISCLAIMER Milestone AV Technologies and its affiliated corporations andsubsidiaries (collectively “Milestone”), intend to make thismanual accurate and complete. However, Milestone makes noclaim that the information contained herein covers all details,condition...
Page 3 - DIMENSIONS
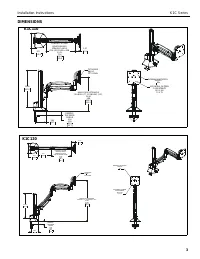
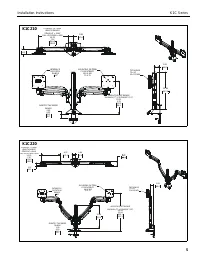
Installation Instructions K1C Series 3 DIMENSIONS HEIGHT ADJUST RANGE MANUAL (7") + DYNAMIC (13") 23.98 3.98 609.2 101.2 3.6993.7 DESKTOP THICKNESS RANGE 2.50 0.50 63.5 12.7 12.89327.4 TILT RANGE UP 10 DOWN 5.17 131.3 1.9750.1 DYNAMIC LIT ARM LENGTH RANGE STRAIGHT = MAX FULL UP/DOWN = MIN 10...
Page 10 - LEGEND
K1C Series Installation Instructions 10 LEGEND Tighten Fastener Apretar elemento de fijación Befestigungsteil festziehen Apertar fixador Serrare il fissaggio Bevestiging vastdraaien Serrez les fixations Loosen Fastener Aflojar elemento de fijación Befestigungsteil lösen Desapertar fixador Allentare ...
Page 11 - TOOLS REQUIRED FOR INSTALLATION; or
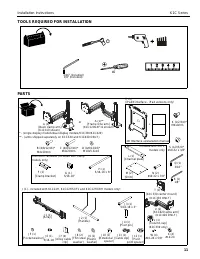
Installation Instructions K1C Series 11 TOOLS REQUIRED FOR INSTALLATION PARTS #2 3/16” (included) 1/8” (included) A (1)** [Desk clamp arm] (K1C110 shown) B (4/8/12/16)* M4x10mm C (4/8/12/16)* M4x20mm D (4/8/12/16)* M10x5.3x10 J (1) - included with K1C22H, K1C22HSXF1 and K1C22HXRH models only! J1 (1)...
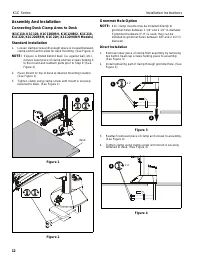
Page 12 - Assembly And Installation; Connecting Desk Clamp Arms to Desk; Figure 1; Grommet Hole Option; K1C clamp mounts may be installed directly to; Direct Installation; desk
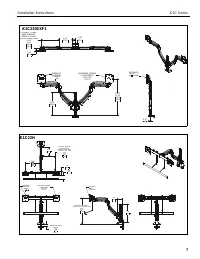
K1C Series Installation Instructions 12 Assembly And Installation Connecting Desk Clamp Arms to Desk (K1C110, K1C120, K1C120XRH, K1C120BI2, K1C210,K1C220, K1C220XRH, K1C22H, K1C22HXRH Models) Standard Installation 1. Loosen clamp screw until enough space is created betweenclamp and mount to allow fo...
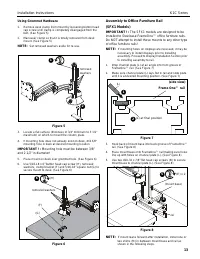
Page 13 - Mounting hole must be between 3/8”; Assembly to Office Furniture Rail; The SFX1 models are designed to be; If mounting holes on displays are recessed, it may be
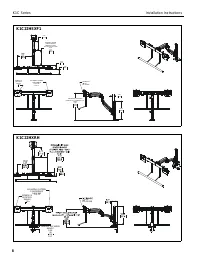
Installation Instructions K1C Series 13 Using Grommet Hardware 1. Remove desk clamp from mount by loosening button headcap screw until clamp is completely disengaged from thebolt. (See Figure 5) 2. Maneuver clamp so that it is totally removed from deskmount. (See Figure 5) NOTE: Set removed washers ...
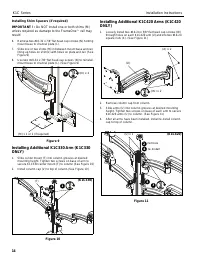
Page 14 - unless required as damage to the FrameOne; Figure 9; Remove column cap from column.
K1C Series Installation Instructions 14 Installing Shim Spacers (if required) IMPORTANT ! : Do NOT install one or both shims (M) unless required as damage to the FrameOne ™ rail may result! 6. Remove two #10-32 x 7/8” flat head cap screws (N) holdingmount base to channel plate (L). 7. Slide one or t...
Page 15 - Display Installation
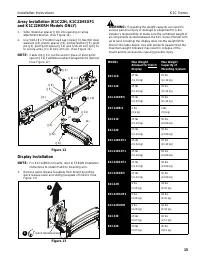
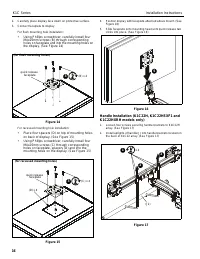
Installation Instructions K1C Series 15 Array Installation (K1C22H, K1C22HSXF1and K1C22HXRH Models ONLY) 1. Slide rotational spacer (J10) into opening on arrayattachment bracket. (See Figure 12) 2. Use 5/16-18 x 3" button head cap screw (J3), two thin steelwashers (J8), plastic spacer (J9), pock...
Page 17 - Adjustments; Rotational Adjustment
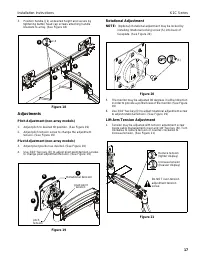
Installation Instructions K1C Series 17 3. Position handle (J2) at desired height and secure bytightening button head cap screws attaching handlebrackets to array. (See Figure 18) Figure 18 Adjustments Pitch Adjustment (non-array models) 1. Adjust pitch to desired tilt position. (See Figure 19) 2. A...
Page 18 - Adjustments - K1C22H models only; Display A djustments; Display Removal; Only remove display from mount when the; Display Removal Security Screw; In order to prevent display from being easily removed
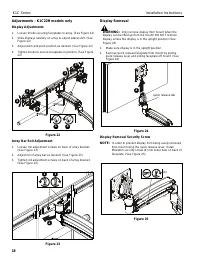
K1C Series Installation Instructions 18 Adjustments - K1C22H models only Display A djustments 1. Loosen knobs securing faceplates to array. (See Figure 22) 2. Slide displays laterally on array to adjust lateral shift. (SeeFigure 22) 3. Adjust pitch and pivot position as desired. (See Figure 22) 4. T...
Page 19 - Pivot Adjustment Range; Be sure to leave enough slack in the; Array Models; of motion
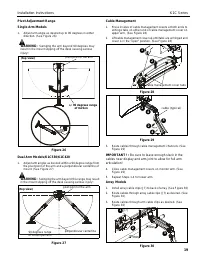
Installation Instructions K1C Series 19 Pivot Adjustment Range Single Arm Models 1. Adjust arm angle as desired up to 90 degrees in eitherdirection. (See Figure 26) WARNING: Swinging the arm beyond 90 degrees may result in the mount slipping off the desk causing seriousinjury! Figure 26 Dual Arm Mod...
Page 20 - Europe; Franklinstraat 14, 6003 DK Weert, Netherlands; Asia Pacific; K1C Series; 017 Milestone AV Technologies
USA/International A 6436 City West Parkway, Eden Prairie, MN 55344 P 800.582.6480 / 952.225.6000 F 877.894.6918 / 952.894.6918 Europe A Franklinstraat 14, 6003 DK Weert, Netherlands P +31 (0) 495 580 852 F +31 (0) 495 580 845 Asia Pacific A Office No. 918 on 9/F, Shatin Galleria18-24 Shan Mei Street...