Page 2 - READ ALL INSTRUCTIONS BEFORE USE; For your safety and continued enjoyment of this product, always; COOKING FORWARDTM; The Chefman; CONTENTS
READ ALL INSTRUCTIONS BEFORE USE For your safety and continued enjoyment of this product, always read the instruction manual before using. COOKING FORWARD™ Welcome! Whether this is your first Chefman ® appliance or you’re already part of our family, we’re happy to be in the kitchen with you. With yo...
Page 3 - SAVE THESE INSTRUCTIONS; SAFETY INSTRUCTIONS
1 2 IMPORTANT SAFEGUARDS IMPORTANT SAFEGUARDS WARNING: When using electrical appliances, basic safety precautions should always be followed to reduce the risk of fire, electric shock, and/or injury to persons including the following: 1. Read all instructions. 2. Do not touch hot surfaces. Use handle...
Page 4 - DO NOT OPERATE APPLIANCE IF THE POWER CORD SHOWS; IMPORTANT SAFEGUARDS; Do not place the appliance
3 4 WARNING: This appliance has a polarized plug (one blade is wider than the other). This plug is intended to fit into a polarized outlet only one way. If the plug does not fit fully into the outlet, reverse the plug. If it still does not fit, contact a qualified electrician. Do not attempt to modi...
Page 5 - CONTROL PANEL
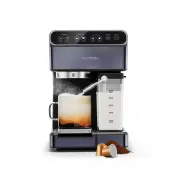
5 6 17 18 16 9 7 11 12 15 14 13 10 1. Water Reservoir Cover 2. Removable Water Reservoir 3. Control Panel 4. Group/Brew Head 5. Power Switch (On Side) 6. Froth Strength Control 7. Milk Reservoir Lid 8. Froth Dispensing Tube Lever 9. Removable Milk Reservoir 10. Froth Dispensing Tube 11. Removable Re...
Page 6 - BEFORE FIRST USE; IMPORTANT–PRIME THE UNIT BEFORE FIRST USE; CHOOSE THE RIGHT SIZE CUP
7 8 OPERATING INSTRUCTIONS OPERATING INSTRUCTIONS BEFORE FIRST USE 1. Remove all packaging materials and check to ensure that all parts and accessories are accounted for. Read all stickers and remove ones that are not permanent. 2. Remove and hand wash the water reservoir, the milk reservoir, the po...
Page 7 - CHOOSE THE RIGHT THE COFFEE AND GRIND; OPERATING INSTRUCTIONS
9 10 HOW TO FILL THE MILK RESERVOIR If you plan to prepare cappuccino or latte, you will need to fill the milk reservoir; it can be left empty or even off the unit for espresso. To remove the milk reservoir from the unit, tilt it up before pulling it out. Fill it with cold milk to between the “Min” ...
Page 8 - HOW TO MAKE AN ESPRESSO; HOW TO PACK THE PORTAFILTER WITH COFFEE; HOW TO PLACE THE PORTAFILTER ON THE BREW HEAD
11 12 HOW TO MAKE AN ESPRESSO Espresso is a unique method of coffee brewing in which hot water is forced through finely ground coffee beans for a richer and more full-bodied brew than regular drip. Because of its strength, espresso is usually served in small (1 ½ to 2 oz) portions in demitasse cups....
Page 9 - HOW TO MAKE A LATTE
13 14 your cappuccino will be ready to enjoy 10. When the brew cycle ends, the unit will go into standby mode and will be preheating in the background. If no button is pressed within 20 minutes, it will switch to sleep mode. 11. To discard spent grinds, remove the portafilter and let cool. Hold the ...
Page 10 - HOW TO ADD MORE FROTH OR FROTH MILK SEPARATELY; TROUBLESHOOTING
15 16 PROBLEM POSSIBLE CAUSES SOLUTIONS Coffee does not come out 1. Appliance not turned on or plugged in 2. No water in reservoir. 3. Coffee is ground too fine. 4. Too much coffee in filter basket 5. Coffee has been tamped down too much 6. Unit has not been used for a while 1. Plug in unit and turn...
Page 11 - CLEANING AND MAINTENANCE
17 18 HOW TO CLEAN THE MILK RESERVOIR AND FROTHING TUBE 1. Remove the milk reservoir from the unit (tilt it up before pulling it out). Transfer any remaining milk to another container and refrigerate. 2. Wash the milk reservoir and its lid thoroughly with warm soapy water. Rinse well. Do not use abr...
Page 12 - TO DECALCIFY INTERNAL PARTS:; HOW TO DECALCIFY THE WATER RESERVOIR; HOW TO CLEAN THE HOUSING AND STORE THE UNIT; HOW TO DECALCIFY
19 20 TO DECALCIFY INTERNAL PARTS: 1. Be sure unit is cool, off, and unplugged. 2. Fill the water reservoir with white vinegar to between the “Min” and “Max” markings on the tank. Fill the milk reservoir with water and slide it into unit. 3. Put a large cup or jar on the drip tray and position the f...
Page 13 - Limited Warranty; Limited Warranty
21 22 We offer a limited 1-year Warranty available on sales through authorized distributors and retailers only. Please note that this Warranty becomes valid from the date of initial retail purchase and that the Warranty is non-transferable and applies only to the original purchaser. This Warranty is...
Page 14 - What do I need to register my product?; •Date code; How do I register my product?; CHEFMAN; For product information,
23 24 What do I need to register my product? •Contact Information •Model Number • Proof of Purchase (online confirmation, receipt, gift receipt) •Date code How do I register my product? All you need to do is fill out a simple Chefman® registration form. You can easily access the form in one of the t...