Page 2 - READ ALL INSTRUCTIONS BEFORE USE; For your safety and continued enjoyment of this product, always; COOKING FORWARDTM; The Chefman
2 READ ALL INSTRUCTIONS BEFORE USE For your safety and continued enjoyment of this product, always read the instruction manual before using. COOKING FORWARD™ Welcome! Whether this is your first Chefman ® appliance or you’re already part of our family, we’re happy to be cooking with you! With your ne...
Page 3 - CONTENTS
3 4 Safety Instructions 8 Features 12 Operating Instructions 18 Blending Tips 19 Cleaning and Maintenance 20 Notes 22 Terms and Conditions 24 Warranty Registration CONTENTS
Page 4 - IMPORTANT SAFEGUARDS
4 IMPORTANT SAFEGUARDS 1. Read all instructions. 2. Be sure to detach the USB cord before using. Detach the shaft from the motor housing before putting on or taking off parts, and before cleaning. 3. To protect against the risk of electrical shock, do not put the motor housing in water or other liqu...
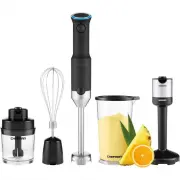
Page 8 - FEATURES
8 1. LED Charge Indicator Ring changes color to indicate charge level 2. Variable Speed–Control Button pressure adjusts blending speed 3. Motor Housing with comfort grip 4. Attachment–Release Button releases attachments from housing 5. Blender Blade Shaft stainless steel and dishwasher-safe 6. Blend...
Page 10 - Blue
10 FEATURES Blue 50%–100% (up to 18 minutes of use) Orange 20%–50% (time to recharge) Red 5%–20% Red and Blinking 5% or less LED CHARGE INDICATOR COLORS
Page 11 - NOTES
Page 12 - OPERATING INSTRUCTIONS; BEFORE FIRST USE; HOW TO CHARGE THE BLENDER
12 OPERATING INSTRUCTIONS BEFORE FIRST USE For best results, follow these steps before using your Cordless Power Immersion Blender Set for the first time. 1. Remove all packaging materials and check to ensure that all parts and accessories are accounted for. 2. Wipe down the motor housing, chopper l...
Page 13 - HOW TO ASSEMBLE THE BLENDER
13 OPERATING INSTRUCTIONS HOW TO ASSEMBLE THE BLENDER The blender is easy to assemble and disassemble. IMPORTANT: Do not press the safety button while attaching or removing parts or accessories. 1. If you like, before attaching the shaft, put on the pan edge guard to prevent the blade from scratchin...
Page 14 - HOW TO USE THE BLENDER
14 OPERATING INSTRUCTIONS HOW TO USE THE BLENDER The blender’s blade is specially designed for processing and pureeing all kinds of foods, including salad dressings, smoothies, and sauces. It can also whisk dry ingredients and chop foods like onions and nuts. 1. Ensure the food to be processed is in...
Page 15 - HOW TO USE THE CHOPPER
15 OPERATING INSTRUCTIONS 8. To stop blending, release the speed-control and safety-lock buttons. Do not lift the blender out of the mixture until the blade has stopped. WARNING: If a piece of food becomes lodged in the blade, remove the blending shaft before trying to dislodge it. Then use a spatul...
Page 16 - HOW TO USE THE WHISK
16 16 OPERATING INSTRUCTIONS HOW TO USE THE WHISK 1. To assemble the whisk: Insert the whisk shaft into the socket of the whisk connector until you feel and hear them click together. 2. Align the motor body housing with the whisk connector and push the pieces together until you feel (and hear) them ...
Page 17 - HOW TO USE THE MASHER
17 OPERATING INSTRUCTIONS HOW TO USE THE MASHER 1. To assemble the masher: Seat the masher connector onto the pin of the masher itself, then twist clockwise until you feel and hear the pieces click together. 2. Align the motor body housing with the masher connector and push the pieces together until...
Page 18 - BLENDING TIPS
18 BLENDING TIPS 1. Cut solid foods into uniform sizes for easy blending and consistent results. 2. To avoid splatter, do not turn on the blender, whisk, or masher until the blade/whisk is beneath the surface of the food; then turn the blender off before removing it. Never take the blender, whisk, o...
Page 19 - CLEANING AND MAINTENANCE
19 CLEANING AND MAINTENANCE With top-rack dishwasher-safe attachments, the immersion blender is easy to clean. Follow these steps for safety and best results. IMPORTANT: Make sure that the safety-lock button is not being pressed while attaching or removing parts or accessories. 1. Before cleaning, d...
Page 22 - TERMS AND CONDITIONS; LIMITED WARRANTY
22 TERMS AND CONDITIONS RJ Brands, LLC d/b/a Chefman ® offers a limited 1-year Warranty (the “Warranty”) available on sales through authorized distributors and retailers only. Please note that this Warranty becomes valid from the date of initial retail purchase and that the Warranty is non-transfera...
Page 23 - WHAT THE WARRANTY COVERS
23 TERMS AND CONDITIONS 1. Manufacturer Defects — Chefman ® products are warranted against defects in material and workmanship, under normal household use, for a period of 1 year from the date of purchase when used in accordance with the directions listed in the Chefman ® User Guide. If your product...
Page 24 - WHAT DO I NEED TO REGISTER MY PRODUCT?
24 CHEFMAN ® WARRANTY REGISTRATION WHAT DO I NEED TO REGISTER MY PRODUCT? 1. Contact Information 2. Model Number 3. Proof of Purchase: online confirmation, receipt, gift receipt 4. Date Code 5. Access Code NOTE: Label depicted here is an example. MADE IN CHINA/FABRIQUE EN CHINE AC ONLY/ AC SEULEMENT...