Page 2 - ANSCHLIESSEN AN DAS STROMNETZ; ACHTUNG; VORSICHT
ANSCHLIESSEN AN DAS STROMNETZ ACHTUNG • Als Stromquelle darf nur gewöhnlicher Haushaltsstrom verwendet werden. Das Verwenden andersartiger Stromquellen kann Brand,elektrischen Schlag und Beschädigungen der Maschine zur Folge haben. • Schalten Sie die Maschine in den folgenden Situationen am Netzscha...
Page 3 - «УКАЗАНИЯ ПО ТЕХНИКЕ БЕЗОПАСНОСТИ»; ВНИМАНИЕ –; “СОХРАНИТЕ НАСТОЯЩЕЕ РУКОВОДСТВО”
«УКАЗАНИЯ ПО ТЕХНИКЕ БЕЗОПАСНОСТИ» При пользовании швейной машиной всегда необходимо соблюдать рекомендации по технике безопасности, включающие следующие положения: “Перед началом работы на машине внимательно изучите настоящее руководство.” ВНИМАНИЕ – Для того, чтобы уменьшить риск поражения электри...
Page 5 - Connecting Plugs and Main Power / Sewing Light Switch
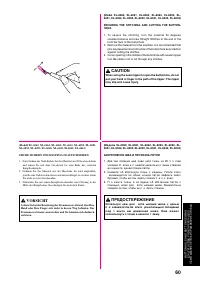
1. Connect the three-prong plug into the machine.2. Connect the electrical supply plug into a wall outlet. - When leaving the machine unattended, the main switch of the machine should be switched off or the plug must beremoved from the socket outlet. Turn on or off the switch for the main power and ...
Page 6 - PLEASE READ BEFORE USING THIS MACHINE
PLEASE READ BEFORE USING THIS MACHINE For safe operation 1. Be sure to keep your eye on the needle while sewing. Do not touch the balance wheel, thread take-up, needle, or other moving parts. 2. Remember to turn off the power switch and unplug the cord when: • Operation is completed• Replacing or re...
Page 7 - BITTE VOR BENUTZUNG DIESER MASCHINE LESEN
BITTE VOR BENUTZUNG DIESER MASCHINE LESEN Für sicheren Betrieb: 1. Behalten Sie während des Nähens immer die Nadel im Auge. Handrad, Fadenhebel, Nadel und andere bewegliche Teile dürfen nicht berührt werden. 2. Denken Sie daran, den Netzschalter auszuschalten und den Stecker aus der Steckdose zu zie...
Page 8 - ПОЖАЛУЙСТА, ПРОЧИТАЙТЕ ПЕРЕД НАЧАЛОМ ЭКСПЛУАТАЦИИ МАШИНЫ
ПОЖАЛУЙСТА, ПРОЧИТАЙТЕ ПЕРЕД НАЧАЛОМ ЭКСПЛУАТАЦИИ МАШИНЫ В целях безопасности 1. Всегда следите за иглой во время шитья. Не прикасайтесь к маховику, механизму подтягивания нитки, игле или иным движущимся деталям машины. 2. Помните о необходимости выключить выключатель питания и отсоединить шнур пита...
Page 9 - TABLE OF CONTENTS
KNOWING YOUR SEWING MACHINE PRINCIPAL PARTS ......................................................... 1ACCESSORIES ............................................................... 3 Optional Accessories .............................................. 3 OPERATING YOUR SEWING MACHINE ......................
Page 10 - INHALT
KENNENLERNEN IHRER MASCHINE HAUPTBESTANDTEILE ........................................................ 2ZUBEHÖR ................................................................................ 4 Optionales Zubehör ........................................................ 4 BEDIENUNG IHRER NÄHMASCHINE...
Page 11 - ОГЛАВЛЕНИЕ
КРАТКОЕ ТЕХНИЧЕСКОЕ ОПИСАНИЕ МАШИНЫ ОСНОВНЫЕ ЧАСТИ МАШИНЫ .................................... 2ПРИНАДЛЕЖНОСТИ ..................................................... 4 Дополнительные принадлежности ..................... 4 ПОЛЬЗОВАНИЕ МАШИНОЙ ......................................... 6 Соединительные ...
Page 12 - PRINCIPAL PARTS
1 KNOWING YOUR SEWING MACHINE KENNENLERNEN IHRER MASCHINE КРАТКОЕ ТЕХНИЧЕСКОЕ ОПИСАНИЕ МАШИНЫ 4 2 1 9 3 8 7 5 6 0 B C D F A G E PRINCIPAL PARTS 1 BOBBIN WINDER (Page 28) Winds the thread onto the bobbin to be used for the lower thread. 2 STITCH LENGTH DIAL (Page 13, 24) Controls the length of the st...
Page 13 - ОСНОВНЫЕ ЧАСТИ МАШИНЫ
2 KNOWING YOUR SEWING MACHINE KENNENLERNEN IHRER MASCHINE КРАТКОЕ ТЕХНИЧЕСКОЕ ОПИСАНИЕ МАШИНЫ ОСНОВНЫЕ ЧАСТИ МАШИНЫ 1 1 1 1 1 МЕХАНИЗМ НАМОТКИ ШПУЛЬКИ (Стр. 28) Наматывает на шпульку нитку, используемую в качестве нижней. 2 2 2 2 2 РУЧКА РЕГУЛИРОВАНИЯ ДЛИНЫ СТЕЖКА (Стр. 14, 25) Регулирует длину стеж...
Page 14 - ACCESSORIES; Optional Accessories
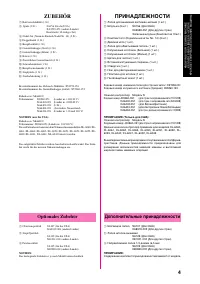
3 KNOWING YOUR SEWING MACHINE KENNENLERNEN IHRER MASCHINE КРАТКОЕ ТЕХНИЧЕСКОЕ ОПИСАНИЕ МАШИНЫ 1 X59370-051 2 SA156XA5539-051 3 X57117-051 4 X57521-001 5 XA4911-151(XL-6060, XL-6061, XL-6062, XL-6063, XL-6050, XL-6051, XL-6052, XL-6053) X59369-251 (XL-6040, XL-6041, XL-6042, XL-6043) 6 130012-054 7 1...
Page 15 - ПРИНАДЛЕЖНОСТИ; Optionales Zubehör; Дополнительные принадлежности
4 KNOWING YOUR SEWING MACHINE KENNENLERNEN IHRER MASCHINE КРАТКОЕ ТЕХНИЧЕСКОЕ ОПИСАНИЕ МАШИНЫ ПРИНАДЛЕЖНОСТИ 1 Лапка для вшивания застежек-молний (1 шт.) 2 Шпулька (3 шт.) SA156 (Для США) XA5539-051 (Для других стран) Запасные шпульки (Комплект из 10 шт.) 3 Комплект игл (Нормальные иглы No. 14) (3 ш...
Page 16 - OPERATING YOUR; Connecting Plugs; WARNING
5 KNOWING YOUR SEWING MACHINE KENNENLERNEN IHRER MASCHINE КРАТКОЕ ТЕХНИЧЕСКОЕ ОПИСАНИЕ МАШИНЫ OPERATING YOUR SEWING MACHINE Connecting Plugs 1. Connect the power cord plug into the machine.2. Connect the power supply plug into a wall outlet. CAUTION1. When leaving the machine unattended, the main sw...
Page 17 - ПОЛЬЗОВАНИЕ МАШИНОЙ; Соединительные штепсели; ПРЕДУПРЕЖДЕНИЕ; BEDIENUNG IHRER; Kabelanschlüsse
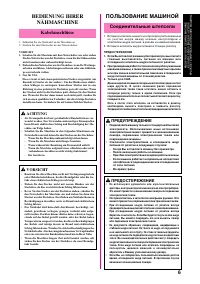
6 KNOWING YOUR SEWING MACHINE KENNENLERNEN IHRER MASCHINE КРАТКОЕ ТЕХНИЧЕСКОЕ ОПИСАНИЕ МАШИНЫ ПОЛЬЗОВАНИЕ МАШИНОЙ Соединительные штепсели 1. Вставьте штепсель ножного контроллера, расположенный на участке шнура между ножным контроллером иштепселем шнура питания, в разъем на швейной машине. 2. Вставь...
Page 18 - Light Switch; Главный выключатель питания /
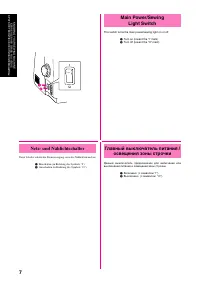
7 KNOWING YOUR SEWING MACHINE KENNENLERNEN IHRER MASCHINE КРАТКОЕ ТЕХНИЧЕСКОЕ ОПИСАНИЕ МАШИНЫ 2 1 Main Power/Sewing Light Switch This switch turns the main power/sewing light on or off. 1 Turn on (toward the “I” mark) 2 Turn off (toward the “O” mark) Главный выключатель питания / освещения зоны стро...
Page 19 - Foot Controller; CAUTION; ПРЕДОСТЕРЕЖЕНИЕ; Fußanlasser
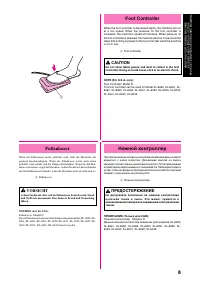
8 KNOWING YOUR SEWING MACHINE KENNENLERNEN IHRER MASCHINE КРАТКОЕ ТЕХНИЧЕСКОЕ ОПИСАНИЕ МАШИНЫ Foot Controller When the foot controller is depressed lightly, the machine will runat a low speed. When the pressure on the foot controller isincreased, the machine’s speed will increase. When pressure onth...
Page 20 - Checking the Needle; Replacing the Needle
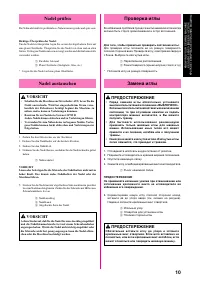
9 KNOWING YOUR SEWING MACHINE KENNENLERNEN IHRER MASCHINE КРАТКОЕ ТЕХНИЧЕСКОЕ ОПИСАНИЕ МАШИНЫ 2 3 4 Checking the Needle The sewing needle must always be straight and sharp for smoothsewing. To Check the Needle Correctly: To check the needle, place the flat side of the needle on a flatsurface. Check ...
Page 21 - Nadel prüfen; Nadel austauschen; Проверка иглы; Замена иглы
10 KNOWING YOUR SEWING MACHINE KENNENLERNEN IHRER MASCHINE КРАТКОЕ ТЕХНИЧЕСКОЕ ОПИСАНИЕ МАШИНЫ Nadel prüfen Die Nähnadel muß für problemloses Nähen immer gerade und spitz sein. Richtiges Überprüfen der Nadel: Um die Nadel zu überprüfen, legen Sie sie mit der abgeflachten Seite aufeine plane Oberfläc...
Page 22 - Changing the Presser Foot; Nähfuß wechseln; Замена нажимной лапки
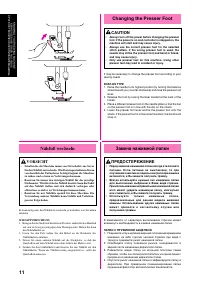
11 KNOWING YOUR SEWING MACHINE KENNENLERNEN IHRER MASCHINE КРАТКОЕ ТЕХНИЧЕСКОЕ ОПИСАНИЕ МАШИНЫ Changing the Presser Foot CAUTION • Always turn off the power before changing the presserfoot. If the power is on and controller is stepped on, themachine will start and may cause injury. • Always use the ...
Page 23 - Flat Bed Attachment
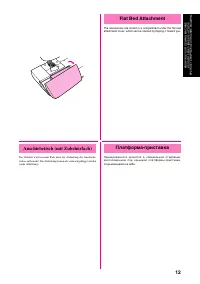
12 KNOWING YOUR SEWING MACHINE KENNENLERNEN IHRER MASCHINE КРАТКОЕ ТЕХНИЧЕСКОЕ ОПИСАНИЕ МАШИНЫ Flat Bed Attachment The accessories are stored in a compartment under the flat bedattachment cover, which can be opened by flipping it toward you. Anschiebetisch (mit Zubehörfach) Das Zubehör wird in einem...
Page 24 - VARIOUS CONTROLS; Pattern Selection Dial
13 KNOWING YOUR SEWING MACHINE KENNENLERNEN IHRER MASCHINE КРАТКОЕ ТЕХНИЧЕСКОЕ ОПИСАНИЕ МАШИНЫ VARIOUS CONTROLS Pattern Selection Dial CAUTIONWhen you use the Pattern Selection Dial to select a pattern,turn the balance wheel to the front (counter-clockwise) byhand to set the needle in the highest po...
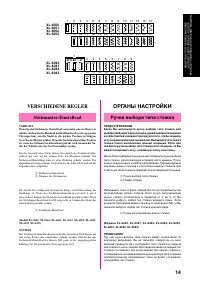
Page 25 - VERSCHIEDENE REGLER; ОРГАНЫ НАСТРОЙКИ; Ручка выбора типа стежка
14 KNOWING YOUR SEWING MACHINE KENNENLERNEN IHRER MASCHINE КРАТКОЕ ТЕХНИЧЕСКОЕ ОПИСАНИЕ МАШИНЫ VERSCHIEDENE REGLER Stichmuster-Einstellrad VORSICHTWenn Sie das Stichmuster-Einstellrad verwenden, um ein Muster zuwählen, drehen Sie das Handrad mit der Hand nach vorne (gegen denUhrzeigersinn), um die N...
Page 26 - RECOMMENDED LENGTHS FOR STITCHES
15 KNOWING YOUR SEWING MACHINE KENNENLERNEN IHRER MASCHINE КРАТКОЕ ТЕХНИЧЕСКОЕ ОПИСАНИЕ МАШИНЫ RECOMMENDED LENGTHS FOR STITCHES (Model XL-6060, XL-6061, XL-6062, XL-6063) PATTERN STITCH NAME PRESET WIDTH RECOMMENDED INSTRUCTION [mm(inch)] LENGTH [mm(inch)] MANUAL PAGE 1-STEP AUTOMATIC 5 F-1.5 55 BUT...
Page 29 - EMPFOHLENE EINSTELLWERTE
18 KNOWING YOUR SEWING MACHINE KENNENLERNEN IHRER MASCHINE КРАТКОЕ ТЕХНИЧЕСКОЕ ОПИСАНИЕ МАШИНЫ EMPFOHLENE EINSTELLWERTE (Modell XL-6060, XL-6061, XL-6062, XL-6063) STICHMUSTER STICHNAME VOREINGESTELLTE EMPFOHLENE SEITE IN DER BREITE [mm (Zoll)] LÄNGE [mm (Zoll)] ANLEITUNG 1-STUFEN- 5 F-1,5 56 KNOPFL...
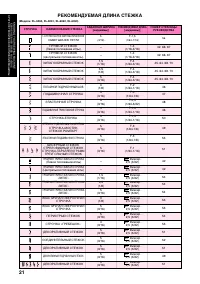
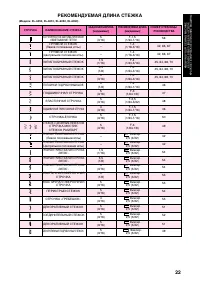
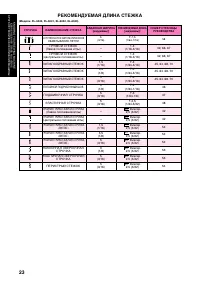
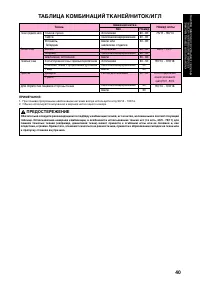
Page 32 - РЕКОМЕНДУЕМАЯ ДЛИНА СТЕЖКА
21 KNOWING YOUR SEWING MACHINE KENNENLERNEN IHRER MASCHINE КРАТКОЕ ТЕХНИЧЕСКОЕ ОПИСАНИЕ МАШИНЫ РЕКОМЕНДУЕМАЯ ДЛИНА СТЕЖКА (Модели XL-6060, XL-6061, XL-6062, XL-6063) СТРОЧКА НАИМЕНОВАНИЕ СТЕЖКА ЗАДАННАЯ ШИРИНА РЕКОМЕНДУЕМАЯ ДЛИНА НОМЕР СТРАНИЦЫ [мм(дюймы)] [ мм(дюймы)] РУКОВОДСТВА 1-СТУПЕНЧАТОЕ АВТО...
Page 35 - Stitch Length Dial
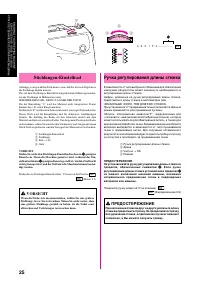
24 KNOWING YOUR SEWING MACHINE KENNENLERNEN IHRER MASCHINE КРАТКОЕ ТЕХНИЧЕСКОЕ ОПИСАНИЕ МАШИНЫ 1 3 2 1 2 3 4 · · 4 · 3 · 2 · 1 · F · 0 .................... SS A A A A A Stitch Length Dial Depending on your selected stitch, you may need to adjust the stitchlength for best results.The numbers marked o...
Page 36 - Ручка регулирования длины стежка
25 KNOWING YOUR SEWING MACHINE KENNENLERNEN IHRER MASCHINE КРАТКОЕ ТЕХНИЧЕСКОЕ ОПИСАНИЕ МАШИНЫ Stichlängen-Einstellrad Abhängig vom gewählten Stich kann es sein, daß Sie für beste Ergebnissedie Stichlänge ändern müssen.Die auf dem Stichlängen-Einstellrad aufgedruckten Zahlen repräsentie-ren die Stic...
Page 37 - Reverse Sewing Lever; Рычаг реверсирования строчки
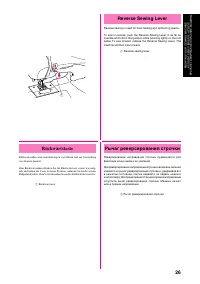
26 KNOWING YOUR SEWING MACHINE KENNENLERNEN IHRER MASCHINE КРАТКОЕ ТЕХНИЧЕСКОЕ ОПИСАНИЕ МАШИНЫ 1 Reverse Sewing Lever Reverse sewing is used for back tacking and reinforcing seams. To sew in reverse, push the Reverse Sewing Lever in as far aspossible and hold in that position while pressing lightly ...
Page 38 - Converting to Free-arm Style; Переключение на режим
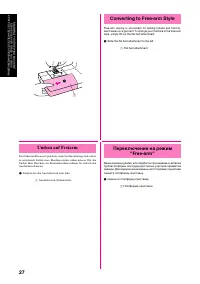
27 KNOWING YOUR SEWING MACHINE KENNENLERNEN IHRER MASCHINE КРАТКОЕ ТЕХНИЧЕСКОЕ ОПИСАНИЕ МАШИНЫ 1 1 Converting to Free-arm Style Free-arm sewing is convenient for sewing tubular and hard-to-reach areas on a garment. To change your machine to the free-armstyle, simply lift out the flat bed attachment....
Page 39 - THREADING; Winding the Bobbin; ЗАПРАВКА НИТОК; Намотка ниток на шпульку; FADENFÜHRUNG; Aufspulen
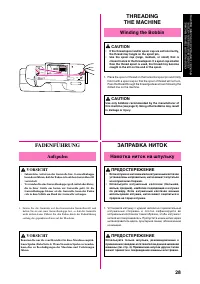
28 KNOWING YOUR SEWING MACHINE KENNENLERNEN IHRER MASCHINE КРАТКОЕ ТЕХНИЧЕСКОЕ ОПИСАНИЕ МАШИНЫ THREADING THE MACHINE Winding the Bobbin CAUTION • If the thread spool and/or spool cap are set incorrectly,the thread may tangle on the spool pin. • Use the spool cap (large, medium, or small) that isclos...
Page 42 - Lower Threading
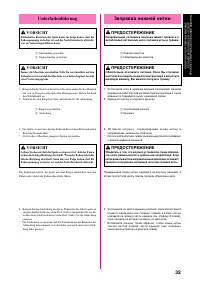
31 KNOWING YOUR SEWING MACHINE KENNENLERNEN IHRER MASCHINE КРАТКОЕ ТЕХНИЧЕСКОЕ ОПИСАНИЕ МАШИНЫ 2 1 2 1 Lower Threading CAUTION Setting the bobbin improperly may cause the thread ten-sion to loosen, breaking the needle and resulting in injury. 1 Wound evenly 2 Wound poorly CAUTION Be sure to turn off...
Page 43 - Заправка нижней нитки; Unterfadenführung
32 KNOWING YOUR SEWING MACHINE KENNENLERNEN IHRER MASCHINE КРАТКОЕ ТЕХНИЧЕСКОЕ ОПИСАНИЕ МАШИНЫ Заправка нижней нитки ПРЕДОСТЕРЕЖЕНИЕ Неправильная установка шпульки может привести кослаблению натяжения нити, поломке иглы и травме. 1 Ровная намотка 2 Неправильная намотка ПРЕДОСТЕРЕЖЕНИЕ Обязательно от...
Page 44 - Upper Threading
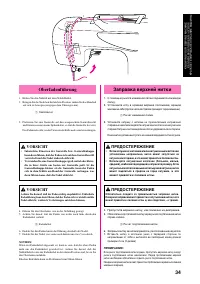
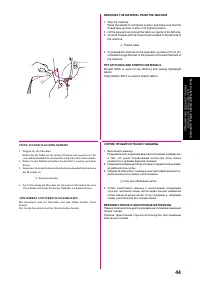
33 KNOWING YOUR SEWING MACHINE KENNENLERNEN IHRER MASCHINE КРАТКОЕ ТЕХНИЧЕСКОЕ ОПИСАНИЕ МАШИНЫ Upper Threading 1. Raise the presser foot using the Presser Foot Lever.2. Raise the needle to its highest position by turning the balance wheel toward you (counterclockwise). 1 Presser foot lever 3. Place ...
Page 45 - Заправка верхней нитки; Oberfadenführung
34 KNOWING YOUR SEWING MACHINE KENNENLERNEN IHRER MASCHINE КРАТКОЕ ТЕХНИЧЕСКОЕ ОПИСАНИЕ МАШИНЫ Заправка верхней нитки 1. С помощью рычага нажимной лапки поднимите нажимную лапку. 2. Установите иглу в крайнее верхнее положение, вращая маховик на себя (против часовой стрелки при виде с торца машины). ...
Page 46 - Drawing Up Lower Thread; Вытягивание нижней нитки; Heraufholen des Unterfadens
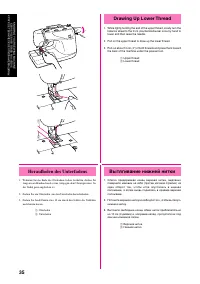
35 KNOWING YOUR SEWING MACHINE KENNENLERNEN IHRER MASCHINE КРАТКОЕ ТЕХНИЧЕСКОЕ ОПИСАНИЕ МАШИНЫ Drawing Up Lower Thread 1. While lightly holding the end of the upper thread, slowly turn the balance wheel to the front (counterclockwise) once by hand tolower and then raise the needle. 2. Pull on the up...
Page 47 - Twin Needle Sewing; Двухигольная строчка; Nähen mit Doppelnadel
36 KNOWING YOUR SEWING MACHINE KENNENLERNEN IHRER MASCHINE КРАТКОЕ ТЕХНИЧЕСКОЕ ОПИСАНИЕ МАШИНЫ Twin Needle Sewing Your machine is designed for twin needle sewing, which allows youto sew with two top threads. You can use the same color or twodifferent colors of thread for making decorative stitches. ...
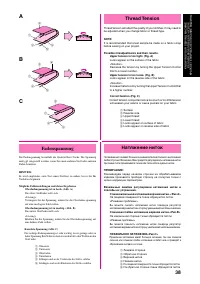
Page 49 - Thread Tension; Натяжение ниток
38 KNOWING YOUR SEWING MACHINE KENNENLERNEN IHRER MASCHINE КРАТКОЕ ТЕХНИЧЕСКОЕ ОПИСАНИЕ МАШИНЫ Thread Tension Thread tension will affect the quality of your stitches. It may need tobe adjusted when you change fabric or thread type. NOTE: It is recommended that a test sample be made on a fabric scrap...
Page 52 - PLEASE READ BEFORE SEWING; ПОЖАЛУЙСТА, ПРОЧИТАЙТЕ ДО НАЧАЛА ШИТЬЯ; BITTE VOR DEM NÄHEN LESEN
41 STRAIGHT AND ZIGZAG STITCHING GERAD- UND ZICKZACKSTICH НОРМАЛЬНАЯ ПРЯМАЯ И ЗИГЗАГООБРАЗНАЯ СТРОЧКА PLEASE READ BEFORE SEWING CAUTION • To avoid injury, pay special attention to the needle while the machine is in operation. Keep your hands away from movingparts while the machine is in operation. •...
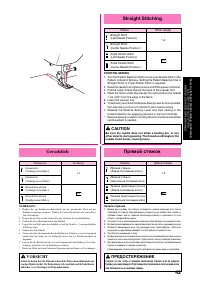
Page 53 - Straight Stitching; Geradstich; Прямой стежок
42 STRAIGHT AND ZIGZAG STITCHING GERAD- UND ZICKZACKSTICH НОРМАЛЬНАЯ ПРЯМАЯ И ЗИГЗАГООБРАЗНАЯ СТРОЧКА SS SS Straight Stitching Pattern Stitch Length (Straight Stitch 1-4 (Left Needle Position)) (Straight Stitch (Center Needle Position)) (Triple Stretch Stitch (Left Needle Position)) (Triple Stretch ...
Page 56 - Zigzag Stitching; Зигзагообразный стежок; Zickzackstich
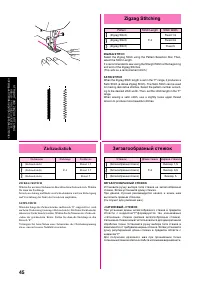
45 STRAIGHT AND ZIGZAG STITCHING GERAD- UND ZICKZACKSTICH НОРМАЛЬНАЯ ПРЯМАЯ И ЗИГЗАГООБРАЗНАЯ СТРОЧКА Zigzag Stitching Pattern Stitch Length Stitch Width (Zigzag Stitch) Fixed 1.5 (Zigzag Stitch) F-4 Fixed 3.5 (Zigzag Stitch) Fixed 5 ZIGZAG STITCH Select the Zigzag Stitch using the Pattern Selection...
Page 57 - Blind Hem Stitching
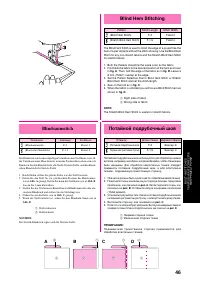
46 BUILT-IN STITCHES VERF Ü GBARE STICHMUSTER ФИГУРНЫЕ СТРОЧКИ Blind Hem Stitching Pattern Stitch Length Stitch Width (Blind Hem Stitch) F-2 Fixed 3 (Stretch Blind Hem Stitch) F-1.5 Fixed 4 The Blind Hem Stitch is used to finish the edge of a project like thehem of a pair of pants without the stitch...
Page 58 - Shell Tuck Stitching; Подшивочная строчка; Biesenstich
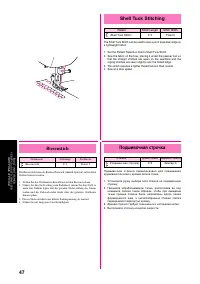
47 BUILT-IN STITCHES VERF Ü GBARE STICHMUSTER ФИГУРНЫЕ СТРОЧКИ Shell Tuck Stitching Pattern Stitch Length Stitch Width (Shell Tuck Stitch) F-3 Fixed 5 The Shell Tuck Stitch can be used to sew a picot (lace like) edge ona lightweight fabric. 1. Set the Pattern Selection Dial to Shell Tuck Stitch.2. S...
Page 59 - Elastic Stitching; Эластичная строчка; Elastikstich
48 BUILT-IN STITCHES VERF Ü GBARE STICHMUSTER ФИГУРНЫЕ СТРОЧКИ Elastic Stitching Pattern Stitch Length Stitch Width (Elastic Stitch) F-2.5 Fixed 5 The Elastic Stitch can be used for 3 functions: mending, sewingelastic or joining fabric. Each is explained below.Set the Pattern Selection Dial to Elast...
Page 60 - Double Action Stitching; Стежок с двойным эффектом; Elastische Schrittnaht
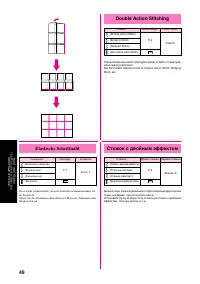
49 BUILT-IN STITCHES VERF Ü GBARE STICHMUSTER ФИГУРНЫЕ СТРОЧКИ Double Action Stitching Pattern Stitch Length Stitch Width (Double Action Stitch) (Bridging Stitch) F-3 Fixed 5 (Rampart Stitch) (Decorative hem Stitch) SS These stitches are used for joining two pieces of fabric, for example,when making...
Page 61 - Scallop Stitching; Bogennaht
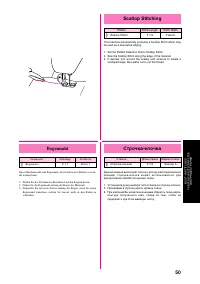
50 BUILT-IN STITCHES VERF Ü GBARE STICHMUSTER ФИГУРНЫЕ СТРОЧКИ Scallop Stitching Pattern Stitch Length Stitch Width (Scallop Stitch) F-1.5 Fixed 5 This machine automatically produces a Scallop Stitch which maybe used as a decorative edging. 1. Set the Pattern Selection Dial to Scallop Stitch.2. Sew ...
Page 62 - Decorative Stitching; Декоративный стежок; Dekorstiche
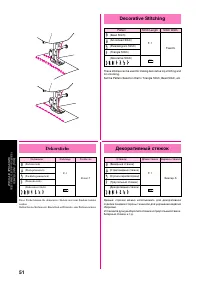
51 BUILT-IN STITCHES VERF Ü GBARE STICHMUSTER ФИГУРНЫЕ СТРОЧКИ SS SS SS Decorative Stitching Pattern Stitch Length Stitch Width (Bead Stitch) (Arrowhead Stitch) F-1 (Parallelogram Stitch) Fixed 5 (Triangle Stitch) (Decorative Stitch) These stitches can be used for making decorative top stitching and...
Page 63 - Лоскутное шитье; Patchwork
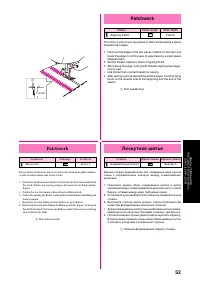
52 BUILT-IN STITCHES VERF Ü GBARE STICHMUSTER ФИГУРНЫЕ СТРОЧКИ Patchwork Pattern Stitch Length Stitch Width (Fagoting Stitch) SS Fixed 5 This stitch is used to join two pieces of fabric while leaving a spacebetween their edges. 1. Fold over the edges of the two pieces of fabric for the hem and baste...
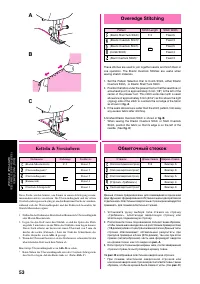
Page 64 - Overedge Stitching; Обметочный стежок
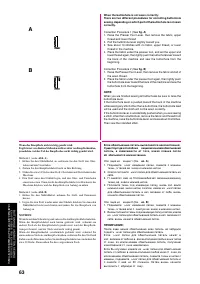
53 BUILT-IN STITCHES VERF Ü GBARE STICHMUSTER ФИГУРНЫЕ СТРОЧКИ A B C Overedge Stitching Pattern Stitch Length Stitch Width (Elastic Shell Tuck Stitch) F-3 Fixed 5 (Elastic Overlock Stitch)* Fixed 3 (Elastic Overlock Stitch) SS Fixed 5 (Comb Stitch) Fixed 4 (Slant Overlock Stitch)* Fixed 3 These stit...
Page 65 - Feather Stitching
54 BUILT-IN STITCHES VERF Ü GBARE STICHMUSTER ФИГУРНЫЕ СТРОЧКИ Feather Stitching Pattern Stitch Length Stitch Width (Feather Stitch) SS Fixed 5 Use the Feather Stitch as a decorative top stitch or when hemmingblankets, tablecloths or draperies or when embroidering. 1. Set the Pattern Selection Dial ...
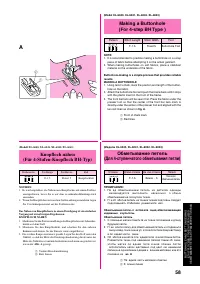
Page 66 - Making a Buttonhole
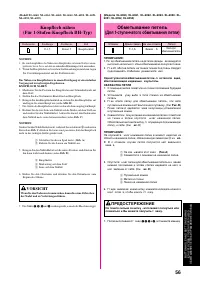
55 BUTTONHOLE AND BUTTON SEWING KNOPFLÖCHER UND KNÖPFE NÄHEN ОБМЕТЫВАНИЕ ПЕТЕЛЬ И ПРИШИВАНИЕ ПУГОВИЦ (Model XL-6060, XL-6061, XL-6062, XL-6063, XL-6050, XL-6051, XL-6052, XL-6053) Making a Buttonhole (For 1-step BH Type) Pattern Stitch Length Stitch Width Foot F-1.5 Fixed 5 Buttonhole Foot NOTE: 1. ...
Page 67 - Обметывание петель; Knopfloch nähen
56 BUTTONHOLE AND BUTTON SEWING KNOPFL Ö CHER UND KN Ö PFE N Ä HEN ОБМЕТЫВАНИЕ ПЕТЕЛЬ И ПРИШИВАНИЕ ПУГОВИЦ (Модели XL-6060, XL-6061, XL-6062, XL-6063, XL-6050, XL-6051, XL-6052, XL-6053) Обметывание петель (Для 1-ступенчатого обметывания петли) Стежок Длина стежка Ши ина стежка Лапка F-1,5 Фикси . 5...
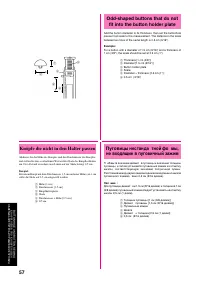
Page 68 - Knöpfe die nicht in den Halter passen; Odd-shaped buttons that do not; Пуговицы нестанда тной фо мы,
57 BUTTONHOLE AND BUTTON SEWING KNOPFL Ö CHER UND KN Ö PFE N Ä HEN ОБМЕТЫВАНИЕ ПЕТЕЛЬ И ПРИШИВАНИЕ ПУГОВИЦ Knöpfe die nicht in den Halter passen Addieren Sie die Höhe des Knopfes und den Durchmesser des Knopfes,und stellen Sie den so erhaltenen Wert auf der Skala des Knopflochfußesein. Der Abstand z...
Page 72 - Buttonhole Fine Adjustment
61 BUTTONHOLE AND BUTTON SEWING KNOPFL Ö CHER UND KN Ö PFE N Ä HEN ОБМЕТЫВАНИЕ ПЕТЕЛЬ И ПРИШИВАНИЕ ПУГОВИЦ Buttonhole Fine Adjustment If the stitching on the two sides of the buttonhole do not appearuniform, the following adjustments can be made. 1. Set the Stitch Length Dial at “F-1.5” and stitch t...
Page 73 - Тонкая наст ойка для
62 BUTTONHOLE AND BUTTON SEWING KNOPFL Ö CHER UND KN Ö PFE N Ä HEN ОБМЕТЫВАНИЕ ПЕТЕЛЬ И ПРИШИВАНИЕ ПУГОВИЦ Тонкая наст ойка для обметывания петель Если стежки с обеих сто он петли не идентичны по азме у,то можно выполнить описанные ниже егули овки. 1. Установите учку егули ования длины стежка на отм...
Page 75 - Button Sewing; П ишивание пуговиц; Knöpfe annähen
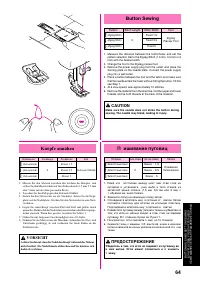
64 BUTTONHOLE AND BUTTON SEWING KNOPFL Ö CHER UND KN Ö PFE N Ä HEN ОБМЕТЫВАНИЕ ПЕТЕЛЬ И ПРИШИВАНИЕ ПУГОВИЦ Button Sewing Pattern Stitch Length Stitch Width Foot (Zigzag Stitch) Fixed 1.5 (Zigzag Stitch) 0 Fixed 3.5 (Zigzag Stitch) Fixed 5 1. Measure the distance between the buttonholes and set the p...
Page 76 - Zipper Insertion; Gathering
65 USING ATTACHMENTS AND APPLICATIONS HEFTEN UND APPLIZIEREN ИСПОЛЬЗОВАНИЕ ПРИСПОСОБЛЕНИЙ И ИЗГОТОВЛЕНИЕ АППЛИКАЦИЙ Zipper Insertion Pattern Stitch Length Foot (Straight Stitch 2-3 Zipper Foot (Center Needle Position)) The zipper foot is used to sew various types of zippers and caneasily be position...
Page 77 - Вшивание застежек-молний; Об аботка сбо ок; Reffen
66 USING ATTACHMENTS AND APPLICATIONS HEFTEN UND APPLIZIEREN ИСПОЛЬЗОВАНИЕ ПРИСПОСОБЛЕНИЙ И ИЗГОТОВЛЕНИЕ АППЛИКАЦИЙ Лапка для вшивания застежек- молний Вшивание застежек-молний Cтежок Длина стежка Лапка (П ямой стежок 2-3 (Цент альное положение иглы)) Лапка для вшивания застежек-молний п едназначена...
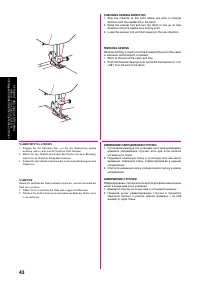
Page 78 - Darning
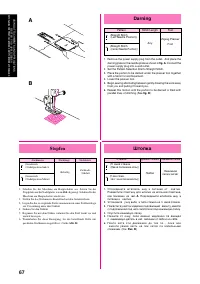
67 USING ATTACHMENTS AND APPLICATIONS HEFTEN UND APPLIZIEREN ИСПОЛЬЗОВАНИЕ ПРИСПОСОБЛЕНИЙ И ИЗГОТОВЛЕНИЕ АППЛИКАЦИЙ Нажимная лапка зигзаг Darning Pattern Stitch Length Foot (Straight Stitch Any (Left Needle Position)) (Straight Stitch (Center Needle Position)) 1. Remove the power supply plug from th...
Page 79 - Appliqués; Applizieren; Аппликации
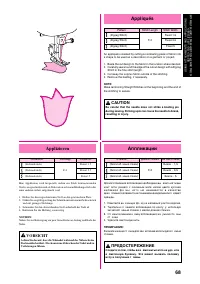
68 USING ATTACHMENTS AND APPLICATIONS HEFTEN UND APPLIZIEREN ИСПОЛЬЗОВАНИЕ ПРИСПОСОБЛЕНИЙ И ИЗГОТОВЛЕНИЕ АППЛИКАЦИЙ Appliqués Pattern Stitch Length Stitch Width (Zigzag Stitch) Fixed 1.5 (Zigzag Stitch) F-2 Fixed 3.5 (Zigzag Stitch) Fixed 5 An appliqué is created by cutting a contrasting piece of fa...
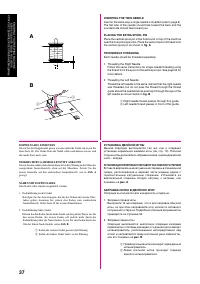
Page 80 - Monogramming and
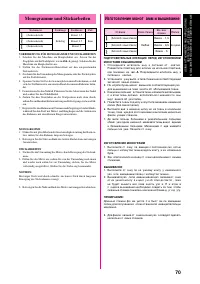
69 USING ATTACHMENTS AND APPLICATIONS HEFTEN UND APPLIZIEREN ИСПОЛЬЗОВАНИЕ ПРИСПОСОБЛЕНИЙ И ИЗГОТОВЛЕНИЕ АППЛИКАЦИЙ Monogramming and Embroidering Pattern Stitch Length Stitch Width Foot (Zigzag Stitch) Fixed 1.5 (Zigzag Stitch) Any Fixed 3.5 None (Zigzag Stitch) Fixed 5 PREPARING FOR MONOGRAMMING AN...
Page 81 - Monogramme und Stickarbeiten; Изготовление моног амм и вышивание
70 USING ATTACHMENTS AND APPLICATIONS HEFTEN UND APPLIZIEREN ИСПОЛЬЗОВАНИЕ ПРИСПОСОБЛЕНИЙ И ИЗГОТОВЛЕНИЕ АППЛИКАЦИЙ (Зигзагооб азный стежок) Фикси . 1,5 (Зигзагооб азный стежок) Любая Фикси . 3,5 Не нужна (Зигзагооб азный стежок) Фикси . 5 ПОДГОТОВИТЕЛЬНЫЕ ОПЕРАЦИИ ПЕРЕД ИЗГОТОВЛЕНИЕММОНОГРАММ И ВЫШ...
Page 82 - OPTIONAL ACCESSORIES; Using the Walking Foot
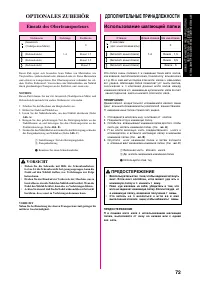
71 USING ATTACHMENTS AND APPLICATIONS HEFTEN UND APPLIZIEREN ИСПОЛЬЗОВАНИЕ ПРИСПОСОБЛЕНИЙ И ИЗГОТОВЛЕНИЕ АППЛИКАЦИЙ 1 2 C B A 1 OPTIONAL ACCESSORIES Using the Walking Foot Pattern Stitch Length Stitch Width (Straight Stitch 0 (Center Needle Position)) (Zigzag Stitch) 1-4 Fixed 1.5 (Zigzag Stitch) Fi...
Page 83 - Einsatz des Obertransporteurs; Использование шагающей лапки
72 USING ATTACHMENTS AND APPLICATIONS HEFTEN UND APPLIZIEREN ИСПОЛЬЗОВАНИЕ ПРИСПОСОБЛЕНИЙ И ИЗГОТОВЛЕНИЕ АППЛИКАЦИЙ OPTIONALES ZUBEHÖR Einsatz des Obertransporteurs Stichmuster Stichlänge Stichbreite (Geradstich 0 (Nadelposition Mitte)) (Zickzackstich) 1-4 Fixiert 1,5 (Zickzackstich) Fixiert 3,5 (Zi...
Page 84 - Using the Spring-action
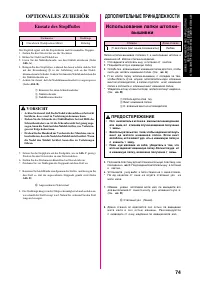
73 USING ATTACHMENTS AND APPLICATIONS HEFTEN UND APPLIZIEREN ИСПОЛЬЗОВАНИЕ ПРИСПОСОБЛЕНИЙ И ИЗГОТОВЛЕНИЕ АППЛИКАЦИЙ OPTIONAL ACCESSORIES Using the Spring-action Quilting Foot Pattern Stitch Length (Straight Stitch (Center Needle Position)) Any The Spring -action Quilting Foot is useful for darning a...
Page 85 - Использование лапки штопки-; Einsatz des Stopffußes
74 USING ATTACHMENTS AND APPLICATIONS HEFTEN UND APPLIZIEREN ИСПОЛЬЗОВАНИЕ ПРИСПОСОБЛЕНИЙ И ИЗГОТОВЛЕНИЕ АППЛИКАЦИЙ ДОПОЛНИТЕЛЬНЫЕ ПРИНАДЛЕЖНОСТИ Использование лапки штопки- вышивки Стежок Длина стежка (П ямой стежок (Цент альное положение иглы)) Любая Лапка штопки-вышивки полезна п и выполнении што...
Page 87 - Einsatz des Patchworkfuß; Использование нап авляющей
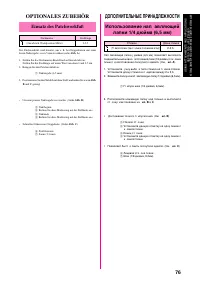
76 USING ATTACHMENTS AND APPLICATIONS HEFTEN UND APPLIZIEREN ИСПОЛЬЗОВАНИЕ ПРИСПОСОБЛЕНИЙ И ИЗГОТОВЛЕНИЕ АППЛИКАЦИЙ OPTIONALES ZUBEHÖR Einsatz des Patchworkfuß Stichmuster Stichlänge (Geradstich (Nadelposition Mitte)) 2-2,5 Der Patchworkfuß wird benutzt, um z. B. bei Stepparbeiten mit einerfesten Na...
Page 88 - Changing the Light Bulb
77 MAINTENANCE WARTUNG ТЕХНИЧЕСКОЕ ОБСЛУЖИВАНИЕ Changing the Light Bulb CAUTION • Turn off the main power switch and unplug the machinebefore changing the light bulb. If the main power switchis on when the light bulb is changed, an electric shockmay result. If the machine is on and foot controller i...
Page 89 - Замена лампочки освещения; Nählichtlampe auswechseln
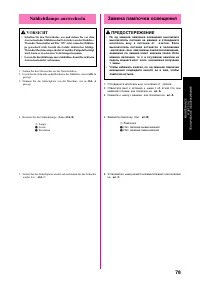
78 MAINTENANCE WARTUNG ТЕХНИЧЕСКОЕ ОБСЛУЖИВАНИЕ Замена лампочки освещения ПРЕДОСТЕРЕЖЕНИЕ • Пе ед заменой лампочки освещения выключите выключатель питания на машине и отсоединитеш т е п с е л ь ш н у а п и т а н и я о т о з е т к и . Е с л и выключатель питания останется в положении«включено» во в е...
Page 90 - Cleaning
79 MAINTENANCE WARTUNG ТЕХНИЧЕСКОЕ ОБСЛУЖИВАНИЕ Cleaning CAUTION Be sure to unplug the machine before cleaning it. Other-wise, electric shock or injury may result. 1. Remove the power supply plug from the outlet.2. Raise the needle and the presser foot.3. Loosen the presser foot screw and the needle...
Page 91 - Чистка машины; Reinigung
80 MAINTENANCE WARTUNG ТЕХНИЧЕСКОЕ ОБСЛУЖИВАНИЕ Чистка машины ПРЕДОСТЕРЕЖЕНИЕ Пе ед чисткой машины обязательно отсоединитештепсель шну а питания от озетки. В п отивномслучае возможно по ажение элект ическим током илиполучение иной т авмы. 1. Отсоедините штепсель шну а питания от озетки.2. Поднимите ...
Page 92 - CONTACT YOUR LOCAL SERVICE CENTER
81 MAINTENANCE WARTUNG ТЕХНИЧЕСКОЕ ОБСЛУЖИВАНИЕ No Page 31 No Page 39 No Page 79 No Page 9 Bobbin is not threaded properly in the race. Inferior needle is used. Lint is clinging to the bottom of the needle plate. The combination of needle size/thread size/fabric is incorrect. SKIPPED STITCHES LOOP I...
Page 94 - WENDEN SIE SICH AN EINE WERKSTATT
83 MAINTENANCE WARTUNG ТЕХНИЧЕСКОЕ ОБСЛУЖИВАНИЕ Nein Seite 39 Nein Seite 80 Nein Seite 10 Nein Seite 32 WENDEN SIE SICH AN EINE WERKSTATT CHECKLISTE Wann immer Sie beim Nähen auf Schwierigkeiten stoßen, lesen Sie den Abschnitt dieser Anleitung, die den Vorgang beschreibt, den Sie geradedurchführen, ...
Page 96 - ТАБЛИЦА ВОЗМОЖНЫХ НЕИСПРАВНОСТЕЙ
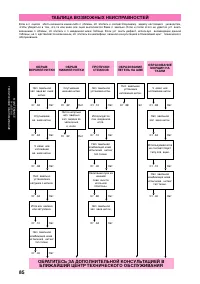
85 MAINTENANCE WARTUNG ТЕХНИЧЕСКОЕ ОБСЛУЖИВАНИЕ ТАБЛИЦА ВОЗМОЖНЫХ НЕИСПРАВНОСТЕЙ Если в поцессе аботы возникли какие-либо поблемы, об атитесь к соответствующему азделу настоящего уководства,чтобы убедиться в том, что та или иная опе ация выполняется Вами п авильно. Если и после этого не удается уст ...
Page 97 - ОБРАТИТЕСЬ ЗА ДОПОЛНИТЕЛЬНОЙ КОНСУЛЬТАЦИЕЙ В
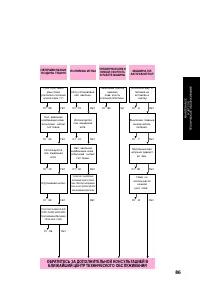
86 MAINTENANCE WARTUNG ТЕХНИЧЕСКОЕ ОБСЛУЖИВАНИЕ Нет Ст . 8 Нет Ст .80 Нет Нет Ст .56 Неве но используется ножной конт олле . ЧРЕЗМЕРНЫЙ ШУМ И НИЗКАЯ СКОРОСТЬ В РАБОТЕ МАШИНЫ МАШИНА НЕ ЗАПУСКАЕТСЯ ОБРАТИТЕСЬ ЗА ДОПОЛНИТЕЛЬНОЙ КОНСУЛЬТАЦИЕЙ В БЛИЖАЙШИЙ ЦЕНТР ТЕХНИЧЕСКОГО ОБСЛУЖИВАНИЯ НЕПРАВИЛЬНАЯ ПОДА...
Page 98 - Repacking the Machine; IMPORTANT; Maschine verpacken; WICHTIG; Пе еупаковка машины
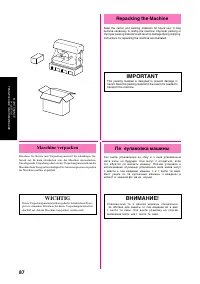
87 MAINTENANCE WARTUNG ТЕХНИЧЕСКОЕ ОБСЛУЖИВАНИЕ Repacking the Machine Keep the carton and packing materials for future use. It maybecome necessary to reship the machine. Improper packing orimproper packing material could result in damage during shipping.Instructions for repacking the machine are ill...


 Brother SC6600
User Manual
Brother SC6600
User Manual
 Brother SC9500
User Manual
Brother SC9500
User Manual
 Brother FAX-270MC
User Manual
Brother FAX-270MC
User Manual
 Brother FAX190
User Manual
Brother FAX190
User Manual
 Brother MFC 6550MC
User Manual
Brother MFC 6550MC
User Manual
 Brother NB-60
User Manual
Brother NB-60
User Manual
 Brother MFC-4550
User Manual
Brother MFC-4550
User Manual
 Brother HL-5250DN
User Manual
Brother HL-5250DN
User Manual
 Brother ULT2003D
User Manual
Brother ULT2003D
User Manual
 Brother HL-5280DW
User Manual
Brother HL-5280DW
User Manual
 Brother GX-6750
User Manual
Brother GX-6750
User Manual
 Brother FAX775
User Manual
Brother FAX775
User Manual