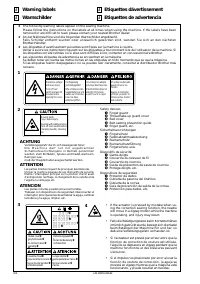
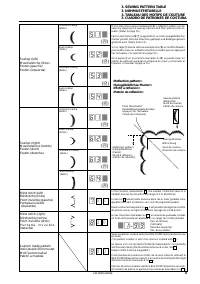
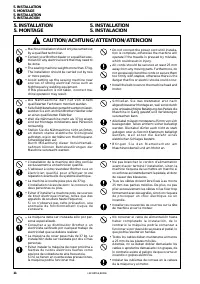
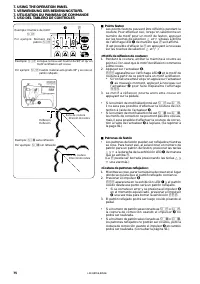
Page 2 - SAFETY INSTRUCTIONS; Safety indications and their meanings; Indications; DANGER; Symbols
LZ2-B855E,B856E (English) Thank you very much for buying a BROTHER sewing machine. Before using your new machine, please read the safetyinstructions below and the explanations given in the instruction manual. With industrial sewing machines, it is normal to carry out work while positioned directly i...
Page 3 - Notes on safety; CAUTION; 0% of the rated voltage for; Environmental requirements; ii
LZ2-B855E,B856E (English) DANGER 2 Notes on safety CAUTION ● Use the sewing machine in an area which is freefrom sources of strong electrical noise such ashigh-frequency welders.Sources of strong electrical noise may causeproblems with correct operation. ● Any fluctuations in the power supply voltag...
Page 4 - When threading the needle; Sewing; iii
LZ2-B855E,B856E (English) CAUTION ● This sewing machine should only be used byoperators who have received the necessarytraining in safe use beforehand. ● The sewing machine should not be used for anyapplications other than sewing. ● Turn off the power switch at the following times,o t h e r w i s e ...
Page 5 - SICHERHEITSHINWEISE; Sicherheitshinweise und ihre Bedeutung; Hinweise; GEFAHR; Symbole; iv
LZ2-B855E,B856E (German) Vielen Dank, daß Sie sich für eine BROTHER-Nähmaschine entschieden haben. Lesen Sie bitte vor der Inbetriebnahmeder neuen Nähmaschine die nachstehenden Sicherheitshinweise und die in der Bedienungsanleitung angegebenenErklärungen durch. Bei industriellen Nähmaschinen ist es ...
Page 6 - Hinweise zur Sicherheit; Betriebsbedingungen
LZ2-B855E,B856E (German) 2 Hinweise zur Sicherheit GEFAHR ACHTUNG ● Verwenden Sie die Nähmaschine an einem Ort,an dem keine elektrischen Störsignale, wie z.B.von Hochfrequenz-Schweißgeräten vorhandensind.D u r c h a u f t r e t e n d e e l e k t r i s c h e S t ö r s i g n a l ekönnen Betriebsstörun...
Page 7 - ACHTUNG; Zum Einfädeln der Nadel; Nähen
LZ2-B855E,B856E (German) ACHTUNG ● Diese Nähmaschine darf nur von Personenbedient werden, die zuerst das notwendigeTraining zur sicheren Bedienung absolvierthaben. ● D i e s e N ä h m a s c h i n e d a r f n u r z u m N ä h e nverwendet werden. ● Schalten Sie den Netzschalter in den folgendenFällen ...
Page 8 - INSTRUCTIONS DE SECURITE; Indications de sécurité et leur signification; Symboles; vii
LZ2-B855E,B856E (French) Nous vous remercions d’avoir acheté une machine à coudre BROTHER. Avant d’utiliser votre nouvelle machine, veuillezlire attentivement les instructions de sécurité ci-dessous et les explications données dans le manuel d’instructions. Pour utiliser les machines à coudre indust...
Page 9 - Remarques concernant la sécurité; Nécessités d’environnement; viii
LZ2-B855E,B856E (French) ATTENTION DANGER 2 Remarques concernant la sécurité ● Attendre au moins 5 minutes après avoir mis l’interrupteur d’alimentation sur la position d’arrêt et avoirdébranché le cordon d’alimentation de la prise murale, avant d’ouvrir la plaque frontale du boîtier decommande. Si ...
Page 10 - ATTENTION; Lors de l’enfilage de l’aiguille; Couture; ix
LZ2-B855E,B856E (French) ATTENTION ● C e t t e m a c h i n e à c o u d r e d o i t ê t r e u t i l i s é es e u l e m e n t p a r d e s o p é r a t e u r s q u i o n tpréalablement reçu la formation nécessaire àl’utilisation sûre de la machine. ● Cette machine ne doit pas être utilisée pourd’autres ...
Page 11 - INSTRUCCIONES DE SEGURIDAD; Indicaciones de seguridad y sus significados; Indicaciones; PELIGRO; Símbolos
LZ2-B855E,B856E (Spanish) Muchas gracias por haber adquirido una máquina de coser BROTHER. Antes de usar su nueva máquina, por favor lealas instrucciones de seguridad a continuación y las explicaciones en este manual. Al usar máquinas de coser industriales, es normal trabajar ubicado directamente de...
Page 12 - Notas sobre sequridad; Requisitos ambientales; xi
LZ2-B855E,B856E (Spanish) ATENCION PELIGRO 2 Notas sobre sequridad ● Usar la máquina de coser en un área que estélibre de fuentes de interferencias eléctricasfuertes como soldadoras de alta frecuencia.Las fuentes de ruidos eléctricos fuertes puedenafectar el funcionamiento correcto. ● Cualquier fluc...
Page 13 - ATENCION; Al enhebrar la aguja; Costura; Al cambiar piezas como el garfio giratorio.; Mantenimiento e inspección; xii
LZ2-B855E,B856E (Spanish) ATENCION ● Sólo operarios que hayan sido entrenadosespecialmente deben usar esta máquina decoser. ● La máquina de coser no debe ser usada paraotro uso que no sea coser. ● Desconectar el interruptor principal en lossiguientes casos, de lo contrario la máquinapodría comenzar ...
Page 14 - Warning labels
xiii LZ2-B855E,B856E Heated covermay burn hands. Do not touch when operating. 高 温 部 さわるとやけどすることがある。通電中はさわらないこと。 Couvercle chaudrisque de br û ler les mains. Ne pas toucher pendant le fonctionnement. Verbrennungsgefahr! Deckel bei Bedienung nicht ber ü hren! La tapa caliente puede quemarle las m...
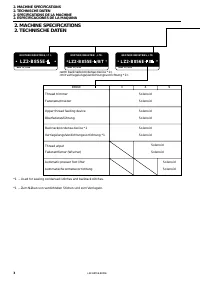
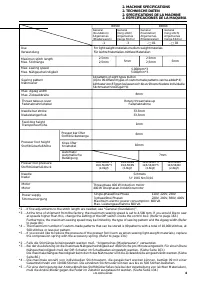
Page 16 - CONTENTS
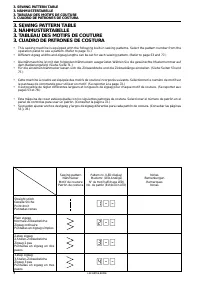
1. NAMES OF MAJOR PARTS .................................. 1 2. MACHINE SPECIFICATIONS ................................ 3 3. SEWING PATTERN TABLE ................................... 7 4. OPTIONAL PARTS ................................................. 9 5. INSTALLATION .................................
Page 17 - INHALT
1. HAUPTTEILE ......................................................... 1 2. TECHNISCHE DATEN ............................................ 3 3. NÄHMUSTERTABELLE ......................................... 7 4. SONDERZUBEHÖTEILE ........................................ 9 5. MONTAGE .......................
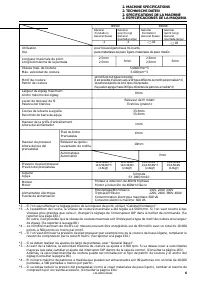
Page 18 - TABLE DES MATIERES
1. NOM DES PIECES PRINCIPALES ......................... 1 2. SPECIFICATIONS DE LA MACHINE ..................... 5 3. TABLEAU DES MOTIFS DE COUTURE ............... 7 4. PIECES EN OPTION .............................................. 9 5. INSTALLATION .....................................................
Page 19 - CONTENIDO
1. NOMBRES DE LAS PIEZAS PRINCIPALES .......... 1 2. ESPECIFICACIONES DE LA MAQUINA ............... 5 3. CUADRO DE PATRONES DE COSTURA .............. 7 4. PARTES OPCIONALES .......................................... 9 5. INSTALACION ....................................................... 11 5-1. Mes...
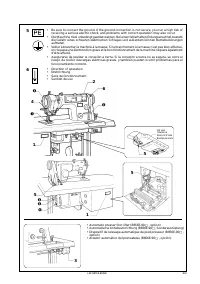
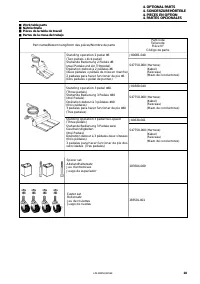
Page 31 - If using a commercially-available table
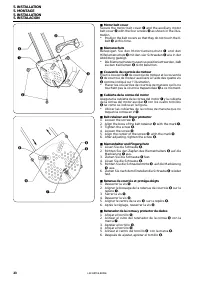
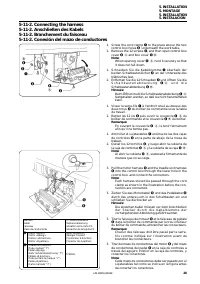
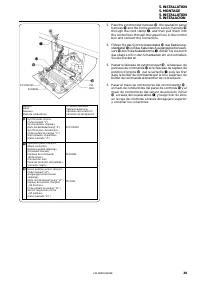
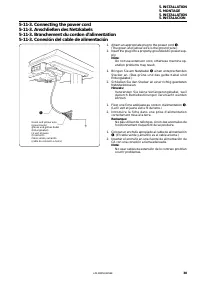
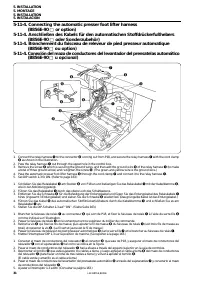
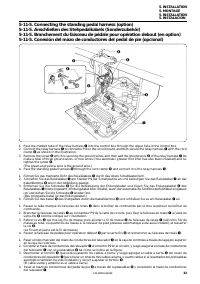
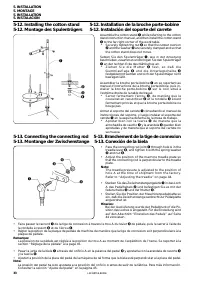
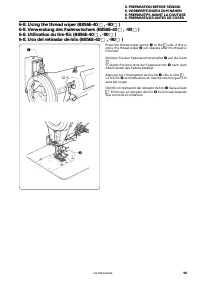
12 LZ2-B855E,B856E 5. INSTALLATION5. MONTAGE5. INSTALLATION5. INSTALACION 5-1. Work Table5-1. Nähtisch5-1. Table de travail5-1. Mesa de trabajo • The top of the table should be 40 mm in thickness and should be strong enough to hold the weight and with-standthe vibration of the sewing machine. • Dril...
Page 53 - the treadle is pressed by mistake, which could result in injury.
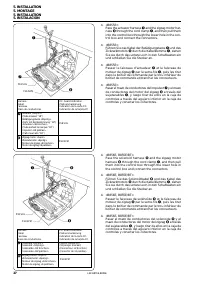
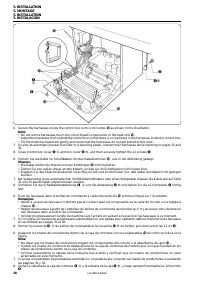
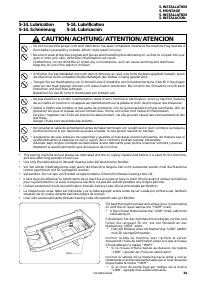
34 LZ2-B855E,B856E 5. INSTALLATION5. MONTAGE5. INSTALLATION5. INSTALACION • The sewing machine should always be lubricated and the oil supply replenished before it is used for the first time,and also after long periods of non-use. • Use only the lubricating oil (Nisseki Sewing Lube 10) specified by ...
Page 55 - ; sur la position de marche.; UP
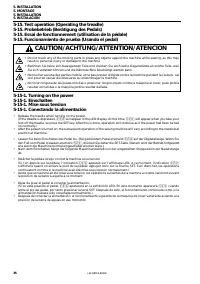
36 LZ2-B855E,B856E 5. INSTALLATION5. MONTAGE5. INSTALLATION5. INSTALACION <If the needle bar is at the needle up stop position> Turn on the POWER switch q . The buzzer will sound for about one second, and then theneedle bar will move horizontally to the sewing start posi-tion. Sewing will then...
Page 56 - Panel setting status
37 LZ2-B855E,B856E ● Raising the needle automatically (additional DIP switch function)(Be sure to turn off the power before changing any of the DIP switch settings. Refer to page 163.)When DIP switch 1-5 inside the control box is set to ON, pressing the half stitch key or depressing the treadlebackw...
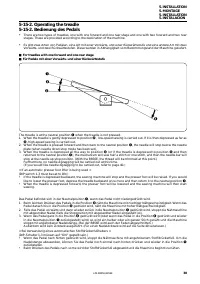
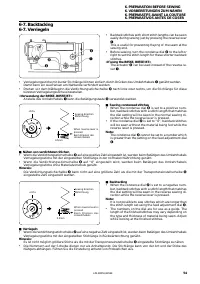
Page 61 - Pedales avec deux paliers avant et deux paliers arriere
42 LZ2-B855E,B856E 5. INSTALLATION5. MONTAGE5. INSTALLATION5. INSTALACION q w e r t y La pédale est en position neutre q lorsqu’on n’appuie pas sur la pédale. 1. Lorsqu’on appuie légèrement sur la pédale jusqu’à la position w , la couture est effectuée à vitesse lente. Si on appuie ensuite sur la pe...
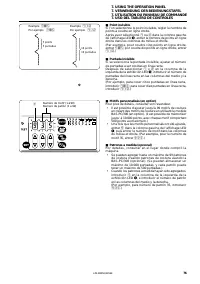
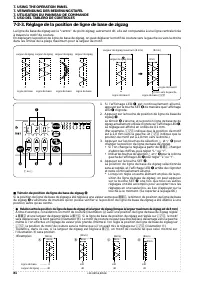
Page 79 - Tecla de posición de línea de base de zigzag
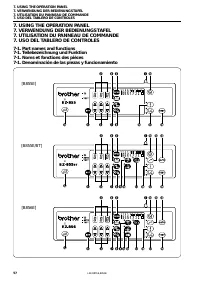
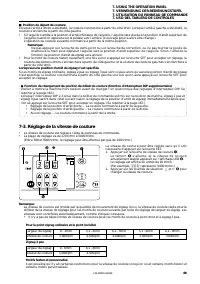
LZ2-B855E,B856E 60 7. USING THE OPERATION PANEL7. VERWENDUNG DER BEDIENUNGSTAFEL7. UTILISATION DU PANNEAU DE COMMANDE7. USO DEL TABLERO DE CONTROLES t PATTERN key/PATTERN-Taste/Touche PATTERN/Tecla PATTERN ● When the PATTERN key t is pressed, the indicator illuminates and the pattern number which is...
Page 86 - Bei Nadelstopposition mit angehobener Nadel
67 LZ2-B855E,B856E 7. USING THE OPERATION PANEL7. VERWENDUNG DER BEDIENUNGSTAFEL7. UTILISATION DU PANNEAU DE COMMANDE7. USO DEL TABLERO DE CONTROLES • When the SET key is pressed to accept a setting change, the subsequent operation of the sewing machine will varyaccording to the needle bar position ...
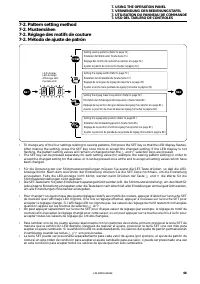
Page 90 - Setting the sewing pattern; Einstellen der Stichmuster
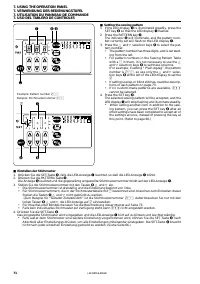
LZ2-B855E,B856E 71 7. USING THE OPERATION PANEL7. VERWENDUNG DER BEDIENUNGSTAFEL7. UTILISATION DU PANNEAU DE COMMANDE7. USO DEL TABLERO DE CONTROLES ■ Setting the sewing pattern 1. If the LED display q is illuminated steadily, press the SET key w so that the LED display q flashes. 2. Press the PATT...
Page 91 - Réglage du motif de couture; Ajuste del patrón de costura
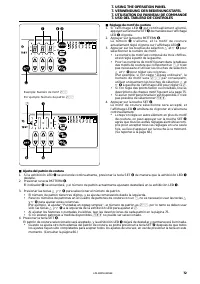
LZ2-B855E,B856E 72 7. USING THE OPERATION PANEL7. VERWENDUNG DER BEDIENUNGSTAFEL7. UTILISATION DU PANNEAU DE COMMANDE7. USO DEL TABLERO DE CONTROLES ■ Réglage du motif de couture 1. Si l’affichage LED q est continuellement allumé, appuyer sur la touche SET w de manière que l’affichage LED q clignot...
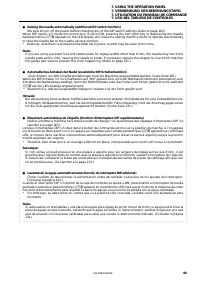
Page 92 - Muschelstichmuster; AAA; Scallop patterns; AAA
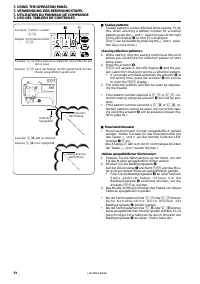
LZ2-B855E,B856E 73 7. USING THE OPERATION PANEL7. VERWENDUNG DER BEDIENUNGSTAFEL7. UTILISATION DU PANNEAU DE COMMANDE7. USO DEL TABLERO DE CONTROLES PA PAT T E R N E R N L r q A AAA w ■ Muschelstichmuster • Muschelstichmuster können spiegelbildlich genähtwerden. Stellen Sie dazu für das Muschelmust...
Page 94 - Points feston; Patrones de festón
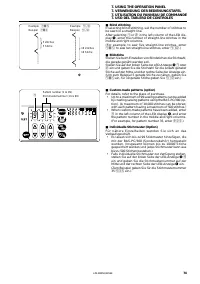
LZ2-B855E,B856E 75 7. USING THE OPERATION PANEL7. VERWENDUNG DER BEDIENUNGSTAFEL7. UTILISATION DU PANNEAU DE COMMANDE7. USO DEL TABLERO DE CONTROLES ■ Points feston • Les points festons peuvent être réfléchis pendant lacouture. Pour effectuer ceci, lorsqu’on sélectionne unnuméro de motif pour un mo...
Page 100 - Témoin de position de ligne de base de zigzag
LZ2-B855E,B856E 81 7. USING THE OPERATION PANEL7. VERWENDUNG DER BEDIENUNGSTAFEL7. UTILISATION DU PANNEAU DE COMMANDE7. USO DEL TABLERO DE CONTROLES La ligne de base de zigzag est le “centre” du point zigzag; autrement dit, elle est comparable à une ligne centrale tiréeà travers le motif de couture....
Page 103 - For plain zigzag and blind stitch
LZ2-B855E,B856E 84 7. USING THE OPERATION PANEL7. VERWENDUNG DER BEDIENUNGSTAFEL7. UTILISATION DU PANNEAU DE COMMANDE7. USO DEL TABLERO DE CONTROLES ■ Sewing star t position When right stopping has been set, sewing starts from the right side. When left stopping has been set, sewing starts fromthe le...
Page 105 - Für normale Zickzackstichmuster und Blindstiche
LZ2-B855E,B856E 86 7. USING THE OPERATION PANEL7. VERWENDUNG DER BEDIENUNGSTAFEL7. UTILISATION DU PANNEAU DE COMMANDE7. USO DEL TABLERO DE CONTROLES ■ Nähbstar tposition Bei Einstellung der rechten Stopposition beginnt das Nähen von der rechten Seite; bei Einstellung der linken Stoppositionbeginnt d...
Page 107 - Position de départ de couture; Zigzag 2 pas
LZ2-B855E,B856E 88 7. USING THE OPERATION PANEL7. VERWENDUNG DER BEDIENUNGSTAFEL7. UTILISATION DU PANNEAU DE COMMANDE7. USO DEL TABLERO DE CONTROLES ■ Position de départ de couture Lorsque l’ar rêt à droite a été établi, la couture s’enclenche à partir du côté droit. Lorsque l’arrêt à gauche a été ...
Page 108 - Indicador de posición de parada de zigzag
LZ2-B855E,B856E 89 7. USING THE OPERATION PANEL7. VERWENDUNG DER BEDIENUNGSTAFEL7. UTILISATION DU PANNEAU DE COMMANDE7. USO DEL TABLERO DE CONTROLES Cuando las puntadas en zigzag simples, puntadas en zigzag en dos pasos, puntadas en zigzag en tres pasos o patronesde festón han sido seleccionados, se...
Page 109 - Posición de parada de costura; Puntadas en zigzag en dos pasos
LZ2-B855E,B856E 90 7. USING THE OPERATION PANEL7. VERWENDUNG DER BEDIENUNGSTAFEL7. UTILISATION DU PANNEAU DE COMMANDE7. USO DEL TABLERO DE CONTROLES ■ Posición de parada de costura Cuando la parada a la derecha haya sido ajustada, la costura comienza desde el lado derecho. Cuando la parada a laizqu...
Page 112 - Turning the start backtack function on and off
LZ2-B855E,B856E 93 7. USING THE OPERATION PANEL7. VERWENDUNG DER BEDIENUNGSTAFEL7. UTILISATION DU PANNEAU DE COMMANDE7. USO DEL TABLERO DE CONTROLES After thread trimming (or after the treadle has been depressed backward for the B855E/BT), or at the sewing startimmediately after the SET key has been...
Page 114 - Ein- und Ausschalten der Anfangsriegelfunktion
LZ2-B855E,B856E 95 7. USING THE OPERATION PANEL7. VERWENDUNG DER BEDIENUNGSTAFEL7. UTILISATION DU PANNEAU DE COMMANDE7. USO DEL TABLERO DE CONTROLES Nach dem Fadenabschneiden (bzw. wenn das Pedal der B855E/BT nach hinten gedrückt wird) oder beim Nähbeginnunmittelbar nach dem Drücken der SET-Taste fü...
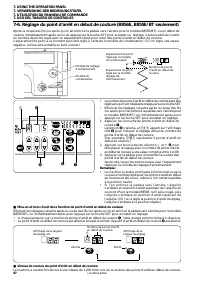
Page 116 - Vitesse de couture du point d’arrêt en début de couture
LZ2-B855E,B856E 97 7. USING THE OPERATION PANEL7. VERWENDUNG DER BEDIENUNGSTAFEL7. UTILISATION DU PANNEAU DE COMMANDE7. USO DEL TABLERO DE CONTROLES Après la coupe des fils (ou après qu’on ait enfoncé la pédale vers l’arrière pour le modèle B855E/BT), ou en début decouture immédiatement après qu’on ...
Page 118 - Velocidad de costura de rematado por atrás inicial
LZ2-B855E,B856E 99 7. USING THE OPERATION PANEL7. VERWENDUNG DER BEDIENUNGSTAFEL7. UTILISATION DU PANNEAU DE COMMANDE7. USO DEL TABLERO DE CONTROLES Después del corte de hilo (o después de pisar el pedal hacia atrás para la B855E/BT), o al comienzo de la costurainmediatamente después que la tecla SE...
Page 120 - Turning the end backtack function on and off
LZ2-B855E,B856E 101 7. USING THE OPERATION PANEL7. VERWENDUNG DER BEDIENUNGSTAFEL7. UTILISATION DU PANNEAU DE COMMANDE7. USO DEL TABLERO DE CONTROLES When the treadle is depressed backward, you can sew a set number of stitches at a narrow pitch to create end backtackstitches.The stitch pitch at this...
Page 122 - Ein- und Ausschalten der Endriegelfunktion
LZ2-B855E,B856E 103 7. USING THE OPERATION PANEL7. VERWENDUNG DER BEDIENUNGSTAFEL7. UTILISATION DU PANNEAU DE COMMANDE7. USO DEL TABLERO DE CONTROLES Wenn das Pedal nach hinten gedrückt wird, kann eine eingestellte Stichzahl eng genäht werden, um einen Endriegel zunähen.Der Stichvorschub kann mit de...
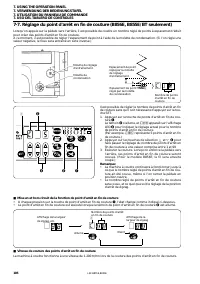
Page 124 - Vitesse de couture des points d’arrêt en fin de couture
LZ2-B855E,B856E 105 7. USING THE OPERATION PANEL7. VERWENDUNG DER BEDIENUNGSTAFEL7. UTILISATION DU PANNEAU DE COMMANDE7. USO DEL TABLERO DE CONTROLES Lorsqu’on appuie sur la pédale vers l’arrière, il est possible de coudre un nombre réglé de points à espacement réduitpour créer des points d’arrêt en...
Page 126 - Velocidad de costura de rematado por atrás final
LZ2-B855E,B856E 107 7. USING THE OPERATION PANEL7. VERWENDUNG DER BEDIENUNGSTAFEL7. UTILISATION DU PANNEAU DE COMMANDE7. USO DEL TABLERO DE CONTROLES Cuando se pisa el pedal hacia atrás, se puede coser una cantidad de puntadas ajustadas con una pequeña separaciónpara crear el rematado por atrás fina...
Page 130 - w q
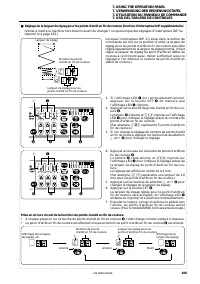
LZ2-B855E,B856E 111 7. USING THE OPERATION PANEL7. VERWENDUNG DER BEDIENUNGSTAFEL7. UTILISATION DU PANNEAU DE COMMANDE7. USO DEL TABLERO DE CONTROLES T E S T T E S T E E A U TO S E T E T S ROM PAT T E R N F 1 2 1 2 3 3 4 4 9 9 8 8 7 7 6 6 5 5 S L r e r w q 7-8. Setting fixed stitches/name label se...
Page 131 - Automatic thread trimming function (B856E only); is pressed so that the indicator; t r; Combining fixed stitches/name label sewing with
LZ2-B855E,B856E 112 7. USING THE OPERATION PANEL7. VERWENDUNG DER BEDIENUNGSTAFEL7. UTILISATION DU PANNEAU DE COMMANDE7. USO DEL TABLERO DE CONTROLES ■ Automatic thread trimming function (B856E only) • When setting fixed stitch/name label sewing, if thethread trimming key r is pressed so that the i...
Page 133 - Automatisches Fadenabschneiden (nur B856E); gedrückt wird, so daß die
LZ2-B855E,B856E 114 7. USING THE OPERATION PANEL7. VERWENDUNG DER BEDIENUNGSTAFEL7. UTILISATION DU PANNEAU DE COMMANDE7. USO DEL TABLERO DE CONTROLES ■ Automatisches Fadenabschneiden (nur B856E) • W e n n b e i m F e s t s t i c h / E t i k e t t n ä h e n d i eFadenabschneidetaste r gedrückt wird,...
Page 135 - F o n c t i o n d e c o u p e a u t o m a t i q u e d e s f i l s ( B 8 5 6 E; de manière que le témoin
LZ2-B855E,B856E 116 7. USING THE OPERATION PANEL7. VERWENDUNG DER BEDIENUNGSTAFEL7. UTILISATION DU PANNEAU DE COMMANDE7. USO DEL TABLERO DE CONTROLES ■ F o n c t i o n d e c o u p e a u t o m a t i q u e d e s f i l s ( B 8 5 6 E seulement) • Lorsqu’on règle la couture de point fixe/étiquette denom...
Page 136 - para cambiar el ajuste
LZ2-B855E,B856E 117 7. USING THE OPERATION PANEL7. VERWENDUNG DER BEDIENUNGSTAFEL7. UTILISATION DU PANNEAU DE COMMANDE7. USO DEL TABLERO DE CONTROLES T E S T T E S T E E A U TO S E T E T S ROM PAT T E R N F 1 2 1 2 3 3 4 4 9 9 8 8 7 7 6 6 5 5 S L r e r w q 7-8. Ajuste de la costura de puntadas fij...
Page 137 - Función de corte de hilo automático (sólo B856E); Combinación de costura de puntadas fijas/etiquetas
LZ2-B855E,B856E 118 7. USING THE OPERATION PANEL7. VERWENDUNG DER BEDIENUNGSTAFEL7. UTILISATION DU PANNEAU DE COMMANDE7. USO DEL TABLERO DE CONTROLES ■ Función de corte de hilo automático (sólo B856E) • Cuando se ajusta la costura de puntadas fijas/etiquetas,si se presiona la tecla del cortahilos r...
Page 139 - SEWING
120 LZ2-B855E,B856E • Attach all safety devices before using the sewing machine. If the machine is used without these devicesattached, injury may result. • Turn off the power switch at the following times, otherwise the machine may operate if the treadle is pressedby mistake, which could result in i...
Page 141 - Lower thread tension; TENSION DU FIL; THREAD TENSION
122 LZ2-B855E,B856E • Turn off the power switch before removing or inserting the bobbin case, otherwise the machine may operate if the treadle is pressed by mistake, which could result in injury. • Schalten Sie den Netzschalter der Maschine vor dem Entfernen oder Einsetzen einer Squlenkapsel aus, we...
Page 144 - is pressed by mistake, which could result in injury.
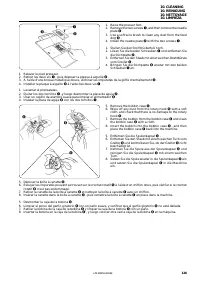
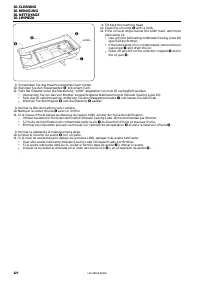
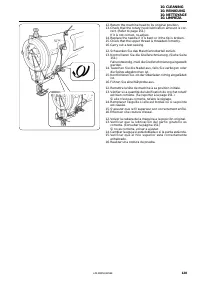
125 LZ2-B855E,B856E • Turn off the power switch before carrying out cleaning, otherwise the machine may operate if the treadle is pressed by mistake, which could result in injury. • Be sure to wear protective gogales and gloves when handling the lubricating oil, so that no oil gets into your eyes or...
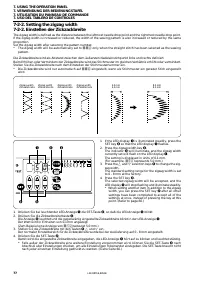
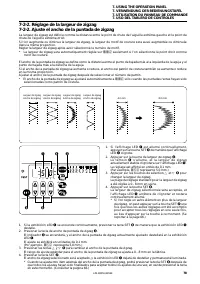
Page 152 - Limiting the zigzag width (additional DIP switch function)
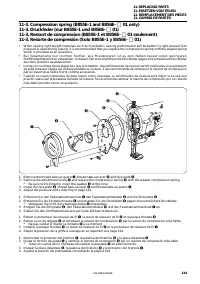
133 LZ2-B855E,B856E 11. REPLACING PARTS11. ERSETZEN VON TEILEN11. REMPLACEMENT DES PIECES11. CAMBIO DE PARTES ● Limiting the zigzag width (additional DIP switch function) (Be sure to turn off the power before changing any of the DIP switch settings. Refer to page 163.)When using a presser foot and n...
Page 159 - 2-4. Réglage de I’angle de la griffe d’entraînement
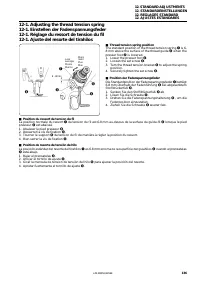
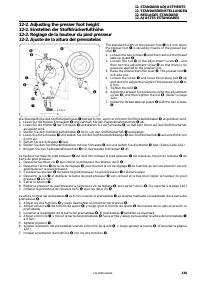
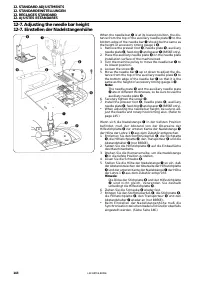
LZ2-B855E,B856E 140 12. STANDARD ADJUSTMENTS12. STANDARDEINSTELLUNGEN12. REGLAGES STANDARD12. AJUSTES ESTANDARES The standard angle for the feed dog q is for the top of the needle plate to be parallel with the top of the feed dog q (for the B855E) or raised slightly at the side closest to the operat...
Page 165 - 2-9. Einstellen der Greiferanschlagposition
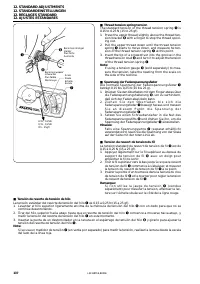
LZ2-B855E,B856E 146 12. STANDARD ADJUSTMENTS12. STANDARDEINSTELLUNGEN12. REGLAGES STANDARD12. AJUSTES ESTANDARES 12-9. Einstellen der Greiferanschlagposition Das Ende des Greiferanschlags q muß sich 0 bis 0,5 mm hinter dem Ende A des inneren Greifers w befinden. * Das Ende des Greiferanschlags q dar...
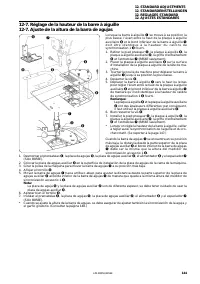
Page 166 - 2-8. Synchronisation de l’aiguille et du crochet rotatif
LZ2-B855E,B856E 147 12. STANDARD ADJUSTMENTS12. STANDARDEINSTELLUNGEN12. REGLAGES STANDARD12. AJUSTES ESTANDARES Régler de manière que l’extrémité de la butée q du cro- chet rotatif soit placée entre 0 et 0,5 mm en arrière del’extrémité A du crochet rotatif interne w . * L’extrémité de la butée q du...
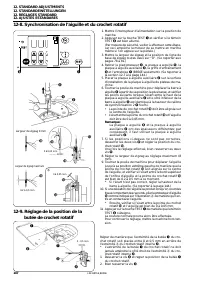
Page 167 - 2-8. Sincronización de la aguja y el garfio giratorio
LZ2-B855E,B856E 148 12. STANDARD ADJUSTMENTS12. STANDARDEINSTELLUNGEN12. REGLAGES STANDARD12. AJUSTES ESTANDARES Ajustar de manera que el tope del extremo del garfiogiratorio q esté 0 a 0,5 mm hacia atrás del extremo A del garfio giratorio interior w . * El tope del extremo del garfio giratorio q nu...
Page 168 - Needle up stop position adjustment; in the direction of normal puley rotation to raise the needle bar; Needle down and thread trimmer signals; Do not adjust the needle down stop position.; Note
LZ2-B855E,B856E 149 12. STANDARD ADJUSTMENTS12. STANDARDEINSTELLUNGEN12. REGLAGES STANDARD12. AJUSTES ESTANDARES 12-10. Adjusting the synchronizer12-10. Einstellen des Synchronisators12-10. Réglage du synchroniseur12-10. Ajuste del sincronizador q Needle up stopNadelstopposition, obenPosition d’arrê...
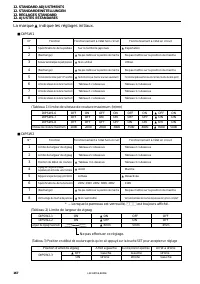
Page 184 - Do not make this setting.
LZ2-B855E,B856E 165 The ▲ mark indicates factory default settings. ■ DIPSW1 (Table 1) maximum sewing speed limit (rpm) ■ DIPSW2 12. STANDARD ADJUSTMENTS12. STANDARDEINSTELLUNGEN12. REGLAGES STANDARD12. AJUSTES ESTANDARES DIPSW1-6 OFF ON OFF ON OFF ON ▲ OFF ON DIPSW1-7 OFF OFF ON ON OFF OFF ▲ ON ON...
Page 185 - dauernd angezeigt
LZ2-B855E,B856E 166 Mit der Markierung ▲ werden die Voreinstellungen bei der Auslieferung bezeichnet. * ... bei verriegeltem Pedal, `|| dauernd angezeigt ■ DIPSW1 (Tabelle 1) Begrenzung der maximalen Nähgeschwindigkeit (/min) ■ DIPSW2 (Tabelle 2) Begrenzung der Zickzackbreite unzulässige Einstellung...
Page 186 - est toujours affiché.
LZ2-B855E,B856E 167 La marque ▲ indique les réglages initiaux. * ... Lorsque le panneau est verrouillé, `|| est toujours affiché. ■ DIPSW1 (Tableau 1) limite de vitesse de couture maximum (tr/mn) ■ DIPSW2 (Tableau 2) Limite de largeur de zigzag Ne pas effectuer ce réglage. Spécifications de la pédal...
Page 187 - se exhibe en todo momento.
LZ2-B855E,B856E 168 12. STANDARD ADJUSTMENTS12. STANDARDEINSTELLUNGEN12. REGLAGES STANDARD12. AJUSTES ESTANDARES DIPSW2-1 ON ▲ ON OFF OFF DIPSW2-2 ON ▲ OFF ON OFF Ancho máximo de zigzag ▲ 8mm 5mm 3mm La marca ▲ indica ajustes por defecto de fábrica. * ... Cuando el panel está bloqueado, `|| se exhib...
Page 188 - Installation
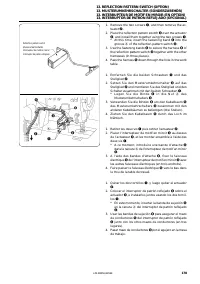
LZ2-B855E,B856E 169 13. REFLECTION PATTERN SWITCH (OPTION)13. MUSTERUMKEHRSCHALTER (SONDERZUBEHÖR)13. INTERRUPTEUR DE MOTIF EN MIROIR (EN OPTION)13. INTERRUPTOR DE PATRÓN REFLEJADO (OPCIONAL) 13. REFLECTION PATTERN SWITCH (OPTION) 13. MUSTERUMKEHRSCHALTER (SONDERZUBEHÖR) 13. INTERRUPTEUR DE MOTIF EN...
Page 191 - Operating the reflection pattern switch
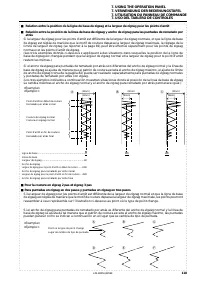
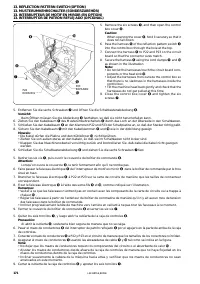
LZ2-B855E,B856E 172 ■ Operating the reflection pattern switch Using the reflection pattern switch allows the following to be carried out.• In addition to scallop patterns, 2-step zigzag, 3-step zigzag (with no zigzag stop position set), blind stitch and custommade patterns can also be sewn as refle...
Page 192 - Bedienung des Musterumkehrschalters
LZ2-B855E,B856E 173 ■ Bedienung des Musterumkehrschalters Mit dem Musterumkehrschalter ergeben sich die folgenden Möglichkeiten:• Neben den Muschelstichmustern lassen sich ebenfalls 2-Stufen-, 3-Stufen-Zickzack (ohne Zickzack-Stoppposition),Blindstich- und individuelle Stichmuster spiegelbildlich n...
Page 193 - Utilisation de l’interrupteur de motif en miroir
LZ2-B855E,B856E 174 ■ Utilisation de l’interrupteur de motif en miroir L’interrupteur de motif en miroir permet d’effectuer les coutures suivantes.• En plus des motifs à festons, le zigzag 2 pas, le zigzag 3 pas (sans réglage de position d’arrêt de zigzag), le pointaveugle et ls motifs personnalisé...
Page 194 - Funcionamiento del interruptor de patrón reflejado
LZ2-B855E,B856E 175 ■ Funcionamiento del interruptor de patrón reflejado Usando el interruptor de patrón reflejado se podrá realizar lo siguiente.• Además de patrones festoneados, zigzag en dos pasos, zigzag en tres pasos (sin ajuste de posición de parada dezigzag), puntadas invisibles y patrones a...
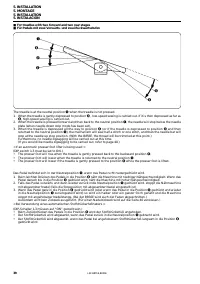
Page 196 - TRANSPORTEURS; When using a non-standard feed dog, modify it as shown above.
LZ2-B855E,B856E 177 15. WHEN USING A NON-STANDARD FEED DOG15. VERWENDUNG EINES VOM STANDARD ABWEICHENDEN TRANSPORTEURS15. UTILISATION D’UNE GRIFFE D’ENTRAINEMENT NON STANDARD15. AL USAR UN ALIMENTADOR NO ESTANDAR 15. WHEN USING A NON-STANDARD FEED DOG15. VERWENDUNG EINES VOM STANDARD ABWEICHENDEN TR...
Page 198 - Skipped stitches occur
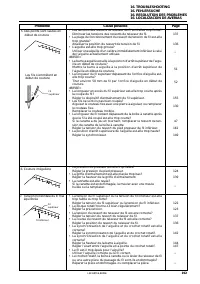
LZ2-B855E,B856E 179 16. TROUBLESHOOTING16. FEHLERSUCHE16. RESOLUTION DES PROBLEMES16. LOCALIZACION DE AVERIAS Problem Possible cause Page 122 − 46 50 - 52 124 − 138 143145 137 16. TROUBLESHOOTING • Please check the following points before calling for repairs or service. • If the following suggestion...
Page 200 - Large degree of puckering; Upper and lower threads
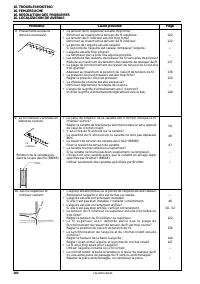
LZ2-B855E,B856E 181 16. TROUBLESHOOTING16. FEHLERSUCHE16. RESOLUTION DES PROBLEMES16. LOCALIZACION DE AVERIAS 122 122 − − 137 136 124 − 140 50 48 47 − − − 46 50 - 52 122 136 143145 − − 80% Problem Possible cause Page 8. Large degree of puckering (excess tension) • Is the upper thread tension too str...
Page 202 - SEt
LZ2-B855E,B856E 183 16. TROUBLESHOOTING16. FEHLERSUCHE16. RESOLUTION DES PROBLEMES16. LOCALIZACION DE AVERIAS Display Details Cause 16-3. List of error codes DANGER CAUTION • Wait at least 5 minutes after turning off the power switch and disconnecting the power cord from the wall outlet before openi...
Page 203 - Continuous operation
LZ2-B855E,B856E 184 16. TROUBLESHOOTING16. FEHLERSUCHE16. RESOLUTION DES PROBLEMES16. LOCALIZACION DE AVERIAS EE7 Display Details Cause Malfunction of P-ROM or poor connectionNoise affecting transmissionMalfunction of control circuit board Panel input when power is turnedon Power turned on while pan...
Page 205 - Störung
LZ2-B855E,B856E 186 16. TROUBLESHOOTING16. FEHLERSUCHE16. RESOLUTION DES PROBLEMES16. LOCALIZACION DE AVERIAS Oberfaden Oberfaden Unterfaden Störung Mögliche Ursache Seite 5. Übersprungene Stiche am Nähbeginn Ausgefranster Faden amNähbeginn • Ist die Spannung der Fadenabnahmefedern zu stark? Die Spa...
Page 206 - Beim Nähbeginn ist der; Unterfaden
LZ2-B855E,B856E 187 16. TROUBLESHOOTING16. FEHLERSUCHE16. RESOLUTION DES PROBLEMES16. LOCALIZACION DE AVERIAS 80% Störung Mögliche Ursache Seite 8. Starkes Zusammenziehen (zu hohe Spannung) • Ist die Oberfadenspannung zu stark?Die Oberfadenspannung so gering wie möglich einstellen. • Ist die Unterfa...
Page 209 - Anzeige
LZ2-B855E,B856E 190 16. TROUBLESHOOTING16. FEHLERSUCHE16. RESOLUTION DES PROBLEMES16. LOCALIZACION DE AVERIAS EE7 Defekt des P-ROM oder schlechte AnschlußverbindungStörung bei der ÜbermittlungDefekt der Schaltplatine Eingang vom Bedienungsfeldbeim Einschalten Beim Einschalten wird eine Taste gedrück...
Page 210 - RESOLUTION DES PROBLEMES
LZ2-B855E,B856E 191 16. TROUBLESHOOTING16. FEHLERSUCHE16. RESOLUTION DES PROBLEMES16. LOCALIZACION DE AVERIAS Problème Cause possible Page 16. RESOLUTION DES PROBLEMES • Vérifier les points suivants avant de faire appel à un technicien. • Si les suggestions suivantes ne vous permettent pas de résoud...
Page 211 - Problème
LZ2-B855E,B856E 192 16. TROUBLESHOOTING16. FEHLERSUCHE16. RESOLUTION DES PROBLEMES16. LOCALIZACION DE AVERIAS Filsupérieur Filsupérieur Fil inférieur Problème Cause possible Page 5. Des points sont sautés en début de couture Les fils s’emmèlent endébut de couture • Les tensions des ressorts de relev...
Page 212 - Plissements excessifs
LZ2-B855E,B856E 193 16. TROUBLESHOOTING16. FEHLERSUCHE16. RESOLUTION DES PROBLEMES16. LOCALIZACION DE AVERIAS 80% Problème Cause possible Page 8. Plissements excessifs (tension excessive) • La tension de fil supérieur est-elle trop forte?Diminuer au maximum la tension de fil supérieur. • La tension ...
Page 214 - Surintensité de courant
LZ2-B855E,B856E 195 16. TROUBLESHOOTING16. FEHLERSUCHE16. RESOLUTION DES PROBLEMES16. LOCALIZACION DE AVERIAS Affichage Détails Cause 16-3. Liste des codes d’erreur DANGER ATTENTION • Attendre au moins 5 minutes après avoir mis l’interrupteur d’alimentation sur la position d’arrêt et avoir débranché...
Page 215 - Affichage
LZ2-B855E,B856E 196 16. TROUBLESHOOTING16. FEHLERSUCHE16. RESOLUTION DES PROBLEMES16. LOCALIZACION DE AVERIAS EE7 Anomalie du P-ROM ou raccordement défectueuxBruit affectant la transmissionAnomalie de la carte des circuits de commande Entrée de panneau quand la ma-chine est mise sous tension Machine...
Page 216 - LOCALIZACION DE AVERIAS
LZ2-B855E,B856E 197 16. TROUBLESHOOTING16. FEHLERSUCHE16. RESOLUTION DES PROBLEMES16. LOCALIZACION DE AVERIAS Problema Causa posible Página 16. LOCALIZACION DE AVERIAS • Se recomienda verificar los siguientes puntos antes de acudir a un centro de servicio autorizado. • Si las sugerencias a continuac...
Page 217 - Problema
LZ2-B855E,B856E 198 16. TROUBLESHOOTING16. FEHLERSUCHE16. RESOLUTION DES PROBLEMES16. LOCALIZACION DE AVERIAS Hilosuperior Hilo superior Hilo inferior Problema Causa posible Página El hilo se enreda alcomienzo de la costura. • ¿La tensión de los resortes de tirahilos es demasiada? Reducir la tensión...
Page 220 - Voltaje de la fuente de alimentación es demasiado alto
LZ2-B855E,B856E 201 16. TROUBLESHOOTING16. FEHLERSUCHE16. RESOLUTION DES PROBLEMES16. LOCALIZACION DE AVERIAS Exhibición Detalles Causa 16-3. Lista de códigos de error PELIGRO ATENCION • Después de desconectar el interruptor principal y desenchufar el cable de alimentación del tomacorriente en la pa...
Page 221 - Exhibición
LZ2-B855E,B856E 202 16. TROUBLESHOOTING16. FEHLERSUCHE16. RESOLUTION DES PROBLEMES16. LOCALIZACION DE AVERIAS EE7 Malfuncionamiento de P-ROM o mala conexiónRuido afectando la transmisiónMalfuncionamiento del tablero del circuito de control Entrada del panel cuando seenciende la alimentación Se conec...


 Brother SC6600
User Manual
Brother SC6600
User Manual
 Brother SC9500
User Manual
Brother SC9500
User Manual
 Brother FAX-270MC
User Manual
Brother FAX-270MC
User Manual
 Brother FAX190
User Manual
Brother FAX190
User Manual
 Brother MFC 6550MC
User Manual
Brother MFC 6550MC
User Manual
 Brother NB-60
User Manual
Brother NB-60
User Manual
 Brother MFC-4550
User Manual
Brother MFC-4550
User Manual
 Brother HL-5250DN
User Manual
Brother HL-5250DN
User Manual
 Brother ULT2003D
User Manual
Brother ULT2003D
User Manual
 Brother HL-5280DW
User Manual
Brother HL-5280DW
User Manual
 Brother GX-6750
User Manual
Brother GX-6750
User Manual
 Brother FAX775
User Manual
Brother FAX775
User Manual