Page 2 - Index; ENGLISH
2 Index I. Congratulations Page 3 II. Quality from the very start Page 4 – 11 III. Important notes Page 12 IV. BRITA, quality and satisfaction guaranteed Page 13 ENGLISH
Page 3 - Your BRITA system offers many advantages; BRITA filtered water; The P 1000 filter cartridge is the key to cleaner,; Lifetime of the P 1000 filter cartridge; I. Congratulations on your new BRITA
ENGLISH 3 Your BRITA system offers many advantages BRITA filtered water • Great tasting filtered water at your fingertips• Filtered water is ideal for bringing out the full potential of your food and tastes great for everyday drinking • Water is a fundamental part of food preparation and can influen...
Page 4 - II. Quality from the very start; Terms of warranty; Contents of the; my; pure P1 Compact Water; Your; my; pure P1 Filtration System includes the
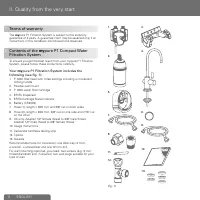
4 ENGLISH II. Quality from the very start 1 Terms of warranty The my pure P1 Filtration System is subject to the statutory guarantee of 2 years. A guarantee claim may be asserted only if all instructions in this handbook are followed and observed. 2 Contents of the my pure P1 Compact Water Filtratio...
Page 5 - pure P1 Compact Water Filtration System
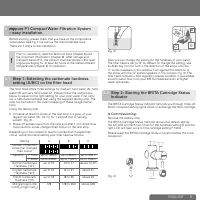
ENGLISH 5 3 my pure P1 Compact Water Filtration System – easy installation Before starting, please check that you have all the components listed above (see fig. 1) as well as the recommended tools.There are 7 steps to the installation. ! Prior to installation, read the Technical Data (chapter 6) and...
Page 6 - B Initial programming of the BRITA Cartridge Status
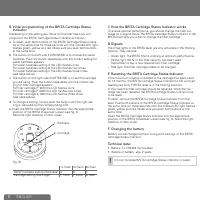
6 ENGLISH B Initial programming of the BRITA Cartridge Status Indicator: Depending on the setting you chose for the filter head you will programm the BRITA Cartridge Status Indicator as follows: a To reset, push both buttons of the BRITA Cartridge Status Indica- tor at the same time for three second...
Page 7 - Step 3: Installing the BRITA Dispenser; Step 4: Attaching the hoses
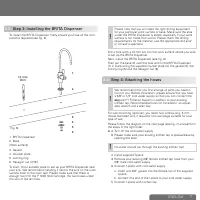
ENGLISH 7 3.3 Step 3: Installing the BRITA Dispenser To install the BRITA Dispenser, firstly ensure you have all the com- ponents required (see fig. 6). 1. 2. 3.4.5.6. (fig. 6) 12 mm Drill 1. BRITA Dispenser2. Base(Work surface)3. Gasket4. Counter plate5. Locking ring6. Hexagon nut (7/16")To sta...
Page 9 - to install the cartridge under the sink
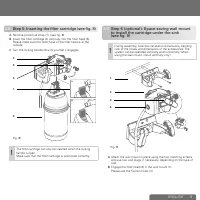
ENGLISH 9 3.5 Step 5: Inserting the filter cartridge (see fig. 8) A Remove protective strap (1). (see fig. 8) B Insert the filter cartridge (4) vertically into the filter head (5). Please make sure the flush hose of the filter head is at the outside. C Turn the locking handle (3) until you feel it e...
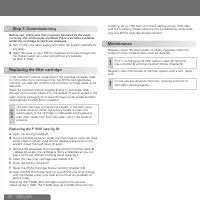
Page 10 - Step 7: Commissioning; Replacing the filter cartridge
10 ENGLISH 3.7 Step 7: Commissioning Before use, make sure that you have followed all the steps correctly and all the parts are fitted. Place a suitable container under the cartridge to catch any leakages.A Turn on the cold water supply and check the system carefully for any leaks. B Open the valve ...
Page 11 - Technical data of the P 1000 cartridge
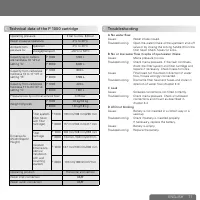
ENGLISH 11 6 Technical data of the P 1000 cartridge Operating pressure 2 bar to max. 8.6 bar Water intake temperature 4°C to 30°C Ambient tem- perature for operation 4°C to 40°C storage/transport –20°C to 50°C Capacity up to carbon- ate hardness 10 °dH at setting "A" P 1000 1200 L P 3000 340...
Page 13 - , quality and satisfaction guaranteed
ENGLISH 13 Correct disposal of the BRITA Cartridge Status Indicator Every BRITA Cartridge Status Indicator has a use- ful life of approx. 5 years. At the end of the useful life of the Status Indicator, remember that it must be disposed of according to the applicable regula- tions and statutory requi...