Page 2 - IMPORTANT; READ ALL INSTRUCTIONS; Contents
2 BREVILLE RECOMMENDS SAFETY FIRST At Breville we are very safety conscious. We design and manufacture consumer products with the safety of you, our valued customer, foremost in mind. In addition we ask that you exercise a degree of care when using any electrical appliance and adhere to the followin...
Page 4 - Misuse can; SPECIFIC
4 • This appliance is for household use only. Do not use in any type of moving vehicles. Do not use the appliance outdoors, or for anything other than its intended use. Misuse can cause injury. • If the appliance is to be: left unattended, cleaned, moved, assembled or stored, always switch the unit ...
Page 5 - FOR HOUSEHOLD USE ONLY
5 WARNING To reduce the risk of FIRE, ELECTRIC SHOCK, EXPOSURE TO EXCESSIVE UV RADIATION, OR INJURY TO PERSONS:• Always unplug the oven and let all parts (including the bulb housing, glass cover and enclosure) cool completely before replacing bulb. • Only use a 25 Watt, 220–240V, G9 type oven bulb. ...
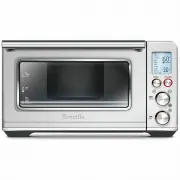
Page 6 - Components; Plug
6 Components A. 30 cm non-stick pizza panB. Wire rackC. Grilling rackD. 28 x 33.5 cm enamel roasting panE. Air fry basketF. Oven light G. Door handleH. Ventilation slotsI. Crumb trayJ. Breville Assist ‰ Plug TEMP Darkness TIME Slices FUNCTION START/CANCEL F I J G H B A C D E
Page 7 - Accessories sold separately:; Bamboo Cutting Board
7 K. LCD screenL. FUNCTION dialM. TEMPERATURE dial/toast and crumpet darkness control N. TIME dial/toast and crumpet selectionO. START/CANCEL buttonP. OVEN LIGHT buttonQ. CONVECTION buttonR. FROZEN buttonS. TEMPERATURE CONVERSION button and volume adjustment button Accessories sold separately: TEMP ...
Page 8 - PREPARING THE OVEN; ELEMENT IQ; Functions
8 PREPARING THE OVEN Before first use, please run the oven empty for 20 minutes to remove protective substances from the heating elements. Ensure the area is well ventilated as the oven may emit vapors. These vapors are safe and are not detrimental to the performance of the oven.1. Remove and safely...
Page 9 - OVEN FUNCTIONS OVERVIEW
9 OVEN FUNCTIONS OVERVIEW FUNCTION SUGGESTED RACK POSITION OPTIONAL SETTINGS PRESETS PREHEAT RANGE GRILL Top HI10 MINS No HI-MED-LOUp to 20 MINS TOAST Middle FROZEN Darkness 4Slices 4 No Darkness 1-7Slices 1-6 CRUMPET Top FROZEN Darkness 4Slices 4 No Darkness 1-7Slices 1-6 BAKE Bottom CONVECTIONTEMP...
Page 10 - OPERATING YOUR BREVILLE OVEN; ROTATE
10 Functions OPERATING YOUR BREVILLE OVEN 1. Position the wire rack so the spokes face upward and insert it into the desired rack position. The rack positions are conveniently printed on the oven door window. 2. Turn the FUNCTION dial until the indicator on the LCD screen reaches the desired setting...
Page 12 - Desired toast colour
12 7. The timer will be displayed and automatically begin to count down. The time can be adjusted during the toasting cycle by turning the TIME dial. The cycle can be stopped at any time by pressing the START/CANCEL button. START/CANCEL 8. At the end of the TOAST cycle, the oven alert will sound. Th...
Page 13 - NOTE
13 indicates the preset darkness setting ‘4’, while the bottom figure indicates the preset number of crumpets ‘4’. START/CANCEL 5. The darkness setting and number of crumpets can be adjusted before or during the toasting cycle. a) The darkness setting is indicated by the row of triangles at the top ...
Page 14 - ROAST FUNCTION
14 START/CANCEL 9. At the end of the BAKE cycle, the oven alert will sound. The START/CANCEL button backlight will go out and the LCD screen will illuminate blue. ROAST FUNCTION The ROAST function is ideal for cooking a variety of meats and poultry. Food will be tender and juicy on the inside and ro...
Page 15 - PIZZA FUNCTION
15 b) The roasting temperature is displayed as the top figure on the LCD screen. Turn the TIME dial to adjust the time up to 2 hours. 5. Press the START/CANCEL button to activate the ROAST function. The button backlight will illuminate red, the oven alert will sound and the LCD screen will illuminat...
Page 16 - A note on pizza stones; REHEAT FUNCTION
16 START/CANCEL 9. At the end of the PIZZA cycle, the oven alert will sound. The START/CANCEL button backlight will go out and the LCD screen will illuminate blue. NOTE If using the included pizza pan, place it in the oven during the preheating cycle for the best result. Carefully place pizza on the...
Page 17 - AIR FRY FUNCTION
17 9. WARM FUNCTION The WARM function maintains hot foods at the recommended temperature to prevent bacterial growth, 70°C or above.1. Insert the wire rack into a rack position that best suits the type of food you are keeping warm. 2. Place food, positioned on the included roasting pan, pizza pan or...
Page 21 - Cleaning the outer body and door; Cleaning the interior; WARNING; Cleaning the crumb tray
21 Care & Cleaning Before cleaning, ensure the oven is turned off by removing the power plug from the power outlet. Allow the oven and all accessories to cool completely before disassembling and cleaning. Cleaning the outer body and door 1. Wipe the outer body with a soft, damp sponge. A non-abr...
Page 22 - Troubleshooting; POSSIBLE PROBLEM
22 Troubleshooting POSSIBLE PROBLEM EASY SOLUTION Oven will not switch "ON" • Check that the power plug is securely inserted into the outlet. • Insert the power plug into an independent outlet. • Insert the power plug into a different outlet. • Reset the circuit breaker if necessary. The LCD...
Page 24 - Breville Customer Service Centre
Breville, the Breville Logo, Smart Oven and Element IQ are trademarks of Breville Pty Ltd (“Breville”) and Breville's products are distributed in Australia and New Zealand under license. Copyright Breville Pty. Ltd. 2018. Due to continued product improvement, the products illustrated/photographed in...