Page 2 - Руководство по эксплуатации; Never attempt to observe the sun with this telescope.; держать в недоступном для детей месте из-за опасности удушения.
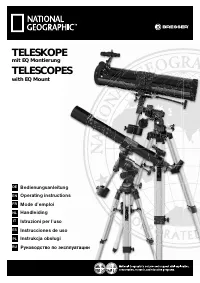
2 (DE) Bedienungsanleitung ............................................................................................... 6 (EN) Operating instructions .......................................................................................... 12 (FR) Mode d’emploi .....................................
Page 6 - Allgemeine Informationen; Zu dieser Anleitung; Allgemeine Warnhinweise
6 Allgemeine Informationen Zu dieser Anleitung Lesen Sie bitte aufmerksam die Sicherheitshinweise in dieser Anleitung.Verwenden Sie dieses Produkt nur wie in der Anleitung beschrieben, um Schäden am Gerät oder Verletzungen zu vermeiden. Bewahren Sie die Bedienungsanleitung auf, damit Sie sich jederz...
Page 7 - Hinweis: Je nach Modell kann die Tubus-Schelle auch mit zwei; Einsetzen des Okulars
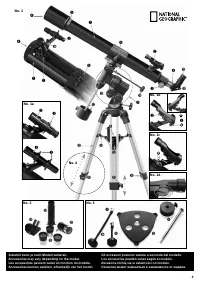
DE 7 2. Stativ Die Stativbeine sind vormontiert und bereits mit dem Stativkopf (No. 5, X) und der Stativspinne (No. 1, 16) verbunden.Nehmen Sie das Dreibeinstativ aus der Verpackung und stellen Sie es senkrecht mit den Stativfüßen nach unten. Nehmen Sie nun zwei der Stativbeine und ziehen Sie diese ...
Page 8 - Ausrichtung des Suchers; Wichtig: Das Bild im Teleskop steht auf dem Kopf, sofern Sie keine; TEIL II – Die Handhabung
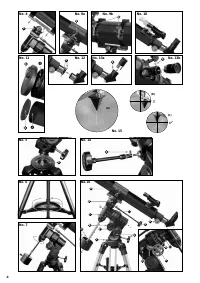
8 8. Ausrichtung des Suchers 8.1 Ausrichtung Typ I + IV (Sucherfernrohre)Das Sucherfernrohr muss vor dem Einsatz justiert werden. Dafür müssen das Sucherfernrohr und der Teleskop-Tubus parallel ausge-richtet werden. Stecken Sie das Okular mit der größten Brennweite in den Zenitspiegel (No. 13a, nur ...
Page 9 - Polare Ausrichtung
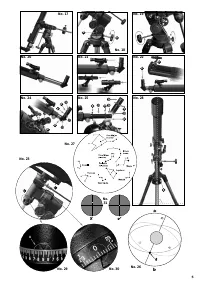
DE 9 Vergessen Sie nicht, die Fixierschraube wieder anzudrehen. Anschließend stellen Sie die Deklinationsachse (No. 16, C), durch Lösen und Festziehen der Fixierschraube (No. 16, D) auf 90° ein. Der Teleskop-Tubus ist nun parallel zur Erdachse ausgerichtet. Dies nennt man polarische Ausrichtung. TIP...
Page 10 - HINWEISE zur Reinigung; Mögliche Beobachtungsobjekte
10 700 mm ÷ 20 mm = 35X 700 mm ÷ 12,5 mm = 56X 700 mm ÷ 4 mm = 175X Formel zur Berechnung der Vergrößerung: Brennweite (Teleskop) ÷ Brennweite (Okular) = Vergrößerung Beispiele: 10.2. Zenitspiegel (nur Refraktor):Der Zenitspiegel (No. 2, 19) bewirkt eine Bildumkehrung (spiegelver-kehrt) und wird des...
Page 11 - Garantie und Garantiezeitverlängerung
DE 11 Sternbild Füchslein / M27 (No. 35)Rektaszension: 19 h 59 m (Stunden : Minuten) Deklination: +22° 43' (Grad : Minuten) Entfernung: 1.360 Lichtjahre von der Erde entfernt Der Dumbbellnebel M27 oder Hantel-Nebel im Füchslein war der erste planetarische Nebel, der überhaupt entdeckt wurde. Am 12. ...
Page 12 - General Information; About this Instruction Manual; General Warning; Do not expose the device to high temperatures.; Privacy Protection; Accessories may vary depending on the model.
12 General Information About this Instruction Manual Please read the safety instructions in this manual carefully. To avoid damage to the unit and the risk of injury, only use this product as described in the manual.Keep the instruction manual handy so that you can easily look up information on all ...
Page 13 - Note: The main tube clamp may have two screws depending; Inserting the eyepiece; Note: The LED finder scope's battery is safeguarded against; Aligning the finder scope
EN 13 IMPORTANTOnly secure screws finger tight. Do not overtighten screws. 2. Tripod The tripod legs are preinstalled and connected to the tripod head (No. 5, X) and tripod spider (No. 1, 16).Remove the tripod from its packaging and place it upright, with the feet at the base. Take two of the legs a...
Page 14 - Part II – Handling
14 gable, church tower top or building facade) and adjust until the object appears in the centre of the field of vision (No. 15, A). Look through the finder scope and align it by turning the three or six adjustment screws until the object is visible in the middle of the crosshairs. The image you pre...
Page 15 - Notes on cleaning
EN 15 6. Finder scope Your telescope is now roughly aligned and set. To arrive at a comfortable observation position, carefully undo the main tube mounting screws (No. 9, X) until you can rotate the tel-escope's main tube. Move the eyepiece and finder scope/LED finder scope until the position is com...
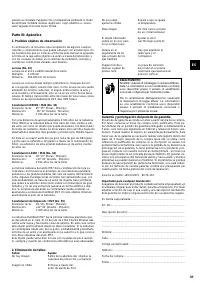
Page 16 - Part III – Appendix; Possible observation targets; Warranty and warranty term extension
16 Protect the device from dust and moisture. After use, particularly in high humidity, let the device acclimatize for a short period of time, so that the residual moisture can dissipate before storing. Remove the dust cover and store it in the included bag during use. Part III – Appendix 1. Possibl...
Page 17 - Informations générales; A propos de ce manuel; Consignes générales de sécurité
FR 17 Informations générales A propos de ce manuel Veuillez lire attentivement les consignes de sécurité présentées dans ce manuel. N’utilisez ce produit comme décrit dans ce manuel, afin d’éviter tout risque de blessure ou de dommage sur l’appareil.Conservez le manuel d’utilisation afin de pouvoir ...
Page 18 - Assemblage du chercheur/ chercheur LED
18 IMPORTANT!Pour toutes les, vis ne les serrez qu‘à la main afin d‘éviter de foirer un filet. 2. Statif : Les jambes du statif sont prémontées et assemblées avec la tête du statif (No. 5, X) et l‘entretoise du statif (No. 1, 16). Sortez le trépied de son emballage et placez le en position verticale...
Page 19 - Mise au point du chercheur; Construction – flexibles de commande manuelle :; PARTIE II – Le maniement
FR 19 8. Mise au point du chercheur 8.1. Mise au point des types I et IV (chercheurs)Avant utilisation, il faut mettre le chercheur au point. C‘est-à-dire que le chercheur et le tube du télescope doivent être orientés parallèle-ment. Insérez l‘oculaire possédant la distance focale la plus grande dan...
Page 21 - REMARQUE concernant le nettoyage; Objets à observer possibles
FR 21 10. Accessoires: L‘équipement de base de votre télescope comprend plusieurs accessoires (graphique 2). Selon le modèle, il comprend 10.1 Des oculaires:En changeant les oculaires, vous pouvez choisir l‘agrandissement de votre télescope. 700 mm ÷ 20 mm = 35X 700 mm ÷ 12,5 mm = 56X 700 mm ÷ 4 mm ...
Page 23 - Algemene informatie; Over deze handleiding; Algemene waarschuwingen
NL 23 Algemene informatie Over deze handleiding Leest u aandachtig de veiligheidsinstructies in deze handleiding. Gebruik dit product, om schade aan het apparaat of verwondingen te voorkomen, alleen zoals in de handleiding is beschreven.Bewaar deze gebruikershandleiding zodat u zich op elk moment we...
Page 24 - Opmerking: Afhankelijk van het model kan de buisbeugel ook; Inzetten van het oculair; Opmerking: De LED-zoeker beschikt over een batterij die bij; Het richten van de zoeker
24 Tip:Een kleine waterpas op het accessoireplankje kan helpen het statief waterpas op te stellen. i 3. Monteren Vervolgens wordt de montering bevestigd (No. 1, 9) op de statiefkop (No. 5, X). Hiervoor steekt u de montering boven in de sta-tiefkop en u draait de kartelschroef beneden handvast De mon...
Page 25 - Deel II – Bediening
NL 25 Schakel nu eerst de LED-zoeker (Fig,1, 2) met de Aan/uitschakelaar (No. 1b, Z) aan. Kies trap „2“ voor gebruik overdag of trap „1“ voor gebruik ‘s nachts.Kijk door de LED-zoeker en richt die door het draaien van de hori-zontale (No. 1b, X) en verticale (No. 1b, Y) regelschroeven zo in, dat u h...
Page 26 - TIPS voor reiniging
26 De fijnregeling gebeurt met behulp van de zoekertelescoop. Kijk door de zoeker en probeer de poolster (No. 27) in het midden van het dra-denkruis van de zoekertelescoop in te stellen (No. 31). Bij de juiste instelling zullen u de golf (No. 16, K) de uuras (No. 16, b), alsook de golf (No. 16, E) v...
Page 27 - Deel III – Aanhangsel; Suggesties voor te observeren hemellichamen
NL 27 Deel III – Aanhangsel 1. Suggesties voor te observeren hemellichamen In het volgende hebben we voor u een paar bijzonder interessante hemellichamen en sterrenhopen uitgezocht en van uitleg voorzien. Op de bijbehorende afbeeldingen aan het eind van de handleiding wordt getoond hoe u deze door u...
Page 28 - Informazioni generali; Informazioni sul presente manuale; Avvertenze di sicurezza generali; Gli accessori possono variare a seconda del modello.
28 Informazioni generali Informazioni sul presente manuale Leggere con attenzione le avvertenze di sicurezza riportate nel manuale. Per evitare danni all‘apparecchio o possibili lesioni, utilizzare questo prodotto soltanto come descritto manuale.Conservare il manuale di istruzioni per poter attinger...
Page 29 - Montaggio – Montaggio del vano portaccessori:; Informazione: A seconda del modello il morsetto del tubo ottico; Montaggio dell’oculare; Informazione: Il cercatore a LED è dotato di una batteria che; Allineamento del cercatore
IT 29 CONSIGLIO!Una piccola livella a bolla nel vano portaccessori può essere di aiuto per posizionare correttamente del treppiede. i 3. Montatura: Successivamente fissare la montatura (fig. 1,9) alla testa del treppi-ede (fig. 5,X). A tal scopo, infilare la montatura sulla testa del treppi-ede e st...
Page 30 - Parte II – Uso
30 8.2 Allineamento tipo II e III (cercatori a LED)Prima dell‘uso il cercatore a LED deve essere regolato. Ciò significa che il cercatore a LED e il tubo ottico del telescopio devono essere allineati parallelamente l‘uno all‘altro.Inserire l’oculare con la maggiore distanza focale nel diagonale a sp...
Page 31 - Montaggio ed uso dei telescopi a lente; NOTE per la pulizia
IT 31 Per raggiungere una posizione d’osservazione comoda, allentare con cautela le viti del supporto del tubo ottico (fig. 9, X), così da poter ruotare il tubo del telescopio. Portare l’oculare e il cercatore/cercatore a LED in una posizione dalla quale è possibile osservare comodamente. Per esegui...
Page 32 - Parte III – Appendice; Possibili oggetti di osservazione
32 da eliminare l’umidità residua. Applicare i copri-obiettivo e conser-vare l’apparecchio nella borsa fornita. Parte III – Appendice 1. Possibili oggetti di osservazione Qui di seguito abbiamo indicato alcuni corpi celesti e ammassi stel-lari molto interessanti che abbiamo selezionato e spiegato ap...
Page 33 - Informaciones de carácter general; Sobre este manual; Advertencias de carácter general; General – Emplazamiento
ES 33 Informaciones de carácter general Sobre este manual Lea atentamente las indicaciones de seguridad recogidas en este manual. Emplee este producto exclusivamente de la forma descrita en el manual, con el fin de evitar daños en el aparato o lesiones.Conserve el manual de instrucciones para poder ...
Page 34 - Bandeja de accesorios; Nota: En función del modelo, la abrazadera de tubo también; Colocación del ocular; Orientación del buscador
34 SUGERENCIA!Un pequeño nivel de burbuja en la bandeja de accesorios puede ayudarle a colocar el soporte en posición totalmente horizontal. i 3. Sistema El siguiente paso consiste en sujetar el sistema de ejes (No. 1, 9) en la cabeza de trípode (No. 5, X). Para ello, inserte dicho sistema en la par...
Page 36 - Búsqueda de estrellas; Manejo – Desmontaje
36 Con este ajuste podrá buscar objetos celestes con ayuda de los cír-culos parciales (escalas). Consulte también el apartado 3.1, titulado Objetos de observación posibles. 6. Buscador El telescopio está ahora orientado globalmente y ajustado. Para conseguir una posición de observación cómoda, afloj...
Page 39 - Umieszczenie okularu; Montaż szukacza lunetkowego/z diodą LED; Nastawienie szukacza
PL 39 3. Montaż: Następnie umocować montaż (No. 1, 9) na głowicy statywu (No. 5, X).W tym celu należy wsunąć uchwyt u góry na głowicę statywu i wkręcićręcznie śrubę radełkową od dołu. Montaż (No. 1, 9) zostaje złożony, poprzez wsunięcie odważnika napręt odważnikowy (No. 7, X) i przez jego ręczne wkr...
Page 40 - CZĘŚĆ II – Obsługa
40 9. Pokrywy przeciwpyłowe: Aby ochronić wnętrze Państwa teleskopu przed kurzem i brudem, wlotteleskopu jest chroniony przez pokrywy przeciwpyłowe (No. 11, X).Pokrywy przeciwpyłowe znajdują się również na nasadce okularu(No. 1, 6). Do obserwacji proszę ściągnąć pokrywy z wlotów okularów. 10. Giętki...
Page 41 - WSKAZÓWKI dotyczące czyszczenia; Możliwe obiekty obserwacji
PL 41 szukaczu LED, będą Państwo mogli, spoglądając przez okular,rozpoznać w teleskopie gwiazdę polarną. W razie potrzeby mogą Państwo za pomocą giętkiego wału podjąćdokładne ustawienie na gwiazdę, jak również ustawienie ostrościobrazu za pomocą pokrętła ustawienia ostrości (No. 16, B). Oprócz tego ...
Page 43 - Общая информация; Общее предупреждение; Комплектация может изменяться в зависимости от модели.; Часть 1 — Сборка
RU 43 Общая информация О руководстве пользователя Внимательно прочтите данное руководство пользователя. Неправильное использование или обслуживание прибора может привести к травмам или повреждению самого прибора.Держите данное руководство под рукой в качестве справочника по правилам эксплуатации и м...
Page 44 - Лоток для аксессуаров; Сборка искателя / Искатель с красной точкой; Настройка искателя; Ручки тонких движений
44 4. Лоток для аксессуаров Лоток для аксессуаров (рис. 1, 3 и 10) вставляется плоской стороной вниз в центр распорки треноги (рис. 1, 16) и крепится на месте одним поворотом на 60° против часовой стрелки (рис. 6) таким образом, чтобы крепежные элементы лотка совпали с крепежными элементами распорки...
Page 45 - Часть 2 — Использование; Установка полярной оси
RU 45 Часть 2 — Использование 1. Монтировка Данная информация важна для правильной сборки и работы телескопа во время ночных наблюдений. В комплекте поставляется так называемая экваториальная монтировка. Главное ее отличие заключается в том, что одна из плоскостей вращения монтировки перпендикулярна...
Page 46 - Уход; Возможные объекты наблюдения; Устранение проблем
46 700 mm ÷ 20 mm = 35X 700 mm ÷ 12,5 mm = 56X 700 mm ÷ 4 mm = 175X Формула вычисления увеличения: Фокусное расстояние (Телескоп) ÷ Фокусное расстояние (окуляра) = Увеличение например: 10.2. Диагональная призма (только для телескопов-рефракторов) Диагональная призма (рис. 2, 19) переворачивает получ...
Page 47 - Гарантия и продление гарантийного срока
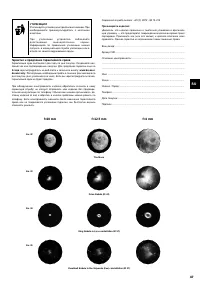
RU 47 f=20 mm f=12.5 mm f=4 mm No. 32 No. 33 No. 34 No. 35 The Moon Orion Nebula (M 42) Ring Nebula in Lyra constellation (M 57) Dumbbell Nebula in the Vulpecula (Fox) constellation (M 27) УТИЛИЗАЦИЯ Утилизируйте упаковку как предписано законом. При необходимости проконсультируйтесь с местными власт...
Page 48 - TELESKOPE; mit EQ Montierung; TELESCOPES; with EQ Mount; Bresser GmbH
TELESKOPE mit EQ Montierung TELESCOPES with EQ Mount Irrtümer und technische Änderungen vorbehalten.Errors and technical changes reserved. ANLTELEEQMSP1113NG Bresser GmbH Gutenbergstr. 2 · DE-46414 Rhedewww.bresser.de · [email protected] © 2012 National Geographic Society NATIONAL GEOGRAPHIC and Yel...